Is your display screen flickering or flashing out of nowhere in Windows 11/10? If yes, then this guide is intended for you, so read till the end.
The screen flickering issues may occur because of several reasons, a few mentioned in the upcoming section. The problem with this happening is that you can not work effectively or sometimes even worry about Motherboard being corrupt. Well, that’s not entirely the case. So, go through the suggestions discussed in this article and see if any help to recover your PC back to its normal state.

What causes Screen Flickering Issues in Windows
The screen flickering or flashing usually occurs due to one or more of the below reasons –
- Outdated or corrupted Graphics card
- Enabled Desktop Windows Manager service
- Installation of new apps
- Presence of temporary, residual, or leftover files
- Hardware malfunction
- Video cables have loosened (for desktops only)
Though the reasons enlisted above may cause your screen to flicker, it’s always a good thing to do some preliminary checks. Say for instance – check if your hard drive is all good, remove and reattach monitor cables (VGA or HDMI), scan for malware, and uninstall lately installed programs.
Only when you are sure that none of the things apply in your case, apply the solutions mentioned below.
How to Fix Screen Flickering Issues on Windows 11/10
Before you proceed to the below solution, we suggest booting your device into Safe mode first. This will prevent your device from being damaged even further.
If you are fed up with screen flickering or flashing every now and then, try out the workarounds discussed in this guide, and see if any helps –
1] Boot into Safe Mode
In certain cases, the screen flickers to such an extent that you can’t even view what’s running on your computer. This might happen when all of a sudden, certain services, processes, or drivers become corrupted and hence result in display problems. To fix it then, you must boot your device into Safe Mode and apply the workarounds suggested below –
- Press the power button on your laptop/desktop to force the shutdown of your PC.
- Repeat this process consecutively 3-4 times, and you will enter the WinRE environment.
- Select Troubleshoot > Advanced options > Startup Settings.
- On the subsequent screen, hit F4 to enable Safe Mode on your computer.
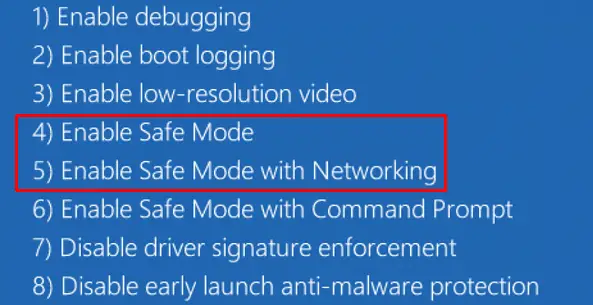
- Though users don’t require a network while troubleshooting, you may press F5 to enable the safe mode with networking.
- Now that you are inside the Safe boot, try the below solutions one by one.
Note: If the screen flickering stops while being inside the Safe boot, this must have occurred because of some old or incompatible applications running on your device. So, boot into your device normally, and uninstall all external software. While doing so, just make sure to remove those programs first that you have recently installed.
Run a clean boot
In cases wherein you can still view what’s running on your display screen, use these steps to enter the Clean boot state.
- Press Win + S to invoke the Search window.
- Type “system configuration” and click upon the top result.
- Go to the Services tab next, and tick the checkbox – Hide all Microsoft services.

- Click Disable all to hide the services and processes from the Microsoft side.
- Go to the Startup tab next, and click the link – Open Task Manager.
- When Task Manager opens up, go to the Startup section, and disable all the services that are still showing the Enabled status.
- Come back to the System Configuration window, and click the Boot tab.
- Under Boot options, mark the checkbox – Safe boot. By default, this will select the Minimal option.
- Hit Apply then OK to restart your device.
- Check if the screen flickering issue resolves now with this tactic or not.
If it is still there, you need to follow the below set of solutions –
2] Update Display Drivers
The screen flickering or flashing issues normally occurs due to corrupted display or graphic drivers. To fix it, you should update these drivers. Here’s how to perform this task –
Via Device Manager
- Press Win + X and choose the option – Device Manager.
- Expand Display adapters.
- Right-click on the available driver and hit “Update driver“.

- On the next screen, choose the option – Search automatically for drivers.
- The system will connect to the server side and check if there is any patch available for your display driver.
- The chances of it returning the message – “The best drivers for your device are already installed” are pretty high.
The system returning such a message has become a trend quite lately. Worry not, as you can always update device drivers by following some other ways as well.
Using Windows update
With Microsoft focussing more and more on its Settings app, you may update your device drivers via Windows update as well. Here’s how this process goes –
- First of all, navigate to the following –
Settings > Windows Update > Check for updates
- The system will check for any pending updates online. If it finds any available updates, the same will appear under the optional updates.
- If you do find such a link, click over it. Proceeding ahead, tick all the checkboxes for which updates are available.
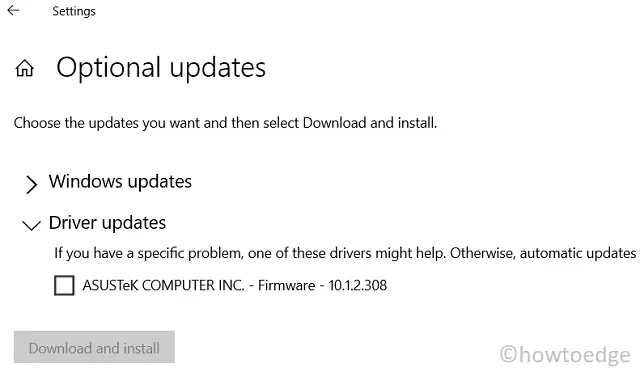
- And at last, hit download and install.
After the drivers get installed successfully, the system will prompt you to restart your computer. Well, do the same and check if the screen flickering resolves.
3] Uninstall or Rollback display drivers
If you had lately installed any display driver and the screen starts flickering or flashing after that, you should uninstall the latest update that you have installed recently. Here’s how you may proceed –
Uninstall Device drivers
- Press the Windows key and X to launch the Power Menu.
- Select Device Manager.
- When it launches, right-click on the display driver, and choose the option – “
uninstall device“. - After the driver gets uninstalled successfully, restart your PC.
When Windows 11/10 reloads, go to the system manufacturer’s official site, and download the latest patches for your computer. Even if you don’t install any patch to the corrupted driver, a mere restart of your computer will reinstall that driver.
Rollback your graphics drivers
If you are completely sure that you had installed an incompatible display driver on your PC and this work of yours has not crossed the 10-day mark, you may roll back the updated display driver. To do so, use these steps –
- Open Device Manager (as stated above).
- Click to expand Display adapters, right-click on the faulty driver, and select Properties.
- Go to the Driver tab, and hit Roll Back driver. Let the system uninstall any update to this adapter and when it does, hit OK.
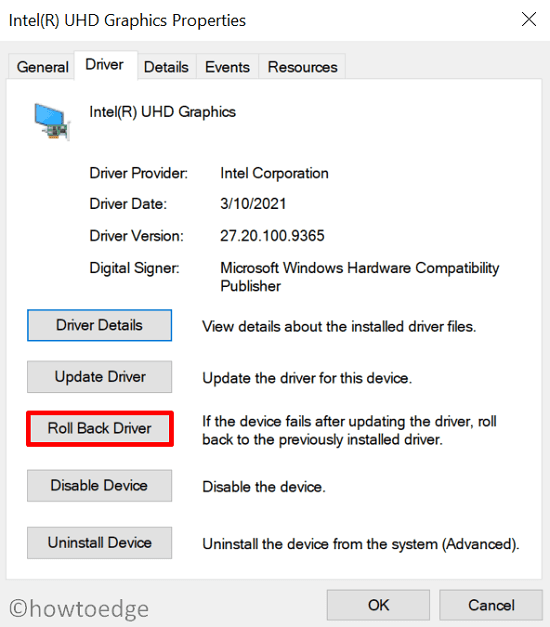
- Reboot your PC and see if it helps to resolve screen flickering or flashing issues on Windows.
4] Disable the Desktop Windows Manager service
In Windows, there exists a service “dwm.exe” which looks after any functions related to display like live taskbar thumbnails, background, lock screen, etc. By default, you will find this service enabled on your computer.
Any corruption or issue with this service may cause your display screen to flicker or in some cases flash as well. To fix it then, stop this service, and see if it helps. Here’s how –
- Press Ctrl + Shift + Esc to launch the Task Manager.
- When it does, go to the Processes tab, and scroll down to the Windows processes section.
- Once you are there, find and right-click on Desktop Window Manager.
- Hit the option – “End task” on the context menu.
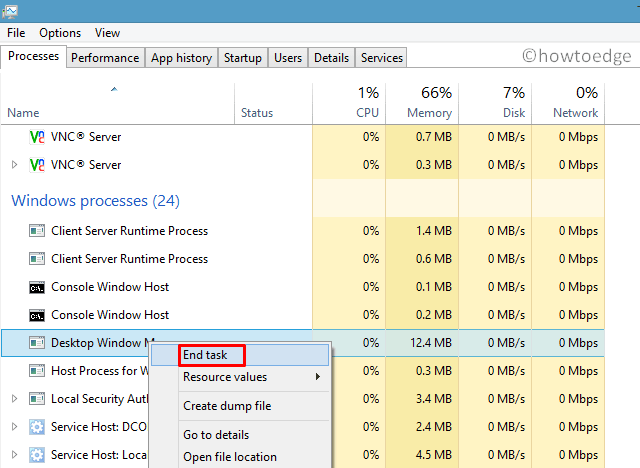
- Come out of the Task Manager and restart your PC.
Sign back into Windows 11/10 and re-visit the above section. The process that you stopped earlier should not be running under “Windows processes”. In case you find it otherwise, you have to disable this on the Services window.
Here’s how to disable Desktop Windows Manager via Services –
- Press WinKey + R to launch the Run command.
- Type “
services.msc” and hit OK. - The Services window will pop up displaying all the services.
- Locate and right-click on Desktop Windows Manager, and hit Properties.
- On its properties page, use the drop-down menu next to Startup type and select Disabled.
- If you see this service already running, click over the Stop button.
- Hit Apply then OK to confirm this action of yours.
- Restart your PC again and check if the screen flickering issue resolves by now or not.
5] Use Disk Cleanup Tool
At times, such issues occur simply because of the presence of a huge cache, old installation files, or leftover/residual files of uninstalled programs.
In order to get rid of such files or windows old installations(s), you may use an in-built tool i.e. Disk Cleanup Tool. Go and clear temporary files from your system and see if it helps to resolve the issue that you were struggling with.

Storage Sense is a good initiative by Microsoft in this direction. If you do face problems every now and then, make sure to keep this setting enabled on your device. This tool will regularly check for any files that it can delete and will act accordingly.
6] Get rid of Old & Obsolete Applications
Microsoft has empowered its Store app to such an extent that you may now install any application right from here. So, if you are still using an application that you installed long back using its executable file, uninstall that completely from your device. In case you don’t find that application on Windows Store (very rare but it happens), visit its official site, and download/install its latest version.
- Launch Control Panel.
- Click Programs > Programs and features.
- Right-click on the app that you no longer need, and hit Uninstall.
- When the confirmatory message pops up, hit Yes.
- Make sure to reboot your PC next. By doing so, the system gets rid of any leftover files of that program.
Reinstall the programs that you have installed recently
Before you download and install any third-party app into your computer, make sure to uninstall that first. To remove an application on Windows 11/10, do the following –
- Right-click on the Windows icon and select Apps & Features.
- The system will take you to the setting page where all apps are listed in alphabetical order.
- Scroll down and locate the app that you have installed recently.
- Once found, right-click over it, and hit the option – Uninstall.
- Now that you have removed the recently installed applications from your system, reboot your PC.
When Windows reloads, visit its official site, download its latest version, and install it on your computer.
I hope you must have resolved the screen flickering or flashing issue by now. If not, use these advanced solutions –
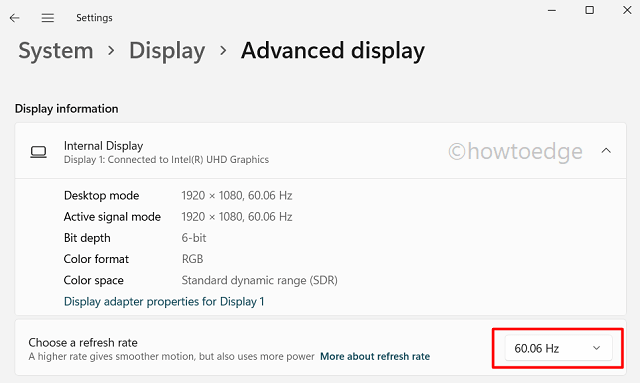
7] Change Windows 11 Monitor refresh rate
Several users love playing high-end games on higher fps. What they do wrong is to keep their systems running on the same frequency even after they are done playing games. As a result, the screen starts to flicker or flash in Windows 11. To fix it then, you should properly configure the Monitor refresh rate.
8] Run Hardware and Devices Troubleshooter
By running this tool, you may check if there are any issues from the hardware side or not. Here’s how to perform this task –
- Press Win + R to launch the Run dialog.
- When it opens up, type the following, and hit OK.
msdt.exe -id DeviceDiagnostic
- Click Next and keep following the instructions that this tool says to.

- If the troubleshooter finds a solution to fix the underlying causes, it will provide – “Apply this fix”.
- Hit over it and see if it helps to resolve the real culprit.
9] Inspect hardware using CHKDSK
Many a time, the real culprit is something else and we keep fixing the already corrected ones. The same can be said of hard disk drives. No matter how many solutions you follow, the moment your hardware starts behaving abruptly, there’s is only one option and i.e. replace HDD. To confirm whether this indeed is true here or not, use the steps below –
- Open Command Prompt as an administrator.
- When it starts, type the following, and press Enter –
chkdsk c: /f
Note: If the installed OS is on some other drive, make sure to replace “C:” with the actual drive letter.

- Type “Y” and press Enter when prompted to confirm the scheduling during the next PC reboot.
- Restart your device next and the CHKDSK will take over.
- While running, the CHKDSK will look for any bad sectors on the hard drive and report the same.
- When this is over, check if your screen still flickers/flashes.
Clean the hard drive for possible dirt
If the above CHKDSK report says that the disk drivers are all okay, try removing the dust that may have accumulated on your hardware components or the nearby areas. You may perform this task quite easily on the Desktop. In the case of using a laptop, follow this only if you are an expert in opening the lid/case and reattaching them after cleaning.
I hope by now you are no longer facing the screen flickering or for that matter, screen flashing issues on your device. If it does again, and the hard disk is alright, consider reverting your PC back to a state where everything was running pretty normally. In case you didn’t generate any backup points in the past, you are left with only one option i.e. Clean install Windows 11/10.