Windows 11 is so far the best operating system by Microsoft. However, if you have installed it on an old PC, it may run very slowly or become unresponsive from time to time. This all happens because Windows 11 is integrated with Cloud operations and supports many modern-day applications.
Learn 14 tips and tricks applying which you can easily speed up your Windows 11 along with boosting its performance.
How to boost up Windows 11 Speed and Performance
Windows 11 requires the presence of adequate system resources to run smoothly. If that’s not the case, this may start running slow or cause trouble performing even basic operations. Go with the below-recommended solutions to fasten your device.
1. Disable Transparency Effects
When it comes to resource utilization by CPU, the one thing that you must do is disable transparency effects on your computer. There is no need for such a feature when your device starts lacking to complete even basic tasks. Here’s how to turn off transparency effects on Windows 11 –
- Right-click anywhere on the desktop and choose the option – Personalize.
- The system will then take you to the personalization window.
- Switch to the right side and click Colors.
- Now, under the second option i.e. “Transparency effects“, slide the toggle switch to the left.

That’s it, open any page on the Settings app and you will notice no transparency effects at all.
2. Turn off Shadows, Animations, and other Visual Effects
We all love Windows 11 for its new user interface, charming visual effects, and dozens of animations. All these features mean nothing if your system is not operating smoothly. So, to tune in your device even further, go and disable all these effects on the Settings page. Here’s how to perform this task –
- Press Win + I to launch the Settings page.
- Select System and then About on the right pane.
- Under Device Specifications, click the last option i.e. Advanced System settings.

- This will launch the System Properties window.
- Go to the Advanced tab and click Settings under Performance.

- On the Performance Options window, check the radio button – ‘Adjust for best performance’.

- Or, you may custom-choose the available options and discard the ones that you don’t want.
- Hit Apply then OK to confirm the changes.
Since you must have gone for the minimum visual effects, this should make your Windows 11 PC fast and much more efficient.
3. Disable Startup Apps – Speed up Windows 11
By default, lots of applications start running right when Windows 11 OS boots in. More programs mean more resource consumption and thus make your device run slow. There might be a few apps running on your device that you might not even open for a single time.
So, it is best to have a look at the Startup programs and disable those that you rarely start. Here’s how to disable startup apps on Windows 11 PC –
- Press the Ctrl + Alt + Del keys altogether and select Task Manager.
- If the task manager opens up as a small window, hit More details.
- Go to the Startup tab and disable all those programs that you rarely use.
- To do so, right-click on any app and choose the option – Disable.

- When you are done disabling the specific apps, reboot your PC.
4. Stop programs running in the background
There are certain apps that you might need running in the background to stay updated. A few examples include Mail, Calendar, etc. However, programs like Microsoft Office, Store, Photos, and several others don’t require to be running in the background as they consume huge resources.
A single software might not be using huge system resources but when combined, they can make your Windows 11 PC run slowly. So, to speed up your Windows 11 PC, stop background apps using the steps below –
- Right-click on the Windows icon and select Apps and Features.
- Moving to the right pane, scroll down to the apps that you don’t want running in the background.
- Click the three vertical dots and then select Advanced options.

- Scroll below to Background apps permissions, and select “Never” using the drop-down menu available under it.

- Now, repeat this process for all apps that you don’t want to consume system resources.
5. Make your PC a non-gaming device
If you had opted for the gaming option on the OOBE screen, the system must have been set to use CPU and GPU resources in such a way that you don’t face problems while playing games.
Setting a PC to use in the Game mode often makes the operating system run slow or hang in between. If that’s the case, you may resolve it simply by making your device ‘Non-Gaming’. Here’s how to proceed –
- First of all, press Win + I to open Windows Settings.
- Select Gaming and then Game Mode on the right pane.

- Turn off the toggle switch under Game Mode.
- Come back and select Xbox Game Bar, Turn off the toggle switch here as well.

- Next, go to the Captures option on the Gaming page, and disable all the checkboxes, and toggle switches.
- Close the Settings app, and restart your PC.
From the next logon, see if it helps to gain back the original speed and performance.
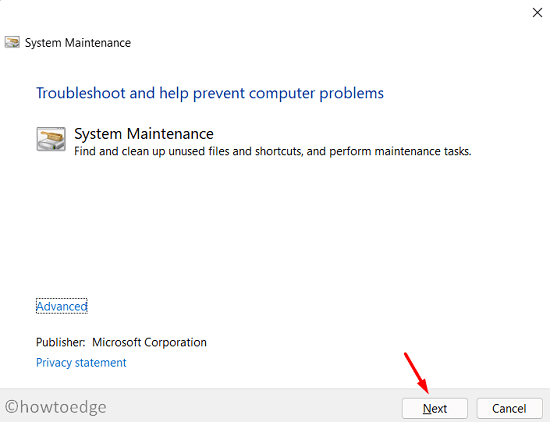
6. Troubleshoot Windows 11 Performance
Troubleshooting Windows 11 can also help you to find out why your device is running slow. So, it would be better to check what is stopping your computer from loading fast.
Running this tool will find the problems that are most likely to decrease your PC functionality and provide ways to amend them. Here’s how to run the performance troubleshooter –
- Open the Run dialog by pressing Win + R.
- Copy/paste the following in the text field and press Enter.
%systemroot%\system32\msdt.exe -id MaintenanceDiagnostic
- Follow the on-screen instructions to complete the remaining steps.
- When this tool completes troubleshooting, this will either resolve the problem automatically or provide you a way to resolve this.
- Click – “Apply this fix“, if so come after when the tool finishes its task.
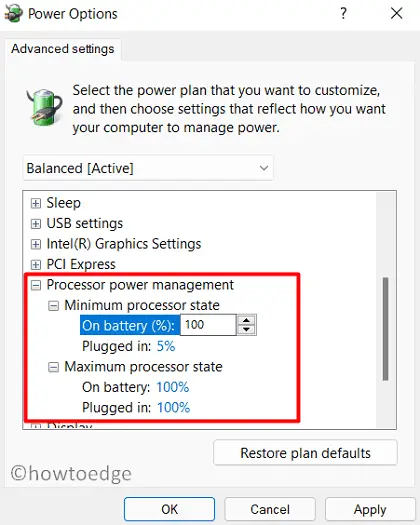
7. Change Power Plan Settings
Another useful way to speed up Windows 11 is by changing the default power plan settings on your computer. To change the default setting, use these steps –
- Open the Control Panel and select Power Options.
- Inside the Selected plan, click once over the link – Change plan settings.

- Hit “Change advanced power settings” to open the Power Options window.
- Expand “Processor power management”, and then “Minimum processor state”.
- Set both “On battery” and “Plugged in” to “100%”. Repeat this process for “Maximum processor state” as well.
8. Clean Residual and Temporary Files
When you uninstall or remove a program from your computer, it prompts for a restart. We often neglect this request and thus residual or temporary files keep building up on the computer. To make your Windows 10 PC faster, you should get rid of these files. Here is the complete guideline on how to purge residual or temporary files –
- Press Win + X to invoke the Power Menu.
- Select Run from the list of available options.
- Type “%temp%” near the clinking cursor and hit OK.
- Performing so will take you to the Temp folder.
- Select all the files and folders available here, and choose to delete all of them.

Note: Alternatively, you may also run the Disk Cleanup tool to scan and delete files that are of no importance.
9. Use Storage Sense
Over some time, huge data get stored on the computer. When the accumulated data reaches its pre-defined limit, this may cause your device to run slow or hang in between. Windows 11 or even Windows 10 version 21H1 comes up with an option enabling you can easily get rid of the junk files. This feature is none other than “Storage sense”.
As its name suggests, this automatically searches for the files that are old enough and requires deletion. Here’s how to enable this setting on your Windows 11 PC –
- First of all, open the Settings app by pressing Win + I.
- Next, go to System and then Storage.
- Under Storage Management, slide the toggle switch to the right.
- Doing so will enable Storage sense.

To customize this setting even further, you may configure Storage Sense as follows –
- Click once upon Storage Sense.
- Inside Configure cleanup schedules, alter the default setting.
- You may choose for how many days deleted contents lie dormant in the recycle bin.
- Additionally, you may also select when to run Storage Sense or when to delete files in your downloads folder.

10. Turn Off Search Indexing
Search engine indexing is a process of collecting, parsing, and storing data that you may use from time to time. This helps to facilitate fast and accurate information retrieval.
Though it has great significance when it comes to finding apps or settings, this might not be that useful if you keep all your apps either on the taskbar or inside the Start home screen.
To disable “Search engine indexing” on Windows 11 PC, use these steps –
- Press the Windows key and R to invoke the Run dialog.
- Type “
services.msc” and hit OK. - On the Services window, scroll below to the Windows Search service.
- Right-click over it and hit the option – Properties.
- Select “Disabled” using the drop-down menu next to the Startup type, and hit Apply > OK.

- Restart your device next so that the changes made become effective from the next login.
11. Uninstall Non-essential programs
If you are a person who loves to install several applications just for the sake of having them on your computer, go and uninstall a few that you use rarely. This way, your PC becomes lightweight and improves a lot performance-wise.
You may find and remove non-essential programs at the location below –
Settings (Win + I) > Apps > Apps & features
12. Stop OneDrive Sync
Syncing important files to OneDrive is no doubt a useful thing to do. This way, users need not worry about accidental loss of personal data on their computers. However, as your device is not running well, there’s no point in wasting system resources to sync files.
Instead, you may run OneDrive once a day and let it sync all the new files that you create or delete on your computer. Here’s how to stop the OneDrive sync feature on your device –
- Right-click on the cloud icon available on the taskbar.
- Click Help & Settings.
- Using the drop-down menu next to Pause syncing, select 2 hours.

- Restart your Windows 11 PC and check if this helps in boosting the performance.
- In case you don’t feel any noticeable changes, go back to its previous setting.
- Right-click on OneDrive, choose Help & Settings > Resume syncing.
Note: If you do find your device working smoothly after disabling OneDrive, you may opt in to disable this app when your device starts up.
13. Defrag Your Hard Disk to speed up Windows 11
Whether there is a movie, music file, or some other information, they all are adjusted at different parts on the hard disk. At times, these files become unreadable and require fragmentation. Though this can be easily done by Windows 11 PC, this whole process might take some time and thus make your device act slower.
To fix this, you may use an in-built tool named “defragmenter”. The sole purpose of this is to re-arrange the fragmented components and thus boost your device performance. Here’s how to defrag your HDD –
- Press the Windows key and start typing “defragment”.
- Choose the top option – Defragment and Optimize Drives.
- On the “Optimize Drives” windows, select the drive that you want to defrag, and hit Optimize.

The defragmentation process starts immediately afterward. Wait till this process is completed successfully.
14. Disable Boot Menu timeout
By default, it takes 30 seconds to boot into Windows 11 PC. If you do want to save this time and make your Windows 11 PC load fast, disable the Boot Menu timeout by following these steps –
- Press Win + S, and type “Advanced system settings” on the search bar.
- From the list, click upon the first result i.e. “View Advanced system settings”.
- When the System Properties window launches, hit “Settings” under Startup and Recovery.
- Uncheck the option – ‘
Time to display list of operating systems‘ and hit OK.
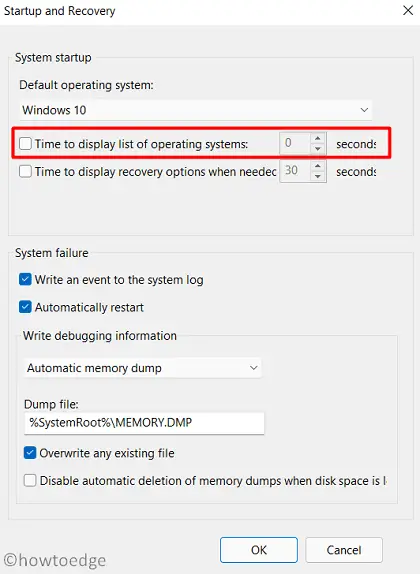
- Restart your PC so that the changes made come into effect.
That’s it, I hope this guide indeed helps to boost your Windows 11 speed and performance.
I hope your device does boost up speed or performance-wise.


