The error code 0x80029c4a is a service-related issue and often occurs when you install a faulty application on your computer. When this occurs, you will no longer be able to download or install any new updates and for that matter, a new program as well. Your PC crashes more often leaving an error message on the display screen.
So, if you are struggling with such an error code and don’t know how to handle it, go through the suggestions enlisted in this guide and see if any resolve this problem.
What causes Error code 0x80029c4a on Windows?
This error, in general, arises when your system meets one or more of the below conditions –
- After you install a buggy software
- Corrupted system image or system files
- Pending updates on your computer
Error Code 0x80029c4a Solutions on Windows
If you are getting this error code while performing any operation on Windows PC, try out the below solutions one after another. Just make sure to reboot your PC after you’re done applying a single workaround. The solutions are as follows –
- Uninstall recently installed applications
- Check and Repair System Files Corruption
- Check and Install Pending Updates
- Manually install pending updates
- Reset your PC
1. Uninstall recently installed applications
The error code 0x80029c4a normally occurs after you install faulty or buggy software on your computer. If you do remember installing any application recently on your device, consider uninstalling that first. Once you have removed the lately installed programs from your system, reboot your PC. Here’s what you need to do to perform this task –
- Press Win + X and choose the option – “Apps and Features”.
- The system will take you to the Installed apps section inside Settings.
- Scroll down and locate the apps that you have installed recently.
- After you locate that app, click the three vertical dots available on its right end.
- Select the Uninstall option from the pop-up menu.
- A confirmation message may prompt after that, hit uninstall again.
- Let the app uninstall successfully from your device.
- Once this is over, reboot your PC to delete any leftover files as well.
Note: You may use the Disk Cleanup Tool to deep clean any old installation of Windows, files that you rarely open, etc.
2. Check and Repair System Files Corruption
We all install so many third-party apps on our computers every now and then. These are the apps that are responsible for corrupting system files, folders, or sometimes even the whole operating system. You may repair the damaged files, get back the missing ones, or rectify Windows 11/10 Image problems using either SFC or DISM tools. Here’s how you may run both these command-line programs on your computer –
- Launch CMD as administrator.
- When it does, execute the below command –
sfc /scannow

- This tool will hardly take 15 minutes to find and repair any issues with the system files.
- Once this is over, inspect Windows 11/10 Image (whichever you own) via DISM.
- To do so, run the below command on the same elevated console –
DISM /Online /Cleanup-Image /RestoreHealth

- Let this code run for another 15 minutes. By this time, DISM will diagnose any problem with the system images and fix them.
- After you’re done running both SFC and DISM tools, restart your PC. This will make the recent changes on your computer effective from the next logon.
3. Check and Install Pending Updates
Now that you have gotten rid of problematic apps, repaired system files, and system Images, check if the update process now works or not. You may do so by visiting the below path and hitting the Check for updates button.
Windows 10: Settings (Win + I) > Update & Security > Windows Update > Check for updates
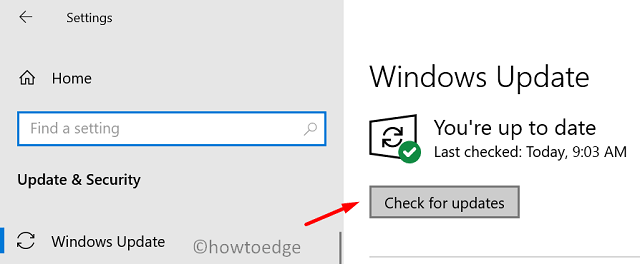
Windows 11: Settings (Win + I) > Windows Update > Check for updates

The system will search for any pending updates online and download/install them onto your computer. In case this process fails to fetch any pending updates, try the manual method as discussed below.
4. Manually install pending updates
To manually install pending updates, you need to know the update that is lacking on your PC. Every cumulative update whether it is security, non-security, or optional bears a KB number. You may get the same by visiting the Update history page.
After you visit the link provided above, click the top link on the left navigation. Note down the KB number on the right pane. Visit Microsoft’s Update Catalog site next, and type the noted down number in the search field. Press Enter to get all updates matching this number.
Pick the update that best matches your system architecture. Moving forward, click the top link to initiate the download of the recent patch on your computer. When the download completes, double-click on the setup file (.msu file format) to begin its installation.
5. Reset your PC
If neither automatic nor the manual method work to resolve the 0x80029c4a error on your computer, you are left with only one option and that is – “Resetting your PC“. When you choose to reset your PC, you will get two options to choose from. They are “Keep Files”, and “Remove everything”. Go for the first option as this will save all your personal data and settings on your computer.
Though this method should work, if not, it’s better to go for a clean installation of Windows 11 OS. For Windows 10, follow this tutorial instead.