Today, we will explore how to fix check for updates issue in Windows 10 after installing any OS Build version. As per several users; when they try to update Windows 10, they receive an error message. The Error message reads “There were some problems installing updates, but we’ll try again later”.
If you experience similar trouble on your System, read this article as we discuss possible reasons and workarounds to encounter this bug. Here, we have brought 13 different ways to tackle this issue which are as follow-
- Run Windows Update troubleshooter
- Make sure the date & time is up to date
- Uninstall any 3rd party antivirus program
- Unplug any USB devices
- Remove or disable Bitlocker
- Delete the “Download” folder in the Windows/ SoftwareDistribution folder
- Rename Windows\SoftwareDistribution\ Download Folder
- Run sfc/scannow command
- Running DISM (Deployment Image Servicing and Management) command
- Reset Windows Update
- Switch Insider Ring to FAST
- Delete WindowsSelfHost key using registry
- Verify MS account
Fix: Unable to CHECK FOR UPDATES in Windows 10 solution
Here are thirteen different workarounds to fix unable to CHECK FOR UPDATES in Windows 10-
1. Run Windows Update troubleshooter
Are you having Fall Creator Update or a newer version installed on your system? If yes, then performing Windows Update Troubleshooter can resolve to Check for Update issue. Here is the procedure-
Step 1: Press Win + I hotkey in order to open Settings.
Step 2: Go to the Update & Security category followed by Troubleshoot on the left pane.
Step 3: Now hit Windows Update henceforth Run the Troubleshooter (see snapshot).

This process will detect the actual problem that occurs inside the system and fix the same if possible.
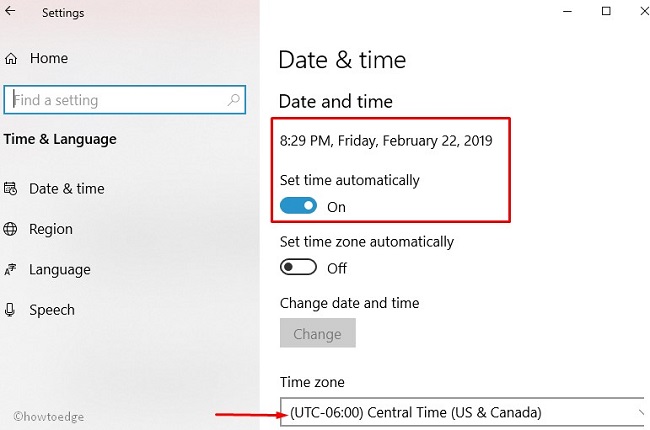
2. Make sure the date & time is up to date
Sometimes incorrect Time/ Date (at the right lower corner of the Taskbar) could also cause such trouble on your PC. If that’s the case, set the right Time/ Date on your system.
- Go to the left corner of the taskbar and right-click on Start.
- Form the list, select the gear icon to launch Settings.
- On the opened window, hit the Time & Language option.
- Switch to the right pane and click Drop down menu of Time zone. Here adjust the Date and Time as per your own timing Zone and hit Enter.
At last, restart your system and see if unable to CHECK FOR UPDATES issue is resolved or not.
3. Uninstall any 3rd party antivirus program
The use of third party anti-malware program may also create this situation on your System. Hence, uninstalling 3rd party application from a PC is the right choice to solve Check For Updates bug on Windows 10. The use of Microsoft inbuilt app (Windows Security) is the best solution to protect your system from any harmful attack. Below is the process to uninstall the antivirus program-
- Go to the Search icon and type Control Panel, click on the same result to launch the app.
- When the window appears up, move to the right top corner and select small icons in the View by menu drop-down menu.

- On the next page, click on the Programs and Features applet thereafter locate and click on the anti-malware program from the list.
- Move to the top section and hit the Uninstall button followed by the Next option.
- Now confirm to permit the changes and wait until the task finishes up.
Once the task is finished, Restart your Windows 10 device and check if the trouble has solved or not.
4. Unplug any USB devices
Utmost the time, more devices attached to a PC can hamper the smooth function of your system. If you are unable to see the pending update, first of all, unplug all the USB cable connected to your system and plug it back in again. In case any specific wore is responsible for this trouble, change it soon to avoid any further damage.
5. Remove or disable Bitlocker
Usually, Bitlocker is a great tool used to protect Unauthorized Data access. However, this can also generate a check for update bug on your system. Therefore if you have locked any particular drive, just disable the same-
- Go to Cortana and type “CP”, hit the Control Panel icon to open the app.
- Select small icons in View by category thereafter double click on the Bitlocker Drive Encryption option.
- Now expand the drive which you have locked down then click on Turn off Bitlocker.
- A window will appear on Desktop Screen, here click again on the Turn off Bitlocker button to permit the changes.

- The Bitlocker will get removed from your specific drive. At last, check the issue again whether it has solved or not.
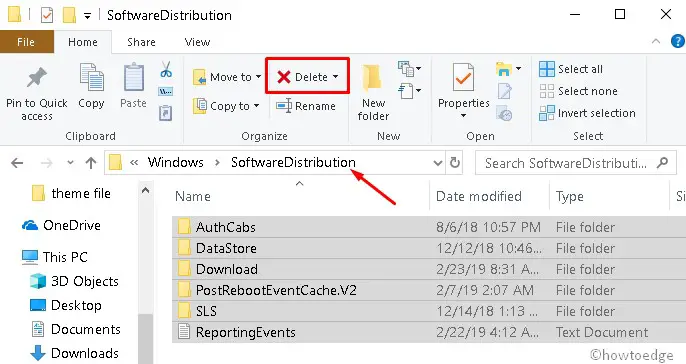
6. Delete the “Download” folder in the Windows/ SoftwareDistribution folder
Unnecessary cache files are also responsible for this update related issue in your system. To get back the smooth running of Windows Update services, try this method-
- Go to Cortana & type Command Prompt, when found right-click on the same, and select Run as administrator option.
- If User Account Control pops up, click Yes to sanction the access.
- On elevated command Prompt type following code followed by the Enter.
     net stop wuauserv
    net stop bits
- This command will stop all Windows Update Services and Background Intelligent Transfer Service.
- Now close Command Prompt succeeding after open the File Explorer app.
- Over the new page, navigate to the following path-
C:\Windows\SoftwareDistribution
- Again select all files/folders which exist here then tap the Delete button.
Note: In case you can’t remove selected files, Reboot your system.
- Once this task finishes, launch Command Prompt again to stop services that you have earlier started. To perform this, execute the below codes-
       net start wuauserv
     net start bits
- At last, restart your system and try Check for Updates on your system again. Hope this time, you can do it without any trouble. If not, follow the next workaround.
7. Rename Windows\SoftwareDistribution\ Download Folder
If you suspect the file that exists under the Windows\SoftwareDistribution folder is essential or don’t want to remove this file, rename this folder. This can also perform a similar function as the troubleshooting process.
- Press Win& R to launch the Run dialog, type cmd in the void box. Simultaneously hit CTRL+ Shift+ Enter hotkey to open Command Prompt as Administrator.
- If the UAC prompt appears up, tap Yes to allow access.
- On the prompt window, type below written code followed by the Enter key to perform the execution.
      net stop wuauserv
     net stop bits
- The above command will stop Windows Update and Background Intelligent Transfer Service.
- Succeeding after copy/ paste the following code to rename the folder name.
rename %windir%\SoftwareDistribution SoftwareDistribution.bak
Thereafter, start the services again which you have already stopped. For this, you can write these two commands and hit Enter at last.
     net start wuauserv
    net start bits
When this task is finished successfully, the System will create a new folder named SoftwareDistribution.bak. It stores all necessary components in the newly created folder. Lastly, try Check for Updates again. If it still fails, you can follow below two fixes which are equally important.
8. Run sfc/scannow command
System File Checker utility can resolve most of the Windows related bugs. It inspects the whole computer for any possible corrupt file and repairs the same if possible. Therefore, you should also try this out to resolve the Check for updates issue. To perform this, just follow these steps-
- Make a right-click on the Windows icon at the extreme left of Task Manager.
- Choose the Run option from the list, again type cmd at void on the Dialog box.
- Tap Ctrl + Shift + Enter hotkey to open the app as Administrator.
- If UAC prompt pops up, hit Yes to sanction the access.
- When Command Prompt appears up, type the below command and hit Enter to let execute this code.
sfc /scannow

- You will see the status performance here, so wait until it gets finished. Once the task is completed, Restart your Windows device and check for updates again.
9. Running DISM (Deployment Image Servicing and Management) command
Sometimes the existence of corrupt images is also responsible to occur noise on your system. DISM is an in-built Microsoft tool that works to rectify and recover the problem if found on a Windows machine. If you perform this tool on Command Prompt, it identifies the faulty images that exist in Windows Environments, Installation Media, or Virtual Hard Disk Drive. If you don’t know how to proceed, here are the steps to follow-
- Go to Cortana and type Command Prompt in the Text box.
- When the same result appears on Screen, make a right-click and select Run as administrator.
- Thereafter click Yes to permit access.
- When Command Prompt opens up, copy/ paste the below code near the blinking cursor and hit Enter to execute this code.
DISM.exe /Online /Cleanup-image /Restorehealth

- This process will take approx. 10 minutes for complete scanning, so keep patience. Once over, try to check for updates again. Windows 10 Updates may start to work as usual.
Note: If the downloading process gets stuck at 20%, there is nothing to worry about as this is a normal phenomenon.
10. Reset Windows Update
If the above process does not help to check for updates on your system, Reset Windows Update, Troubleshooter utility may fix the diagnostic. This is an in-built Microsoft app that provides a quick way to resolve Unable to check for updates trouble.
- At first, click here to download the Windows Update troubleshooter. Once saved, open and install the same on your system.
- After the installation, select Windows Update on the appeared page and hit the Next button.
- If a new pop-up appears, click “Try troubleshooting as an administrator” then click again on the Next option.
- This will start troubleshooting and fix the issue if found. Once finished, close the window.
- Go ahead and open again the Windows update troubleshooter.
- Once the page view on the screen, select “Windows Networking Diagnostics” followed by the Next option.
- Wait until this process fixes Update and networking related trouble, once finished click the Close button.
- At last, Reboot your system and try to update your PC again. Hope this time it works as expected.
11. Switch Insider Ring to FAST
If you are using Insider build in your system and experience Unable to check for update, check the currently installed ring. In case, it is slow or another Ring switches to the Fast One.
- At first press Win logo & I, in order to launch Settings.
- Once the page comes into effect, hit the Update & security category.
- Click on Windows Insider Program on the left column then move to the corresponding right-hand side.
- Again hit the Current installed Ring thereafter activate the Fast radio button.
- Finally, Reboot your system henceforth try to check for updates.
12. Delete WindowsSelfHost key using registry
If all the above workarounds do nothing to solve this error, delete “WindowsSelfHost” key in Registry Editor may possibly help you to solve this trouble. Here is how to proceed-
- Press the Win logo and R to launch the Run dialog. On the visible window, type regedit in the text box and hit Enter.
- Click Yes on UAC to authorize the access.
- When Registry Editor Window appears, navigate to the below path-
Computer\HKEY_LOCAL_MACHINE\SOFTWARE\Microsoft\WindowsSelfHost
- Once found, move to the right pane and delete this folder.

- Now close all opened windows and Reboot your system so that changes made so far took place.
Note: Modification in Registry Editor requires expertise and careful exercise. Unnecessary changes can corrupt the Operating system or important files.
This method will most probably solve your quest. If not, you can try one more fix.
13. Verify MS account
If you have a Microsoft account, it is necessary to verify the same at its official site. In case this is not done, it might lead to trouble like unable to CHECK FOR UPDATE. Here’s how to solve this-
- Firstly visit here and click on sign in with Microsoft account using registered email address & password.
- Hit the Security tab at the top thereafter the fourth tab i.e. Update info.

- On the next page, click Verify then Next for further process.
- You will shortly get a verification code on your registered email id. Type the code and click Verify to let this process complete.
Hope the above article helps you in fixing the Check for Updates issue on Windows 10. If you have any queries related to this article, do write to us in the comment box.