Windows Update error is a common bug that appears from time to time on your PC. Today, we depict some working methods to reset Windows Update Components. This, in turn, can solve a plethora of Windows download, installation, and update-related issues. Some error messages that may appear during this are “Windows Update not being able to connect to the Microsoft servers” or others.
The prime culprits behind this bug are – certain “Update services stop working”, Windows cache files, Microsoft servers outage, and corrupt components. Here, in this blog post, we depict different workarounds to Reset Windows Update Components. Update Troubleshooter and Command Prompt are two efficient ways to solve this Windows update issue. Alternatively, you can also solve this trouble manually by repairing corrupt system files and installing security patches or SSU.
- Reset Windows Update Components
- Reset Windows Update using Troubleshooter
- Fix Windows Update by installing the latest update manually
- Fix Windows Update by installing the latest Servicing Stack Update
- Repair corrupted system files
- Run DISM command
Methods to Reset Windows Update Components
Resetting Windows Update Components is the most effective way to resolve an update-related issue on Windows 11/10. Proceeding this way, you restart all update services, reset Network services, purge stored cache, and re-register the missing or outdated DLL files.
Follow the below solutions one after another and hopefully, you will be able to update Windows normally after then.
1] Reset Windows Update Components using Command Prompt
Alternatively, you can also reset the Windows Update components via Command Prompt on your Windows 10 PC. However, as this method is quite lengthy and complex, so follow the steps carefully-
- At first, hit the Search icon and type cmd in the text area.
- Next, right-click on the well-matched result and choose the Run as administrator option.
- Again, tap Yes if the UAC prompt appears.
- Subsequently, copy-paste the following command lines followed by the Enter key at the end of each code-
net stop bits
net stop wuauserv
net stop appidsvc
net stop cryptsvc
The above command lines will prevent the well-functioning of Background Intelligent Transfer Service (BITS), Windows Update service, and Cryptographic service.
Note: If you do not receive any confirmation message “stopped the services successfully”, repeat the above steps more than once.
- Moving ahead, execute the following command to remove all the
qmgr*.datfiles that occur inside the BITS.
Del "%ALLUSERSPROFILE%\Application Data\Microsoft\Network\Downloader\*.*"
- If the confirmation message appears, type Y to delete such files.
- Now, you should clear the Windows Update cache using the below codes henceforth try to download the updates again.
rmdir %systemroot%\SoftwareDistribution /S /Q
rmdir %systemroot%\system32\catroot2 /S /Q
- Succeeding after, reset the BITS as well as the Windows Update Services using the following codes. Make sure to press Enter Key at the end of each command.
sc.exe sdset bits D:(A;;CCLCSWRPWPDTLOCRRC;;;SY)(A;;CCDCLCSWRPWPDTLOCRSDRCWDWO;;;BA)(A;;CCLCSWLOCRRC;;;AU)(A;;CCLCSWRPWPDTLOCRRC;;;PU)
sc.exe sdset wuauserv D:(A;;CCLCSWRPWPDTLOCRRC;;;SY)(A;;CCDCLCSWRPWPDTLOCRSDRCWDWO;;;BA)(A;;CCLCSWLOCRRC;;;AU)(A;;CCLCSWRPWPDTLOCRRC;;;PU)
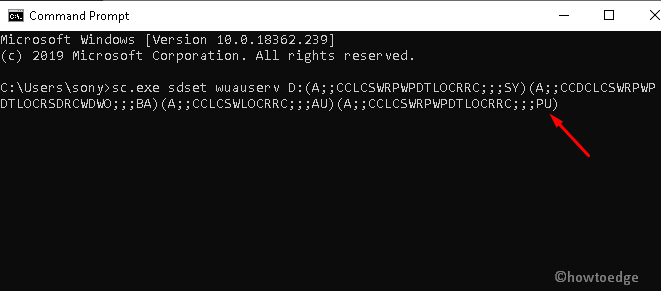
- You can now move to the System32 folder running this code-
cd /d %windir%\system32
- Thereupon, register all the files on BITS and Windows Update DLLs on Registry. To do this, you need to carry out the following command lines one by one.
regsvr32.exe /s atl.dll
regsvr32.exe /s urlmon.dll
regsvr32.exe /s mshtml.dll
regsvr32.exe /s shdocvw.dll
regsvr32.exe /s browseui.dll
regsvr32.exe /s jscript.dll
regsvr32.exe /s vbscript.dll
regsvr32.exe /s scrrun.dll
regsvr32.exe /s msxml.dll
regsvr32.exe /s msxml3.dll
regsvr32.exe /s msxml6.dll
regsvr32.exe /s actxprxy.dll
regsvr32.exe /s softpub.dll
regsvr32.exe /s wintrust.dll
regsvr32.exe /s dssenh.dll
regsvr32.exe /s rsaenh.dll
regsvr32.exe /s gpkcsp.dll
regsvr32.exe /s sccbase.dll
regsvr32.exe /s slbcsp.dll
regsvr32.exe /s cryptdlg.dll
regsvr32.exe /s oleaut32.dll
regsvr32.exe /s ole32.dll
regsvr32.exe /s shell32.dll
regsvr32.exe /s initpki.dll
regsvr32.exe /s wuapi.dll
regsvr32.exe /s wuaueng.dll
regsvr32.exe /s wuaueng1.dll
regsvr32.exe /s wucltui.dll
regsvr32.exe /s wups.dll
regsvr32.exe /s wups2.dll
regsvr32.exe /s wuweb.dll
regsvr32.exe /s qmgr.dll
regsvr32.exe /s qmgrprxy.dll
regsvr32.exe /s wucltux.dll
regsvr32.exe /s muweb.dll
regsvr32.exe /s wuwebv.dll
Here, regsvr32 symbolizes registering the files whereas DLL denotes the registry files components. Similarly, /S is there to execute these codes silently without prompting any message.
- Afterward, reset the network configuration which may also cause a nuisance. Here are the codes to run –
netsh winsock reset
netsh winsock reset proxy
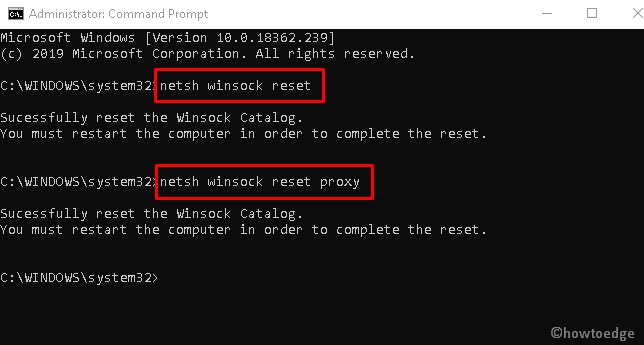
- This will prompt a window asking “Restart the computer”.
- After the next login, you may start back the Windows services like BITS, Windows Update, and Cryptographic services which you have earlier blocked. To perform this, execute these codes on the elevated Command Prompt.
net start bits
net start wuauserv
net start appidsvc
net start cryptsvc
- Once, you run the above commands successfully, Reboot your System again.
That’s it, hope all the services of Windows Update are working fine without any interruption.
Note: If you experience the same problem on Surface Pro 6, Surface Book, Surface Laptop, or any other Surface device, you may apply the above workarounds to fix such issues.
Now that you have reset Windows update components, go and check if you can install pending updates on your PC. If you are still facing issues, try out these workarounds –
2] Reset Windows Update using Troubleshooter
Using the Troubleshooter is the easiest way to reset the Windows Update components. Thus, it may resolve the downloading or installing updates issue. Here are the steps to follow –
- First of all, visit the Microsoft website to download the Windows Update Troubleshooter.
- When the setup file is downloaded, right-click on the same and click “open file location”.
- Double-click on the set-up file to install the Troubleshooter. Thereupon, choose the Windows Update option and then Next to detect the actual problem.

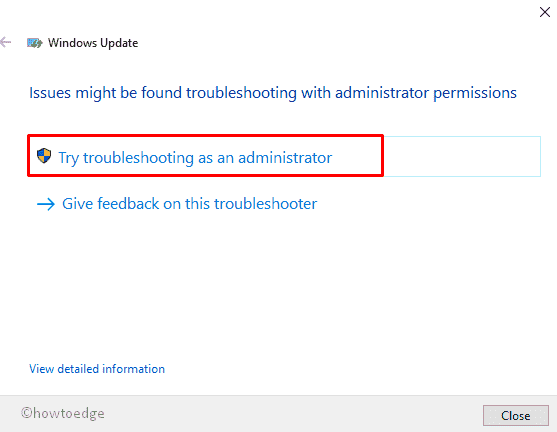
- Afterward, click on the Try troubleshooting as an administrator option.
- Now, follow the on-screen instructions. After you complete the instructions hit the Close button.
- Open the Windows Update Troubleshooter again.
- Here, click on the Windows Networking Diagnostics option then Next to proceed ahead.

- Henceforth, pick Try troubleshooting as an administrator option.
- Follow the on-screen instructions until the network issue gets resolved. Network trouble may restrict downloading Windows Updates.
That’s it, you can now close this tool and Reboot your System. Your PC may start functioning as before after the next login. If not, try the next set of solutions outlined below.
3] Fix Windows Update by manually installing the latest update
If you continue to encounter bugs while updating your existing OS, you should manually download and install the patch update. Follow these guidelines to do so –
Note: Just make sure that you have already installed the current SSU on your System. If you don’t know what this is or how to proceed, jump to the next section then come back here again.
- Go to the Windows 10 Update history website.
- Once the page appears, move to the left pane and browse the latest Windows 10 Update.
- Note down the latest KB for your PC thereafter opens the Microsoft Update Catalog.
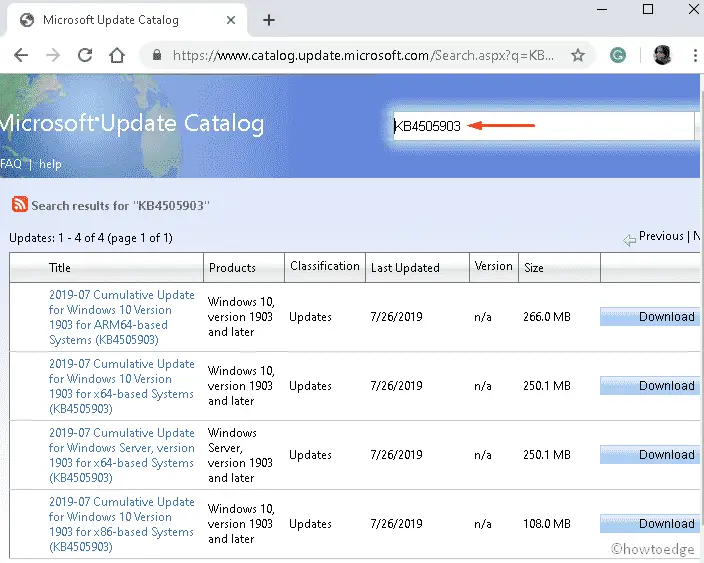
- Here, locate the same Cumulative Update (noted down earlier) and download it as per your system architect (32-bit (x86) or 64-bit (x64)).
| Note: In case, you don’t know about your system architecture, press Win + I together to start the Settings window. On the left pane, select System > About. Move to the right pane, and scroll down to the Device specifications. Here you can view all the details like Processor, Installed RAM, Product ID, System type, and others. See the Snapshot below – |

- Once you are sure which file to download, get the .msi files to complete the installation.
- After updating your System with the latest Cumulative Update, see whether you are getting the same Update error or not.
- Most probably, you won’t receive the earlier bugs again.
4] Fix Windows Update through the latest Servicing Stack Update (SSU)
If there is still some Update related trouble, try lashing your System with the recent SSU. Here are the steps to work upon –
- First of all, make sure which Windows version you are currently having on your PC. You have to be sure of the Model’s architect as well i.e. 32 or 64-bit. To do this, navigate to the following path –
Settings > System > About
- Move to the corresponding right pane and see the Model’s information under Device Specifications.
- Next, visit the Microsoft website to note down the latest SSU. Having the current servicing stack update will ensure that nothing goes wrong during the Upgrading process.
- Now, download the same file from the Microsoft Update catalog.
- Once the downloading finishes, double-click on the set-up file to install this file.
- At last, reboot your PC. Succeeding after, proceed to download and install the latest cumulative update.
5] Repair Corrupt System Files
After Updating the PC manually, if you are still facing the same bug, the problem lies on your PC. Hence, try running the sfc/scannow utility. This will scan your whole PC for a malware threat or corrupt core files and repair the same. Here’s how to proceed –
- Click on the Search icon and type Command Prompt in the search field.
- Right-click on the top icon and choose Run as administrator.
- In case, there appears a UAC prompt, tap Yes.
- Next, type
sfc/scannowcommand near the blinking cursor followed by the Enter key.
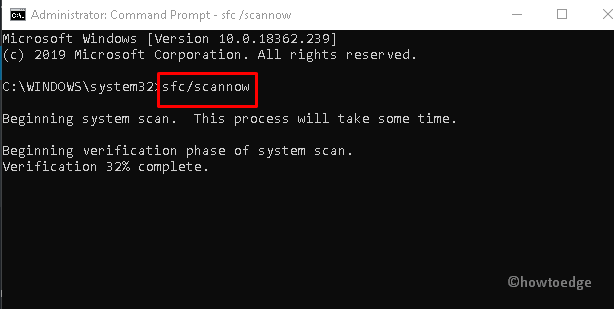
- This is a time-consuming process, so have patience till the end.
- Once the whole PC scanning completes, Reboot your system.
6] Try DISM utility
The DISM is another useful command tool that you may use on Windows to fix update-related issues. Here’s what you need to do to launch the DISM utility program on your computer –
- Right-click on Start and select Run from the Power Menu.
- In the void box, type cmd and simultaneously hold Shift + Alt then tap the Enter key.
- If the UAC prompts, tap Yes to authorize the access-
- Next, type the following command line then press Enter Key.
dism.exe /Online /Cleanup-image /Restorehealth

- This will take a few minutes to complete, so wait accordingly.
- Lastly, Restart your system to save the changes made so far.
I hope you were able to fix update-related issues on your computer after applying the above workarounds. If you do face any difficulty following this guide, let’s know in the below comment section.