Did you recently encounter Error Code 0x800706d9 while opening a Store app, launching Sandbox, or updating Windows 10? Well, in this guide, we explore the reasons that lead to this bug in the first place along with some working ways to resolve the issue.
The error 0x800706d9 may occur due to corrupt system files, missing Windows components, fail to start certain services, storage-related issues, etc. In general, we can categorize them into four different types and each one has its own set of solutions. If you do know why you are receiving this error, reach out to the specific section below –
- Update Error 0x800706D9
- Sandbox Error 0x800706D9
- Microsoft Store Error 0x800706D9
- Windows Defender Error 0x800706D9
Fix: Windows Update Error 0x800706D9
To solve the Update error 0x800706D9, try the below workarounds –
1. Run System File Checker
The update error 0x800706D9 occurs mainly due to corrupt or missing system files. SFC is a great utility program designed to scan and repair damaged system files. Here’s how to use this tool –
- First of all, open Command Prompt with Admin rights.
- Copy/paste
sfc/ scannowon the elevated console and press the Enter key.

- This usually takes 15-20 minutes to locate and repair corrupt system files. In certain cases, this might even take more time, so wait accordingly.
- Once over, Restart Windows so that changes made come into effect.
2. Manually Install Cumulative Update
If the error persists, one should manually download and install the recent standalone package on the computer. Here’s how to perform this task –
- First of all, visit the Windows 10 Update History page.
- On the left column, select the Windows 10 version that you are having on the computer.
- Scroll down to “In this release“.
- Note down the KB number and reach out to the Microsoft Update Catalog site.
- Paste the KB number noted down earlier and hit Enter. A list of matching results will pop-up.
- Look for the system architecture
- Here, hit the Download button next to the system architecture that you are currently having
- On the subsequent screen, click the top link to download the .msu file.
After the file gets downloaded, browse to the Download folder and double-click the setup to install this.
3. Purge Windows Update Folder
Usually, manually installing the recent cumulative update will resolve any update-related issues on Windows 10. If the 0x800706D9 bug persists even after this, purge the update folder and reinstall the setup file (downloaded above). Here’s how to purge Windows update folder –
- Type “regedit” on the search bar and click the top result.
- When the UAC window prompts, hit Yes.
- On the registry window, navigate to –
HKEY_LOCAL_MACHINE\SOFTWARE\Policies\Microsoft\Windows\WindowsUpdate
Note: If you don’t find the WindowsUpdate folder at the above location, use either system backup or clean install Windows 10, May 2020 Update.
- Head over to the right pane and search for
WUServerandWIStatusServerfolders. - Right-click on each one of them and select “delete“.
- Restart Windows to save the recent changes.
Fix: Windows Sandbox Error 0x800706d9
The Sandbox error 0x800706D9 may occur due to some corruption inside the system files, certain services not working properly, or installing an incorrect feature update. To correct this, attempt to disable then re-enable Hyper-V services.
| Note: Make sure to enable the virtualization settings inside the computer BIOS or Firmware menu before proceeding to the solutions. |
Here’s how to fix disable then re-enable Hyper-V related services –
1. Check the status of Hyper-V Related Services
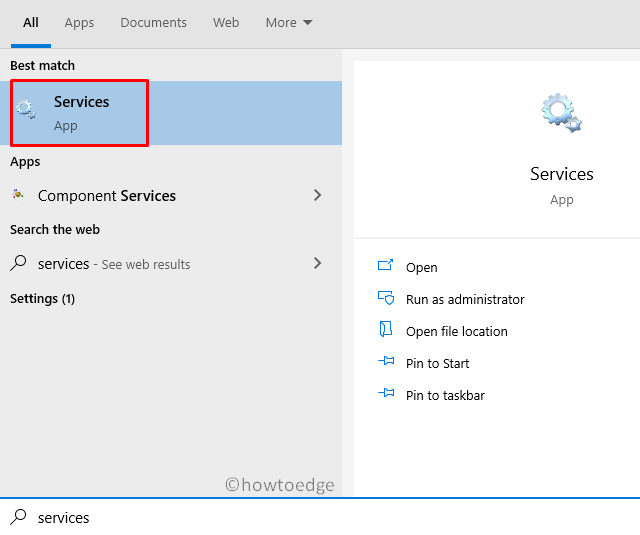
- Press Win+S to invoke the Search UI.
- Type “services” in the text field and click the top result.

- Now, check each one of the services below.
- If you find any one of them as “stopped”, hit “Start” to restart them.
Network Virtualization Service
Virtual Disk
Hyper-V Virtual Machine Manager
Hyper-V Host Compute Service
Container Manager Services
Application Guard Container Service
Remote Procedure Call (RDC)
2. Disable and Enable Hyper-V
First of all, disable the following services –
- Windows Defender Random Folder Protection
- Tamper Protection Service
- Container Manager service
- Windows Sandbox
Next, browse to the below paths –
C:\ProgramData\Microsoft\Windows\Containters\Sandboxes
C:\ProgramData\Microsoft\Windows\Containters\Zygotes
Here, search for VHDX files and delete them. However, make sure not to delete these files from the recycle bin. Now, re-enable the services that you have stopped earlier following the exact reverse order i.e. –
- Windows Sandbox
- Container Manager service
- Tamper Protection Service
- Windows Defender Random Folder Protection
Do Restart Windows to incorporate the above changes. From the next logon, Windows Sandbox will start normally.
Fix: Microsoft Store Error 0x800706D9
This error may also occur while opening Microsoft Store or any of its applications. To solve this, try the following suggestions –
1. Run Store App Troubleshooter
Windows 10 includes a troubleshooter for each one of its services and components. Store App Troubleshooter is one such tool that can locate and repair any bugs related to Windows Store. In case this doesn’t solve the issue, it suggests mending ways to address the issue at hand. Here’s how to use this tool –
- Press Win+I shortcut to start Windows Settings UI.
- Click Update & Security thereafter Troubleshoot on the left overlay.
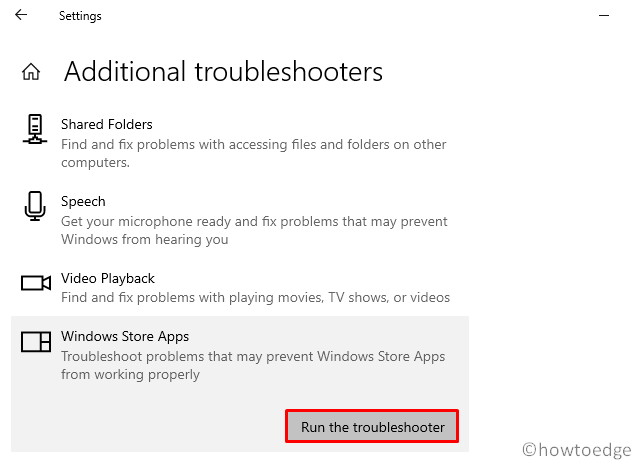
- Move to the right side and click the “Additional troubleshooter” link.
- Scroll down to Windows Store apps and click to extend its pane.
- Hit Run the troubleshooter.

- The tool immediately starts detecting and fixing any errors (if it finds any).
2. Enable Storage Services
At times, the 0x800706D9 error occurs due to Storage services becoming troublesome. Users often disable storage services so as to avoid Windows writing hidden files on USB devices. The 0x6D9 error might occur due to such restrictions on Windows 10. To get rid of this bug, you need to re-enable the services manually following these easy steps –
- Right-click on the Windows icon and choose Run.
- Type “services.msc” without quotes and hit the OK button.
- Locate Storage Service on the succeeding window.
- Double-click the same to launch its Properties window.
- If the Service status displays “stopped”, click the start button.

- Click Apply then OK to confirm these changes.
- Restart Windows so that changes made come into effect from the next logon.
3. Re-register All Store apps
If you are still getting the 0x800706D9 bug, you must re-register each one of the Store apps using PowerShell command. Here are the essential steps to work upon –
- Right-click on the Start button and choose “Windows PowerShell (Admin)“.
- When the UAC window comes into view, tap Yes.
- On the elevated console, copy/paste the below code and hit Enter –
Get-AppXPackage -AllUsers | Foreach {Add-AppxPackage -DisableDevelopmentMode -Register "$($_.InstallLocation)\AppXManifest.xml"}

- After this code runs successfully, reboot PC to implement the recent changes.
Fix: Windows Defender Firewall Error 0x800706d9
If you are getting the error code 0x800706d9 while opening Windows Defender, try these solutions –
| Tip: Make sure to uninstall or remove any third-party antivirus program as well to avoid this error. |
1. Disable Microsoft Defender
- Go and click the “up arrow” available near the notification area and hit the “Shield” icon.
- Doing so will launch the Microsoft Defender application.
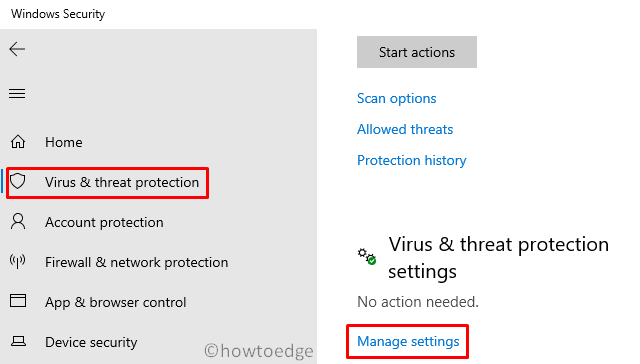
- Head over to the right pane and click Virus & threat protection.
- On the succeeding page, tap Manage settings link.

- Next, turn off the Real-time protection toggle switch.
- When a confirmation window appears, hit the Yes button.
You may now check whether the error 0x800706d9 is still appearing or has disappeared.
2. Set Windows Firewall to Automatic
As per certain user’s POV, disabling the Firewall/ICS service directly may fix this issue on Windows 10. However, doing so you might not even launch the Windows Firewall wizard. Here’s how to fix this –
- Make a right-click on the Windows icon and select Run.
- Type “devmgmt.msc” and press Enter to launch the Device Manager.
- This time, right-click on the Windows firewall and set it to Automatic.
That’s it, I hope the above tutorial does help to address the error code 0x800706d9 on Windows 10.


