Error 0x8007000d is an update-related issue in Windows and it typically occurs when you are upgrading Windows to its latest version i.e. Windows 11. Recently, several users reported facing this error code when they installed the latest cumulative update KB5031356 on their systems.
You may sometimes succeed in initiating the upgrade via Windows Update. However, this will either fail or get stuck at a certain percentage. Since you are here, you must have faced this issue and are not able to install or even upgrade to the recent OS Build version. This prevents all updates from installing on Windows including non-security or optional updates.
What causes Update Error 0x8007000d?
This update error 0x8007000d occurs when either the system files or folders have been corrupted. Corrupt files or stored caches in the Microsoft Store may also result in similar error codes. You may attempt the SFC and DISM tools to find and repair file corruption within your system.
Purge Windows Cache folders to solve the cache problems within SoftwareDistribution and catroot2 folders. If this error persists even after applying these fixes, go for troubleshooting Windows Update or Reset Update Components. Let’s explore these tweaks in more detail –
Update error code 0x8007000d Fixes
To solve the Update error 0x8007000d on Windows 11/10, try the following suggestions –
1] Run Windows Update Troubleshooter
Windows Update, in general, fails due to corrupt Windows update components. Since bugs and errors are pretty common in Windows 10 OS, the company provides an essential tool that works to minimize such issues. Here’s how to run the troubleshooter –
Windows 11:
- Press Windows + X, and select Settings.
- Navigate to the below path inside Settings –
System > Troubleshoot > Other troubleshooters
- Locate Windows Update, and hit the Run button available on its right end.

- Click Next and follow the on-screen instructions.
- As soon as this troubleshooting task is completed, restart your PC.
Sign back into your device again and check if this resolves the update error 0x8007000d on your Windows PC.
Windows 10:
- First of all, launch the Settings app by pressing Windows + I.
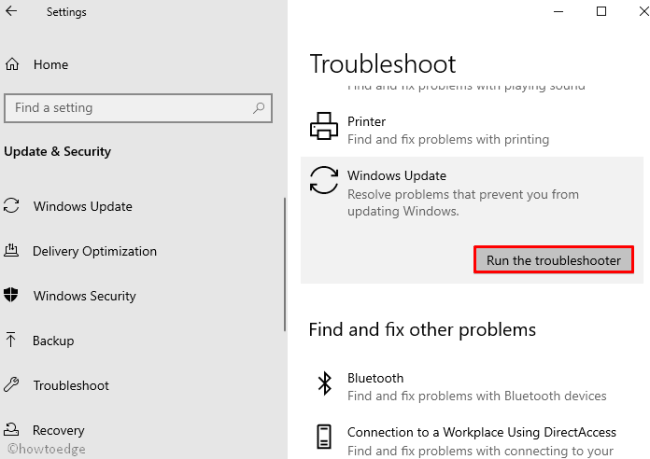
- Select Update & Security and click Troubleshoot on the right pane.
- Find and click on Additional troubleshooters next.
- On the right pane, you will find an option to Windows Update.
- Well, click on it once and hit Run the troubleshooter.

- The repairing task begins immediately afterward.
Restart your PC when this troubleshooting method is completed.
2] Scan and Repair Missing/Corrupt System Files
The presence of corrupt/damaged system files in Windows may also lead to an error code 0x8007000d. To counter this, one may attempt the System File Checker.
Running this command-line utility program scans the entire PC for outdated files and repairs the same (if exists any). Here’s how to proceed –
- Press Win + R to invoke the Run dialog.
- Type cmd at the void and simultaneously press Ctrl + Shift + Enter keys to launch the Command Prompt.
- On the User account control window, tap Yes to go ahead.
- Now, type
sfc/scannowon the elevated prompt and press the Enter key.

- This process will take a few minutes to complete, so wait accordingly.
- Once over, Reboot the Windows 10 device and check whether this solves the update error 0x8007000d or not.
3] Initiate a DISM scan
Sometimes the SFC scan fails to fix the underlying causes. In such cases, one should run the Deployment Image Servicing and Management in-built tool to repair the corrupt files. Here is the complete procedure –
- Go to the Search and type Command Prompt.
- Right-click on the top result and choose Run as Administrator.
- If the UAC window comes into view, tap Yes.
- Copy/paste the following code near the blinking cursor and hit Enter –
dism.exe /online /cleanup-image /scanhealth

- The execution process begins immediately afterward, so wait accordingly.
- When the scanning/repairing completes successfully, execute the below code –
dism.exe /online /cleanup-image /restorehealth
- This command too will take a few minutes to finish. When this completes and reports fixing the underlying cause, Restart the PC.
- Now, try upgrading the Windows 10 OS without receiving the error code 0x8007000d.
4] Enable Windows Update using Group Policy Editor
Sometimes, the disabled update components may cause this error 0x8007000d while performing an OS Build upgrade. If this indeed is the case, enable Windows Update components via Policy Editor. Here are the essential steps to work on –
- Jointly press the Win and R keys to open the Run dialog.
- Type
gpedit.mscat the void and press OK to start the Group Policy Editor. - On the upcoming window, reach out to the following path –
Computer Configuration/ Administrative Templates/ System
- Scroll down and locate the “Specify settings for optional component installation and component repair” policy.

- Once you find this policy, double click the same to open the respective window.
- Here, check the Enabled radio button and hit OK to save the recent changes.

- Finally, Restart your Windows and check for Updates from the next login.
5] Manually download standalone packages and install them on your PC
Microsoft uploads the standalone packages for each and every cumulative update that came for either Windows 11 or 10 OS. All of them remain available on the Update catalog website. Go visit this site, and look for the latest patch update number that came for your version of Windows 10. Windows 11 users may visit this website instead.
Now that you have the KB number with you, copy/paste the same into the Microsoft update catalog’s search field. Press Enter and you will find a list of updates corresponding to different system architectures. Pick the one that suits your system configuration and hit the download button.
Click the top link on the succeeding window and the patch file starts downloading. Double-click on the downloaded setup file and the error 0x8007000d resolves automatically thereafter.
Here’s a detailed description of how to download and install updates manually into your system.
6] Manually Reset the Windows Update Components
If none of the above solutions resolve the error 0x8007000d, you should try to manually reset the Windows update components.
To perform this task, you need to start Windows Console as an Admin and execute a few command lines. Here’s how to proceed –
- Right-click anywhere on the taskbar and select Task Manager.
- When this desktop app comes into view, click File followed by Run new task.
- Under the text box, type cmd (Admin) and hit the OK button.
- Now, run each of the below codes separately. They are meant to stop the essential core services –
net stop bits
net stop wuauserv
net stop appidsvc
net stop cryptsvc
- Subsequently, remove the qmgr*.dat from Windows 10 OS executing the command line –
Del “%ALLUSERSPROFILE%\Application Data\Microsoft\Network\Downloader\qmgr*.dat- Afterward, navigate to the System32 folder running the below code –
cd /d %windir%\system32
- Now, copy/paste the following codes to re-register .dll files. They, in turn, reset the corrupted Windows Update components. Don’t forget to press Enter at the end of each command line –
regsvr32.exe atl.dll
regsvr32.exe urlmon.dll
regsvr32.exe mshtml.dll
regsvr32.exe shdocvw.dll
regsvr32.exe browseui.dll
regsvr32.exe jscript.dll
regsvr32.exe vbscript.dll
regsvr32.exe scrrun.dll
regsvr32.exe msxml.dll
regsvr32.exe msxml3.dll
regsvr32.exe msxml6.dll
regsvr32.exe actxprxy.dll
regsvr32.exe softpub.dll
regsvr32.exe wintrust.dll
regsvr32.exe dssenh.dll
regsvr32.exe rsaenh.dll
regsvr32.exe gpkcsp.dll
regsvr32.exe sccbase.dll
regsvr32.exe slbcsp.dll
regsvr32.exe cryptdlg.dll
regsvr32.exe oleaut32.dll
regsvr32.exe ole32.dll
regsvr32.exe shell32.dll
regsvr32.exe initpki.dll
regsvr32.exe wuapi.dll
regsvr32.exe wuaueng.dll
regsvr32.exe wuaueng1.dll
regsvr32.exe wucltui.dll
regsvr32.exe wups.dll
regsvr32.exe wups2.dll
regsvr32.exe wuweb.dll
regsvr32.exe qmgr.dll
regsvr32.exe qmgrprxy.dll
regsvr32.exe wucltux.dll
regsvr32.exe muweb.dll
regsvr32.exe wuwebv.dll
- Next, use the below commands to reset the network services –
netsh winsock reset
netsh winhttp reset
- Once over, restart the services that you have stopped initially. To do so, use the below codes –
net start bits
net start wuauserv
net start appidsvc
net start cryptsvc

- At last, Reboot your system so that the changes made come into effect after the next login.
I hope the above fixes work to address the update error 0x8007000d on your computer. If you have any queries or suggestions related to this article, ask us in the comment section.


