Did you encounter a runtime error on your Windows 11 PC while launching any program or application? As you are here, you must have. In this guide, we will discuss what may cause such an issue on Windows PC and what are the possible ways to deal with it.
When this problem occurred, you may receive an error message that reads the following –
Runtime Error! Program: Path to the file.
This application has requested the runtime to terminate it in an unusual way.
What may cause Runtime Error on Windows 11?
Below we have included all possible reasons that may cause this problem and their solutions as well. So, have a look at the most effective reasons, check if that’s a possibility or not, and try the appropriate fix to that.
- Outdated Microsoft Visual C++ Runtime library
- Obsolete Display Adapter
- You have downloaded/installed a faulty update or program
- Corrupted System Files or Folders
- Presence of infected files, viruses, or malware
- Pending Windows updates
Fix Runtime Error on Windows 11
If you are getting a runtime error on your Windows 11 PC, go through the below suggestions and incorporate the solution that you find is a necessity.
1] Restart your PC
The first and foremost solution to this error is by restarting your PC. When you reboot your device, several hanging or stuck operations end, and thus there is a possibility that your device is all okay now.
So, if you hadn’t turned off your computer for a long time, give this solution a try. Who knows, the runtime error vanishes automatically and you need not require to perform any complex solutions.
2] Install the latest version of Microsoft Visual C++ Runtime library
In most cases, a runtime error occurs when your system is running an incorrect version of the Visual Runtime library. Even in the error message that comes along with this error code, you will find a mention of this library. See the example below –
Microsoft Visual C++ Runtime Library, Program: chrome.exe
The above message implies that there has been an error while accessing the Visual C++ Runtime library when Chrome is clicked to start. In order to resolve this issue, you may update or install the missing Visual C++ Redistributable for Visual Studio on your PC. To do so, use these steps –
- First of all, visit Microsoft’s official site to Visual C++ Redistributable for Visual Studio 2015.
- After you visit there, select your language, and hit the Download button.
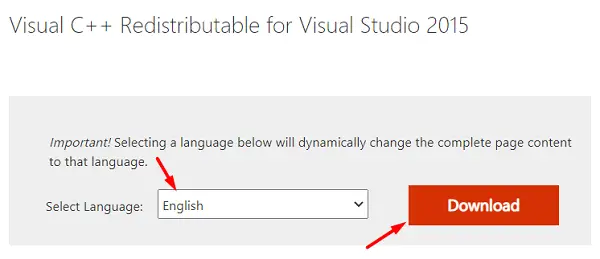
- On the next screen, tick the checkbox left of “vc_redist.x64.exe”, and hit Next.
- After the download completes, double-click on the setup file to begin its installation.
- Now follow the on-screen instructions to complete its installation.
- Restart your PC next so that the changes made become effective from the next login.
3] Check for Driver Updates
Pending display driver updates may also trigger run-time errors on Windows 11 PC. So, go and check if there are any available driver optional updates on your computer or not. If you do find any optional updates inside the Windows update, check if that covers any display driver.
You should keep all your drivers up to date. Even in cases where it seems all drivers are updated, there remain certain drivers that require an update.
4] Boot into the Clean Boot state
Booting your device into the Clean Boot state stops all third-party apps and services. This gives you a fair idea of what actually is happening on your computer. Suppose when you boot into this mode, the Run-time error disappears, the problem may lie with your recent installation(s) of new apps or updates. Well, you can always get rid of them as suggested in solutions 5 and 6.
However, if the error does appear even in the Clean boot state, the system files must have been corrupted. In order to fix them, you may perform solutions 7 and onward.
5] Uninstall the Latest software installation(s)
If you had installed some applications on your PC and the run time error started occurring after that, consider removing all those apps. This might have occurred that you have installed a faulty or buggy program and when that interferes with the system apps, invoke a run time error on your Windows 11 PC.
Here’s how to uninstall recently installed apps on your computer –
- Right-click on the Windows icon and select “Apps and Features“.
- Head over directly to the right pane, scroll down, and locate the apps that you have installed recently.
- Click the three dots available at the extreme right of the app’s name, and click Uninstall.
- Hit uninstall on the pop-up window as well.
- After the chosen program uninstalls successfully, reboot your PC to delete any leftover files as well.
6] Remove Recently installed Windows updates
Just like any recent software installation, if you had updated your operating system to its latest build version, consider downgrading your device for once. We suggest so because there is a possibility that you have installed a buggy update and that’s the reason behind getting a run time error on your Windows 11 OS.
Downgrading your operating system will bring your computer back to its previous Build version and as there was no such error occurring before, this might fix the issue that you are dealing with now. Here are the steps you need to follow up on –
- Press Win + I to launch the Settings app.
- Select Windows Update from the left navigation.
- Go to Update History, scroll down, and click Uninstall updates under the section – Related settings.

- Find the recent update, and hit the uninstall button available beside it.

- Your device will reboot automatically as soon as the chosen update uninstalls.
7] Initiate a Full Scan of PC
Run time errors on Windows 11 may also occur if your system files have been infected with some viruses or malware. In order to resolve and quarantine such threats, you may use Windows Security and initiate a full scan.
Running a full scan will check the entire PC for infected files and quarantine them. Don’t use any third-party antivirus (free) tool to scan for viruses as they will do more harm than good.

8] Run SFC and DISM scans
The presence of corrupted/damaged system files or Windows Images may also cause this issue. In order to fix this issue, one must run SFC and DISM commands altogether. Here’s what you need to do to run both tools –
- Press Win + R to launch the Run dialog.
- Type “CMD”, and press Ctrl + Shift + Enter altogether.
- This will invoke Command Prompt as administrator.
- Type “
sfc /scannow” and press Enter.

- Let this command run as long as it takes to repair the missing/corrupted files.
- Once this is over (roughly 15-20 minutes), run the below code next –
DISM /Online /Cleanup-Image /RestoreHealth

- Press Enter and wait again for the DISM code to execute successfully.
- Running this code will diagnose any issue with the system image and repair it.
- After this scan completes as well, restart Windows.
Now check if this resolves the run time error on your Windows 11 PC.
9] Install pending updates on your computer
Now that you have repaired missing or damaged system files, and incorporated a full scan yet found nothing, go and check if there are any pending updates for your device. If you do find any available patch for your computer, you better download and install that file onto your Windows PC.
Here’s how to check and install pending updates on your device –
- First of all, reach out to the following path –
Settings > Windows update
- Head over to the right side and click Check for updates.

- If the system does find any pending updates, the same will be automatically downloaded and installed.
- Reboot your PC next so that the changes made come into effect from the subsequent login.
10] Restore your PC
I hope the runtime error has already been resolved on your PC by now. If not, consider reverting your PC back to the state where everything was running normally. You may do this only if you have created a system restore point sometime back on your computer. In case you hadn’t created a system backup earlier, skip this solution and clean install Windows on your PC.
Here’s how you may use a restore point on Windows 11/10 machine –
- Press Win + R to launch the Run dialog.
- Type “
rstrui” and hit OK. - When the System Restore window comes into the display, hit Next.
- Moving ahead, select the restore point to which you want your system reverted back.
- You may check the box “Show more restore points” to view all system backups available for your PC.
- Select the restore point and hit Scan for affected programs. This way, you will get to know about the apps which will be lost when your move forward.
- Click Next and then Finish to begin the restoring process.
After the system restoration completes, make sure to restart your PC again. Doing so will help get rid of any temporary or leftover files that are still lying dormant on your computer.