This article will show you how to optimize Windows 11 for gaming. The gaming industry generates billions of dollars every year. From new releases on consoles to new games, there are more ways to play the game than ever. Though the gaming experience can be hindered by a number of factors, such as screen size and hardware, you may adjust a few things to improve the same on your Windows PC.

Windows 11 has some great features for gamers that will optimize your computer and make it the best machine possible for gaming. Here are some tips that will help you have a better gaming experience.
How to Optimize Windows 11 For Gaming
Windows 11 operating system includes some fantastic gaming enhancements. However, many of these features are disabled by default. So even if you have Windows 11 on your computer, you might not be using the best features. These tips will show you how to optimize Windows 11 for gaming so that your games run as smoothly as possible.
- Delete temporary files
- Update Windows 11 to the latest version
- Install the latest graphics drivers
- Turn on the game mode
- Disable the Xbox Game Bar
- Remove unused applications
1. Delete temporary files
It can be helpful to delete temporary files in order to free up cache data and improve the system’s performance. To do so, follow these steps:
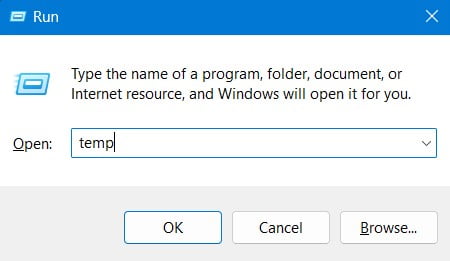
- Press the Windows + R keys together to open the Run window.
- Type temp in the text field and press Enter. If a confirmation window appears, click Continue.
- Here are the files that are stored on your PC in the temporary directory.
- To select all the files, press the Ctrl + A option.
- Then press the Delete key on your keyboard to delete them.
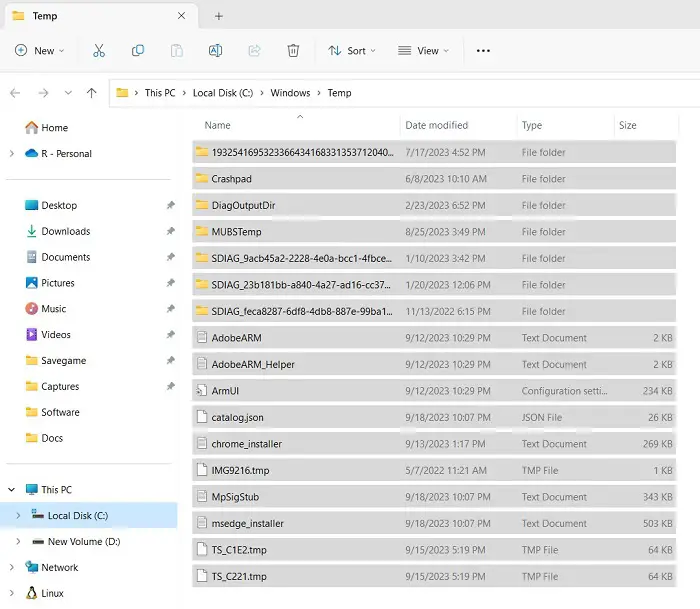
- A few files might not be deleted. If that is the case, skip them and you will be done.
- There is one more directory that you should clean often.
- To do this, open the Run command again and type %temp% in the text box.
- Then select all the files and delete them.
2. Update Windows 11 to the latest version
Windows 11 is optimized best when it’s always up to date. That’s one of the simplest ways to do that. Insiders and preview users will need this even more than normal. Microsoft expects its Windows 11 operating system to release a number of bug fixes, performance improvements, and stability updates in the coming years.
Therefore, keeping your Windows updated is essential if you want to optimize your gaming experience. If you are an online gamer, you should also consider Windows updates that contain security patches.
Follow the steps below to keep Windows updated:
- Right-click on the Start button and select Settings from the menu list.
- From the Settings menu, select Windows Update from the left-hand column.

- Then, click Check for updates and let it run.
It will automatically download and install any updates that are pending. To complete the installation process, you may have to restart your computer.
Note: It is strongly recommended that you do not skip any updates, even if some may seem optional to you.
3. Install the latest graphics drivers
Almost every computer today comes with a graphics card for games and other graphics-intensive tasks. If your computer has an APU or an integrated GPU, Windows Update will update its drivers.
AMD and Nvidia graphics cards require their own dedicated software for updating the graphics drivers. There will be AMD Radeon Software and Nvidia GeForce Experience for AMD and Nvidia respectively. You can download the software from their respective websites.
4. Turn on the game mode
Microsoft introduced Game Mode in Windows 10 and improved it over time. For older or less powerful systems, this setting is highly recommended because it optimizes performance and improves system quality.
There are many ways to increase system performance with Game Mode. It prevents apps from running in the background or from allocating resources to specific components. To enable Game Mode, follow these steps:
- First, press Windows + I to open Settings.
- On the left side of the Settings window, click the Gaming tab.
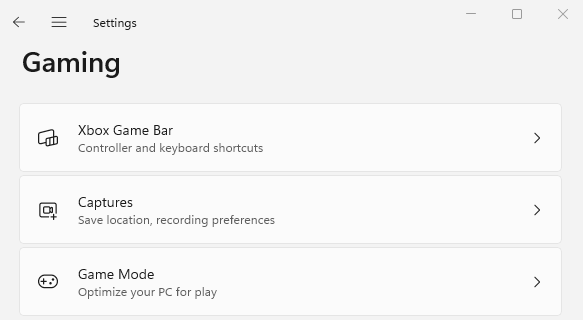
- Choose Game Mode from the Gaming page.
- In order to enable the Game Mode feature, click the toggle next to it.
After you perform the above steps, you will see a noticeable improvement in your gaming performance.
5. Disable the Xbox Game Bar
We recommend turning this feature off if you wish to keep CPU and memory usage low. Xbox Game Bar cannot be completely disabled in Windows 11, as it can in Windows 10. However, if you do not need it, you can remove this feature using Windows PowerShell. Here is how you can do it:
- Open Windows PowerShell with admin access.
- Copy and paste the following command into the PowerShell window and press Enter.
Get-AppxPackage Microsoft.XboxGamingOverlay | Remove-AppxPackage
Running these commands will completely remove the Xbox Game Bar from your system. When you want it back, you can access it through the Microsoft Store.
If you’d like to close only the background process rather than remove it entirely, proceed as follows:
- Open the Settings app using the Windows+I keys.
- Select the Apps tab from the left pane of the Settings window
- In the right-hand panel, click on Apps & features.
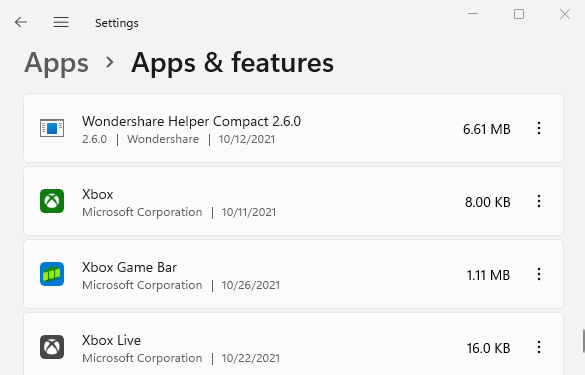
- Scroll down to the bottom, and you will see the Xbox Game Bar.
- Click on the 3 vertical dots and then click on Advanced options.
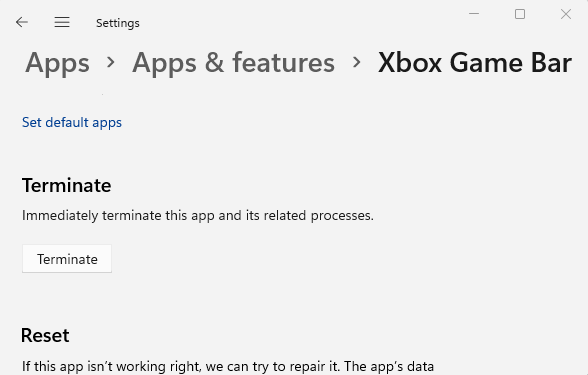
- Scroll down to the Terminate section.
- Then click on the Terminate button to stop the background process.
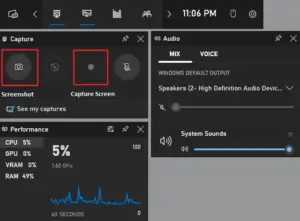
If you want Xbox Game Bar to run but without affecting the performance significantly, disable its resource-intensive Captures feature. To do so, follow the below steps:
- Press the Windows+I keys to launch the Settings window.

- From the Settings menu, select Gaming, then click Captures in the right pane.
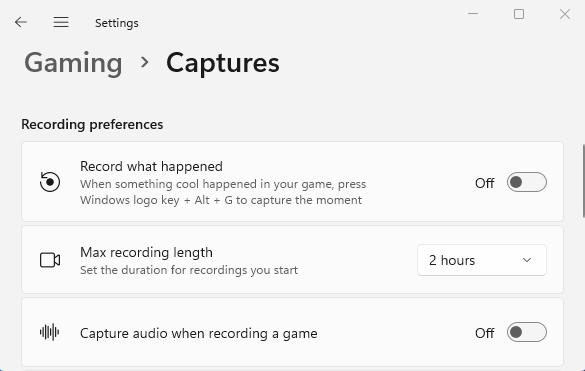
- Turn off the option stating Record what happened as well as Capture audio when recording a game now
In this way, your Xbox Game Bar won’t consume unnecessarily system resources.
6. Remove unused applications
If you are experiencing performance issues when gaming, try removing applications you aren’t using anymore. To do this, follow these steps:
- Right-click on Start and select the Settings menu.
- Click on the Apps tab in the left pane.
- Then select Apps & features to open the list of applications you have downloaded from the Store app.
- From the list, select the applications that are no longer necessary.
- Next, click on the three vertical dots and then select the Uninstall option.
Similarly, remove other apps you no longer need.
Read Next: