The error code 0x80246001 is one of the numerous potential bug codes that appears while updating Windows 10 OS. In this, the downloading process becomes either slow or stuck in between displaying a failed update error message. Well, this is not a big issue and one can easily solve this tweaking a few settings on the computer.
The probable reasons that can lead to this error are – corrupt Windows log files, less storage on HDD, weak network connection, etc. In certain cases, an active Firewall may also block upgradation to a newer Windows 10 Build version. Reset Windows components, Temporarily disabling Firewall, Run Windows troubleshooter may work to resolve this issue. If the error 0x80246001 still occurs, visit the Microsoft Update catalog and download/install the latest cumulative patches.
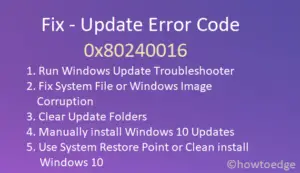
Ways to Fix Windows 10 Installation Error 0x80246001
To solve the error code 0x80246001 while installing Windows 10 updates, use the following workarounds –
1] Check for Net Connectivity
If you often perform Windows 10 updates online, a bad internet connection may lead to this issue. Hence, before proceeding to the solutions, check whether you are receiving proper net connectivity or not. To do so, open the Windows Console as Admin and execute a single code as discussed below –
- Go to Start and type Command Prompt. Right-click on the top result and select Run as administrator.
- If UAC window prompts, tap Yes. On the elevated prompt, run the following code –
ping google.com
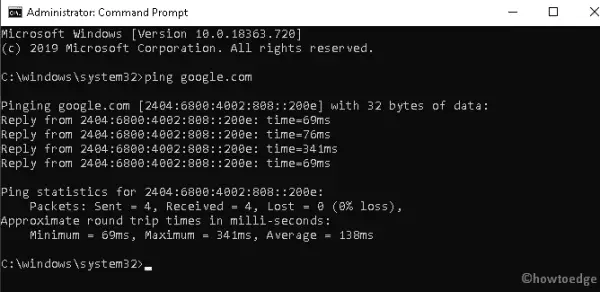
- Now, check the report under lost data. This should come (0%) suggesting no pinning loss.
Note: If there is indeed some data loss, you should change the internet source then only try updating the OS.
2] Temporarily disable Windows Firewall
Though Windows Firewall protects System from any malware attack, this may sometime prevent even the Windows update. So, we suggest temporarily turning off the Windows Firewall and install the recent patches. Here’s how to proceed –
- Jointly Press Win and R keys to start the Run dialog. Type Control Panel in the text box and hit Enter.
- Click Windows Defender Firewall thereafter “Turn Windows Defender Firewall on or off on the succeeding screen.
- Here tick the “
Turn off Windows Defender Firewall (not recommended)” checkbox under Private as well as Public network settings section.

- Click OK to save the changes and Restart your computer.
Note: There is no need to manually turn on the Windows Firewall, as this gets active after every PC reboot.
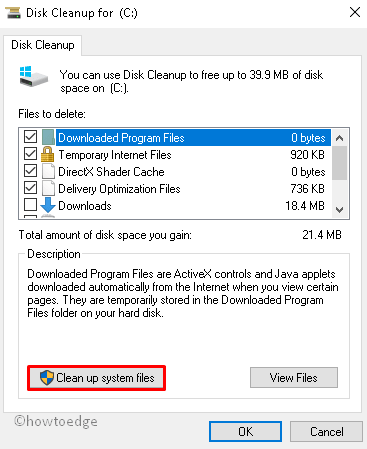
3] Free up more space using clear junk file
The shortage of disk space may also lead to installation issue 0x80246001. So, you should check for unnecessary files on the computer and delete (if found any). To do so, use the Disk Cleanup tool as discussed below –
- Press Win and S keys together to launch the search bar. In the text area, type Disk Cleanup and click the top result.
- Select the root drive (C:) on the pop-up menu and tap OK. The system will start calculating spaces that it can free-up.
- Mark all the checkboxes under Files to delete section except Download.
- Click “Cleanup system files“, select the root drive (C:) and hit OK.
- Once over, Restart your PC and check whether the error 0x80246001 occurs again or not. If yes, try the next solution.
4] Run the Update troubleshooter
If the error persists even after, we suggest you running the built-in app by Microsoft i.e. Update Troubleshooter. Here are the essential steps to work upon –
- Press Win and X shortcut to launch the Power Menu.
- Select Settings thereafter Update & Security on the next screen. Choose Troubleshoot on the left pane and head over to the right side.
- Now, scroll down a little and click to expand Windows Update.
- Hit Run the troubleshooter button and wait till this gets over.
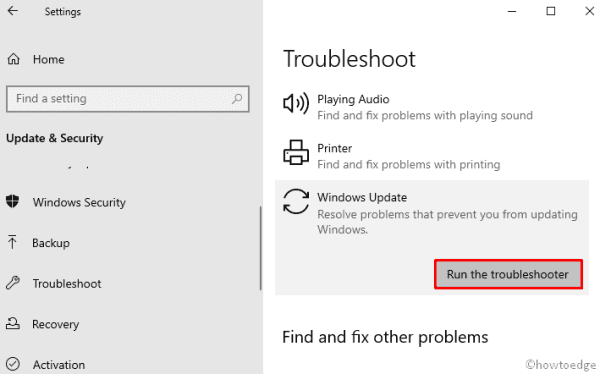
- Lastly, Reboot the PC so that the recent changes come into effect.
5] Reset the Update components
The faulty update components may block new installation and result in the failed message “error 0x80246001”. In such cases, one should reset the update components using the below procedure –
- Press Win & R to invoke the Run dialog.
- Type cmd at the void, hold Ctrl+Shift and press Enter to launch the Command Prompt as Admin.
- When the UAC window prompts, tap Yes to authorize the access.
- Now, execute the following codes one after another. Make sure to press the Enter key after each command.
net stop bits
net stop wuauserv
net stop appidsvc
net stop cryptsvc
- The above codes will stop some of the essential services, now run the below codes to rename certain services –
rmdir %systemroot%\SoftwareDistribution /S /Q
rmdir %systemroot%\system32\catroot2 /S /Q
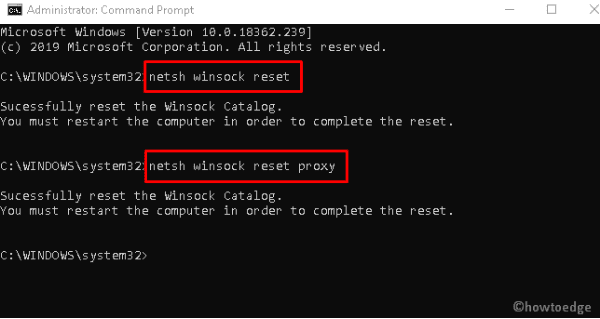
- Subsequently, configure your network connectivity using the following commands –
netsh winsock reset
netsh winsock reset proxy
- After successfully executing the above codes, restart the services that you have previously stopped.
net start bits
net start wuauserv
net start appidsvc
net start cryptsvc
- Finally, Restart your system and check whether the update error code 0x80246001 gets solved or not.
6] Download Recent Updates manually
If you are still unable to perform the Windows update, visit Update Catalog and download the standalone package (as per system architecture and OS build version).
Note: To manually download the cumulative update, you must know the specific KB number. Don’t worry, we have made this easy for you. Just visit the compiled patch list and note down your specific update number.
Now, follow these easy steps –
- Open the Microsoft Official website and type the KB number at the search bar.
- When the matching updates appear, choose your system architecture and click the Download button.

- On the succeeding window, tap the link and the download will start soon afterward.
- Wait for a while, as this takes a few minutes to complete this task. Once over, open the Download folder and double-click on the set-up file.
That’s it, your computer will take care of the further course of action. Just follow the on-screen instructions to upgrade the Windows 10 OS build to the next version.