What Windows 10 users were getting as Blue Screen type errors, Windows 11 users have also confirmed encountering similar issues on their devices. The BSOD here in Windows 11, looks identical, however, this refers to a black screen of death error. Instead of getting a blue background, you might now get a black screen with an identical Sad face, error code, and the reason why it happened.
If you had faced such an issue recently and looking for ways how to fix it on Windows 11 PC, this post is for you. In this article, we will discuss what causes a stop error in Windows 11, and what are the ways that can address a black screen of death error.

What causes Black Screen of Death Error on Windows 11?
The Black screen of death error usually occurs when your device meets one or more of the following reasons –
- Missing or damaged system files
- Corrupted update components
- Faulty or Buggy app installation
- Outdated or Incompatible Device drivers
- Presence of viruses or malware
- Hardware issues like – HDD or RAM failure, using a problematic peripheral device
These are the most common reasons that invoke a BSOD error and prevent you from logging into your PC. Let’s see how to fix it on Windows 11 PC –
Fix Black Screen of Death Error (BSOD) on Windows 11
Since all you get is a blue screen with an error message, you can’t get past the login screen. So, boot your device into the Safe Mode first and then only apply the below troubleshooting methods –
List of Contents
- Remove Secondary or Peripheral devices
- Check the hard disk for possible corruption
- Inspect Random Access Memory
- Scan and Remove Malicious codes or Malware
- Use System File Checker
- Perform a DISM scan
- Run DISK Cleanup Tool
- Install Optional driver updates
- Reset Update Components
- Rebuild Boot Configuration Data (BCD)
- Search for the designated Windows 11 BSOD Error code
- Use System Restore Point
1] Remove Secondary or Peripheral devices
Black Screen errors mostly occur when there is some issue with the hardware internal or external. So, before you move ahead to the solutions, remove all secondary devices like printers, USBs, Mouse & Keyboards, and restart your PC. If the BSOD was occurring due to one of the removed peripheral devices, your computer may start working all right.
2] Inspect the hard disk for possible corruption
Prolonged usage of any disk drive may block some of its sectors and make it troublesome to use. This is why one should regularly check and remove the bad sectors that generate automatically on the hard drive. Windows 11 comprises an excellent tool that can easily check its internal disk drives for possible corruption. Here’s how you can inspect hard disk on Windows 11 –
- Launch Command Prompt as an administrator.
- When the UAC window prompts, hit Yes to authorize this action of yours.
- On the elevated console, type the following, and press Enter –
chkdsk C: /f /r /x
Note: ‘CHKDSK’ stands for Disk Status upon activation and the letters afterward have their usual meaning.
- The command won’t run after pressing the Enter key as the volume is already in use. Instead, this will ask for launching itself when you restart your device.

- Type “Y“, and press Enter to confirm the scanning process when the system restarts.
- Reboot your PC next and you will find the disk scanning starts immediately afterward.
As this is a time-consuming process, wait until the whole disk is scanned by CHKDSK. When this is over, you will get a report on the health status of your root drive. This utility will fix any issues that are repairable or else suggest you buy a new HDD.
3] Inspect Random Access Memory
Many a time, black screen-type errors occur simply because the RAM is malfunctioning on your computer. To ensure if that’s indeed the case, you may use the memory diagnostic tool. Here’s how to check RAM on Windows 11 –
- Press Win+R to open the RUN dialog.
- Type mdsched.exe, and hit OK to launch Windows Memory Diagnostic.
- Here, select the first option i.e. “Restart now and check for problems (recommended)“.

- Clicking on this will reboot your PC first and then start inspecting the Random Access Memory.
- When this diagnostic tool finishes checking the RAM, you will get a report when your Windows 11 PC starts up.
- The report includes all the details that this tool performs on your computer.
Note: In case you didn’t find any results or accidentally click over the close button, visit Event viewer to see the generated report. Here’s how to get all the details about the memory scan –
- Press Win + X to launch the Power menu, and select Event Viewer.
- Navigate to Windows Logs > System next and you will get the most recent Memory Diagnostic file.
- If there are no issues mentioned in this report, rest assured the RAM is working efficiently on your device.
In case you do find some issues on the report, consult with a technician, and replace the RAM.
4] Scan and Remove Malicious codes or Malware from your system
Windows 11 is still in development mode and you can get your hands on it only after becoming an insider. Additionally, not everyone can upgrade their PCs to the new OS due to restrictions imposed by Microsoft.
Well, we as people, always do the thing that we are not supposed to. This leads us to find alternatives from where we can easily get the Windows 11 ISO file, make it bootable, and install it on our devices.
The chances of getting a clean operating system are pretty NIL these days as hackers often inject the ISO file with some malicious codes. When you clean install OS and connect it to Microsoft servers, there arises a contradiction. As a result, a black screen of death error starts occurring on the login screen.
This might not be true in your case, but you do get a picture. So, if you had opted the above way, we suggest becoming an insider first and then only upgrading to Windows 11 Insider preview.
In case you don’t want to do the re-installation, perform a full scan using Windows Security. This will run to find and repair any issues on your computer.
Tip: Windows 11 is quite a new operating system. So, you won’t get much software that is compatible especially the antivirus one. In case you have already installed some third-party security app on your Windows 11 PC and started facing a BSOD error afterward, go and uninstall it completely from your system.
5] Use System File Checker
Many a time, even after successfully removing a program leaves its residual or leftover files on the computer. You won’t get to know of that until you run an SFC scan. This tool also helps to recognize missing or corrupted core files (because of other means) and repair them.
Hence, go for it once and check if this helps to solve Windows 11 BSOD errors on your computer. Here’s how to perform this scan –
- Press WinKey + S to launch the Search window.
- Type CMD in the text field and right-click over the top result.
- Choose the option – “Run as administrator” on the context menu.
- When the command prompt launches, type the following –
sfc /scannow, and press Enter.
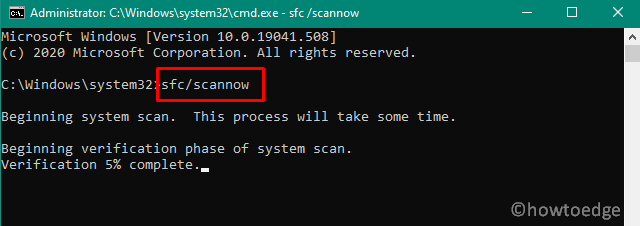
- The SFC utility will then start looking for faulty files/folders, and repair them if possible.
- When the scanning/repairing process reaches 100%, CMD will display a list of things that SFC fixes.
- Reboot your PC and see if you can now boot into Windows 11 normally or still can’t.
6] Perform a DISM scan
The System File Checker (SFC) is a command-line application that scans your system files for possible corruptions and fixes them. However, it can’t do much when Windows 11 Image is itself corrupt. To fix it then, you may use another tool that goes by the name “DISM”.
Here’s how to proceed with the DISM scan on Windows 11 –
- Right-click on the Windows icon and select Windows Terminal (Admin).
- When this launches, copy/paste the command below, and hit Enter –
DISM.exe /Online /Cleanup-image /Restorehealth
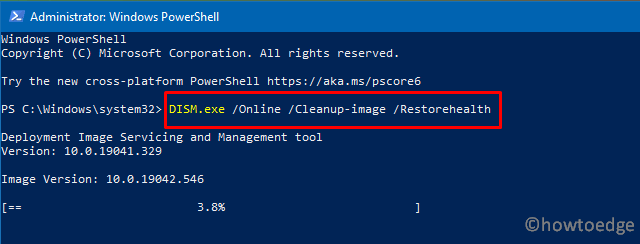
- Running this code will look for any malicious codes on Windows 11 Image, and fix them (if the tool finds any).
- Similar to that of the SFC scan, this too takes 15-20 minutes to finish, so wait patiently.
7] Try DISK Cleanup
Whether you perform a Windows update, do basic operations, or remove some applications, temporary files keep piling up and ultimately start crashing your PC. Though you can set your device to cleanse itself automatically, manually check for junk files once a month. Doing so will not only help to avoid serious issues but will also keep the hard disk healthy.
To purge temporary files manually on Windows 11, you may take the help of an in-built tool i.e. Disk Cleanup.

8] Install Optional driver updates
The presence of an outdated device driver may also interfere with the core system files and thus causes a Black Screen of death error, BSOD on Windows 11. You may avoid such stop errors from even occurring by regularly checking for driver optional updates.
Here’s how to download and install optional driver updates on Windows 11 –
- First of all, reach out to the path below –
Settings (Win + I) > Windows Update > Check for updates
- If the above search reveals any optional updates link, click over it.
- Subsequently, expand Driver updates and mark the checkbox within it.
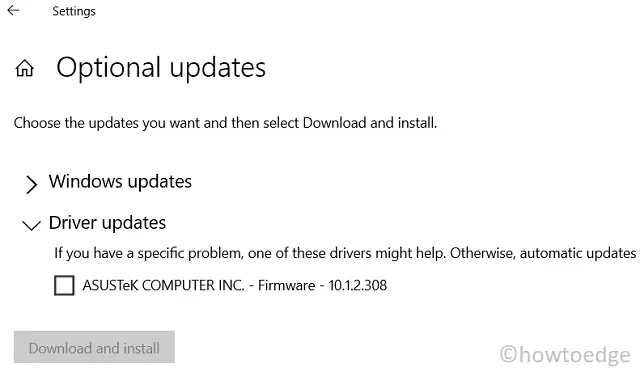
- Lastly, hit “Download and install” and let the system recovers.
9] Reset Update Compoents
The update components becoming corrupted is one of the many reasons that may also trigger a black screen-type error on Windows 11. In such scenarios, it is better to stop and then restart all essential services. While doing so, make sure to rename the Windows Cache folders. If you are still unsuccessful, follow the below-mentioned fixes.
10] Rebuild Boot Configuration Data (BCD)
Corruption inside the Boot Configuration Data may also result in different issues including a Blue/Black/Green screen of death error. In such a scenario, all you can do is rebuild the BCD on Windows 11 by following the steps below –
- First of all, attach the USB device (containing the Installation Media) to one of the computer’s ports.
- Restart your PC next.
- While the BIOS is loading, press the supported function key (F2, F4, F9, Esc, or Del) to launch Boot Menu.
- Under Choose an option screen, pick the Troubleshoot option thereafter Advanced options.
- Choose Command Prompt next among the different options available there. When the elevated prompt appears, execute the following codes one after another –
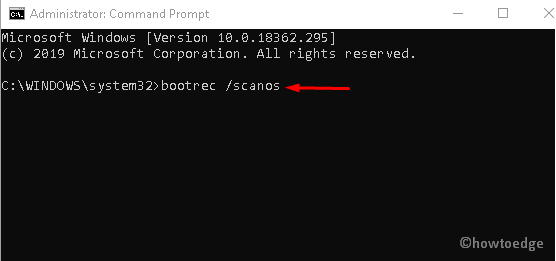
bootrec /scanos
bootrec /fixmbr
bootrec /fixboot
bootrec /rebuildbcd
After you execute all these codes successfully, reboot your PC. In case the problem is still available, try out the below workaround.
11] Search for the designated Windows 11 BSOD Error code
When your PC crashes and turns black, you also receive a message that says a few lines about the issue accompanying an error code. The solution to this error code lies within the error message or the code it bears.
Nowadays, Microsoft displays a QR code along with an error message. Scan this code and the company will redirect you to a site that contains specialized troubleshooting steps. On the visited page, you will find the potential reasons that might have caused the BSOD error on Windows 11. The troubleshooting site also features what you can do to fix the problem at hand.
12] Use System Restore
Restore Points are very useful in cases where your system starts running abruptly or prevents the login screen from appearing. If you have created a system restore after installing Windows 11, now is the right time to test if you can revert your PC back to that state successfully.

If you forget to create any restore point until now, you have only one option left and that is to become an insider and upgrade to Windows 11 PC.
I hope you find this article useful and easy to follow. Let’s know in the below comment section if you find any difficulty following the above articles.