Nothing feels more frustrating than being stuck to print a single paper or more. The situation becomes even more complex when you try canceling the ongoing job. The printer displays “deleting the queued file“, however, never completes the deletion. Did you encounter this problem recently and wondering what possibly could have gone wrong?
Well, this issue may arise owing to different reasons including “connection problems”, or issues in the printer itself. However, such troubles mostly occur on account of the printer-related service not working properly. Print Spooler is one such service that processes the printing command and should execute it effectively. If this doesn’t handle the user’s request properly, the Printer simply stops working and takes forever to print the documents.
In this post, we are going to discuss four different ways to fix the print spooler service on the computer. They are –
- Using Command Prompt
- Through Services Console
- Copy the spool folder from a working PC
- Modify printer-related keys on Registry
Ways to Fix Printer Spooler problems in Windows 10
To solve the Printer Spooler issues on Windows 10 device, try the below workarounds –
1] Using Command Prompt
You may fix the print spooler service simply by executing a few codes on the Command Prompt. All you require is to follow these easy steps –
- Launch the Windows Console as an Administrator.
- On the elevated prompt, run the below codes followed by the Enter separately.
net stop spooler
del /Q /F /S "%systemroot%\System32\Spool\Printers\*.*"
net start spooler

- The above cmdlet will stop the print spooler service first, clean the printers folder then restart the spooler service.
- Once over, Restart Windows to incorporate the above changes.
2] Via Services Console
Alternatively, you may also fix the printer spooler problems by stopping then restarting related services. Here’s how to perform this task –
- Use Winkey + R to launch the Run dialog.
- Type “services.msc” and hit OK to enter the Services wizard.
- Scroll down and locate the Print spooler service.
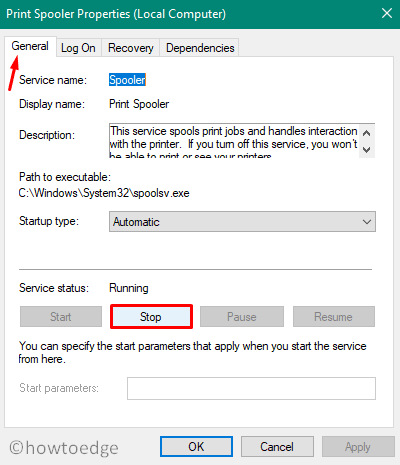
- Once found, make a right-click and choose the “Properties” option.

- Go to the General tab and hit Stop.
Now that you have stopped this service, delete whatever present inside the printers folder. To do so, use these easy steps –
- Launch Windows Explorer using Win + E shortcut key.
- Copy/paste the path “C:\Windows\System32\spool\printers” at its address bar and press Enter.
- Click Continue to permanently get access to this folder.
- Use Ctrl + A to select all the inner contents and press the Delete key.
- Re-visit the General tab on the Services window and click Start. Doing this will restart the spooler service.
- Lastly, hit OK and come out of the services wizard.
- Do Restart your computer so that changes made come into effect from the next logon.
3] Copy the spool folder from a working PC
If the print spooler service is still not functioning properly, copy the spool folder from a working PC. Since the same service is working fine on another device, this should fix the printing issues on your computer as well. Here’s how to do this task –
- Open the File Explorer on a normal device and reach out to the path –
C:\Windows\System32. - Copy all the contents and paste it to a USB drive.
- Plugin this USB to the problematic PC and browse to the above path again (on the affected device).
- Since you have already wiped this folder, move the copied contents here. If not, move all the internal files and sub-folders first to a different location.
| Note: Make sure to copy contents from a PC with matching system architecture. |
4] Modify Registry to fix Print Spooler Service
An incorrectly configured registry may also prevent the print spooler service from functioning properly. If that’s the case, you should modify the registry correctly. However, make sure to create a registry backup. You may use this backup in case something goes wrong while configuring the registry.
Here’s how to modify the Print spooler registry –
- Make a right-click on the Windows icon and select Run.
- Type “
regedit” in the text field and press Enter to start the Registry Editor. - Click Yes if User account control comes into the display.
- Next, navigate to the below path –
HKEY_LOCAL_MACHINE\SYSTEM\CurrentControlSet\Control\Print\Environments\Windows NT x86\Print Processors
Note: If you are using a 64-bit PC, browse to this path instead –
HKEY_LOCAL_MACHINE\SYSTEM\CurrentControlSet\Control\Print\Environments\Windows x64 \Print Processors
- Delete all the keys available here except the winprint key. To do so, make a right-click and hit Delete.

- After performing the above steps successfully, close the Registry Editor, and Reboot your PC.
From the next sign-in, the Printer should work effectively while printing any files or documents. If you still have any queries or suggestions, let us know in the below comment section.
Read Next: