Some Windows users reported encountering the error code 0x80070043 while trying to open files on external servers. This problem also seems to happen when running certain applications, especially Windows Office. Although the problem occurs more frequently on Windows 7 and Windows 8.1, we also found instances on Windows 10 and Windows 11.
The most common cause of this error is corrupted Windows system files that slow the computer down and increase security risks. How about you? Are you also dealing with the 0x80070043 error? Listed below are some possible solutions that may help you resolve the issue.
Related: How to fix Installation Error 0xC1900101 in Windows 11/10
Why does Windows Error Code 0x80070043 occur?
Many users who have managed to resolve the problem have recommended different repair strategies. Listed below are a few potential culprits that are likely to be involved:
- This type of problem is usually triggered when a policy essential for SMB file transfers is disabled. In such a case, you need to enable the Network startup Local policy in the Local Group Policy Editor to fix the issue.
- Some users have reported experiencing this issue because of a condition error. For this problem to be resolved, start the computer in safe mode and remove the contents of the Temp folder.
- Corrupted system files could also cause this error. Sometimes, this error may occur since your operating system is unable to keep track of the correct locations of the files you’d like to open. If this happens, you should run tools like System File Checker and DISM to fix this problem.
- Another possibility is that an application or service that has recently been enabled is interfering with InstallShield. When this happens, the System Restore tool can be used to fix the problem.
- If SFC and DISM are unable to resolve the problem, then a fresh install or repair install of every OS component is the only way to solve the problem.
How to Fix Error Code 0x80070043 in Windows 11/10
Here is how to fix Error Code 0x80070043 in Windows 11/10 –
- Enable the Network Startup Local policy
- Delete the Temp folder in Safe Mode
- Use System File Checker
- Run DISM scan
- Use the System Restore Utility
1] Enable the Network Startup Local policy
It might be that the “Network Startup Local Policy” is preventing SMB file transfers. Some Windows users reported that their issue was finally resolved after enabling a policy in the Local Group Policy Editor. This is how you can resolve it:
- Right-click on the Start button and select the Run option.
- In the Run dialog box, type “gpedit.msc” and press Enter. The Local Group Policy Editor policy will then
- launch.
- If the UAC popup appears, click Yes to grant administrative privileges.
- Once you open the Local Group Policy Editor, select Local Computer Policy > Computer Configuration > Administrative Templates from the left-hand side.
- Go to the right-hand side and click on System, then select Logon from the available options.
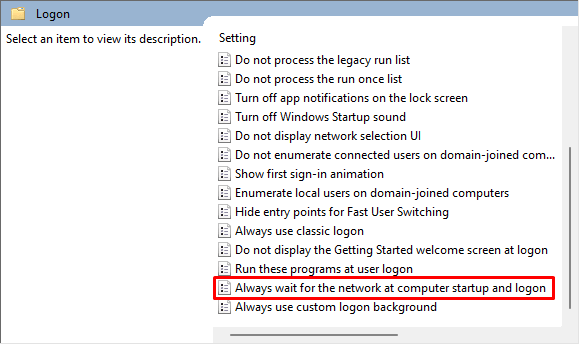
- Now double-click on “Always wait for the network at computer startup and logon“.
- On the next screen, select Enabled and click Apply to save the changes.
- Once the change is applied, restart your computer.
Now follow the steps you previously took to cause the error code 0x80070043. You can move on to the next method if the problem persists.
2] Delete the Temp folder in Safe Mode
Sometimes a condition error may also cause the 0x80070043 error. When you start your computer in safe mode, clear out the condition error by deleting the contents of the %temp% folder.
After following the instructions below, several users reported that they no longer see the 0x80070043 error. This is how to do it:
- Shut down your computer, then restart it. Now, wait until you see the initial login screen.
- At the bottom-right corner, click the Power icon.
- On the context menu that appears, hold down the Shift key when triggering Restart.
- The next time your computer restarts, it will open the Troubleshoot menu. Click on Troubleshoot from there.
- Select Startup Settings from the list of options in the Advanced Options menu.
- To boot in Safe Mode with Networking, press F5 in the Startup Settings menu.
- After the next startup procedure is complete, a slightly different login screen will appear. If you have a Windows password, enter it to complete the startup process.
- When the boot sequence has completed, open the Run dialog box using the Windows+R keys.
- Now type %temp% in the text box and press Enter to open up the Temp folder.
- On the next screen, press the Ctrl+A keys to select all files and press the Delete keys to remove them from the Temp folder.
- When you’ve cleared the Temp folder, restart your computer and check whether the issue is resolved at the next start-up.
In the case that the problem persists, scroll down to the next solution.
3] Use System File Checker
This problem can also be caused by some form of system file corruption. Here, it seems that the operating system is no longer able to keep track of the correct locations of the files and that’s why it causes the error.
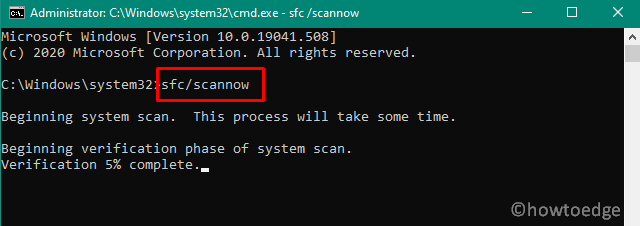
- Run Command Prompt as an administrator.
- Type the following command on the next page –
sfc /scannow
Note: Do not interrupt this scan once you have started it. This could result in additional logical errors resulting in more error messages.
- Now press the Enter key to scan the system files
- After the process is completed, close the running window.
- Start your computer again and check if the problem is resolved.
4] Run DISM scan
The Deployment Image Servicing and Management (DISM) tool can be used to resolve various problems associated with the Windows operating system. Here you can use this tool to fix Error Code 0x80070043 by repairing damaged Windows images files, including Windows Setup. To do so, follow these steps –

- Press the Windows+R keys to open the Run dialog box.
- Then type cmd and press the Ctrl+Shift+Enter keys.
- Click on the Yes button if UAC prompts on the screen.
- Type the following URL in the elevated Command Prompt and press Enter –
DISM.exe /Online /Cleanup-image /Restorehealth
- It will take some time, so be patient and wait for it.
5] Use the System Restore Utility
The error may have been caused by a recent change in your system that resulted in your OS being unable to open the InstallShield executable. If this is the case, you should try to fix this issue by using the system restore utility to restore your computer to an earlier time when it was functioning properly.
To use the System Restore, use the below steps –
- Right-click on Start and select the Run option.
- Type rstrui in the Run dialog box and press Enter to open up the System Restore menu.
- On the following page, click the Next button.
- Select the Show more report points checkbox.
- Now look at the date of each saved restore point and choose one that’s older than when you noticed the issue beginning to occur.
- Once your setup is complete, click on Finish.
When you start this process, your computer will restart and restore its previous state. Restart the computer and see if the error has been resolved.
That’s it.