Error iastora.sys is a blue screen of death error and it primarily occurs when you install a new feature update on your computer. After it appears, you will find it difficult to update your existing apps, install new updates, or sometimes even a blue screen. At times, you may receive an error message that reads – DRIVER_IRQL_NOT_LESS_OR_EQUAL (iaStorA.sys) or SYSTEM_SERVICE_EXCEPTION (iaStorA.sys).
In this quick guide, we will discuss what possibly could have triggered this issue and nine possible solutions to this BSOD error.

What causes this iaStorA.sys Error in Windows 11/10?
This error normally appears when the Intel IRST or IDE ATA/ATAPI drivers are not working or have become obsolete on your PC. In addition to these, recent third-party app installation(s), and missing/damaged system files may also result in this error code.
In order to overcome this issue, you may update all your device drivers, uninstall the problematic software, or update. Make sure to run the SFC command to repair missing and corrupted system files on your PC. If none of these fixes help and you do have a system restore point, you may revert your device back to an earlier working point. In case you haven’t created any restore point, all you can do is perform a clean installation of Windows 11/10 on your computer.
- Remove the IRST drivers
- Update the Intel Rapid Storage Technology Driver
- Uninstall buggy applications
- Disable the background Running Services
- Delete Windows.old folder
- Run sfc/scannow command
- Use System Restore Point
- Clean Install Windows 10
Update Fail BSOD error iaStorA.sys Solutions
Here are the stepwise workarounds to resolve this blue screen error iastora.sys on Windows 11/10 PC –
If you don’t receive the login screen, it becomes really difficult to attempt the below-troubleshooting guides. Boot into your device under Safe Mode and then apply the below fixes in the same order as discussed below.
1] Remove the IRST drivers
In case, this BSOD error iastora.sys is frequently appearing and thus can’t update the Windows, the IRST driver may be the possible reason. It is thereby recommended to uninstall the related IRST drivers to solve this error. Here’s how to apply this fix –
- Right-click on the Windows icon and choose Run.
- Type devmgmt.msc then tap OK to launch Device Manager.
- Henceforth, expand IDE ATA/ATAPI controllers section by clicking on the “>” sign.
- Right-click next on each driver separately and select the Uninstall device option from the context menu.

- Repeat this process systematically until each driver under IDE is removed.
Note: There is no need to re-install the IDE ATA/ATAPI controllers again. This is because they will auto-install themselves during the next Windows 10 update.
- Once you have successfully uninstalled all the ATA/ATAPI controllers, Restart your system to save the changes made so far.
2] Update the Intel Rapid Storage Technology (IRST) drivers
If you still are getting the BSOD error iastora.sys, there may be corrupt or outdated IRST drivers. All you require is to then update this with the latest version. Here are the steps-
- Click on the Search icon and type Device Manager in the text box, and hit the well-matched option.
- Next, locate and right-click on the Intel Rapid Storage Technology (Intel RST) driver from the list.
- Again, select the Update driver option using the context menu.
- Now, press the “Search automatically for updated driver software“ button and let it download the latest version.
- Once the task is over, Reboot your PC and try updating your Windows.
3] Uninstall buggy applications
Sometimes faulty software like third-party anti-virus, or lately installed apps may also cause this error iastora.sys on your PC. If that’s the case, try uninstalling the external apps one by one and find the culprit program. I hope doing this resolves the blue screen error on your computer.
- Press Win and I hotkey together to launch Settings.
- Here, select Apps thereafter Apps & Features from the left pane.
- Switch to the corresponding right pane, scroll downward, and select the lately installed app.
- Thereupon, hit the Uninstall button followed by Uninstall again to confirm the changes.

- Once you remove the app successfully, Restart your system normally.
4] Disable the background running Services
The services running in the background may also at times cause this BSOD error iastora.sys on your PC. If that’s the case, you better disable all such services from running in the background. Here’s how to perform this task –
- Press Win & R hotkey together to launch the Run dialog.
- Type msconfig in the text area henceforth hit the OK button.
- When the System Configuration window appears, hit the Services tab.
- Move to the lower pane and mark the Hide all Microsoft Services checkbox.
- Here, click on the Disable all button then OK to confirm the changes.

- Now go back to the System and update your Windows 10 PC.
- Once you perform the above steps, reboot your system and re-enable all the services using the above process.
5] Delete Windows.old folder
After Upgrading the OS, a new folder “Windows.old” appears by default in the root directory. This keeps the record of the previous OS files. This may arise some bugs like BSOD error iastora.sys on the Desktop. To solve this problem, you need to delete Windows.old folder by following these steps –
- Right-click on the Windows icon and select Run from the Power menu.
- When the dialog appears, type cmd in the text area and simultaneously hit Ctrl+Shift and Enter key.

- The Command Prompt will then launch having administrative privileges.
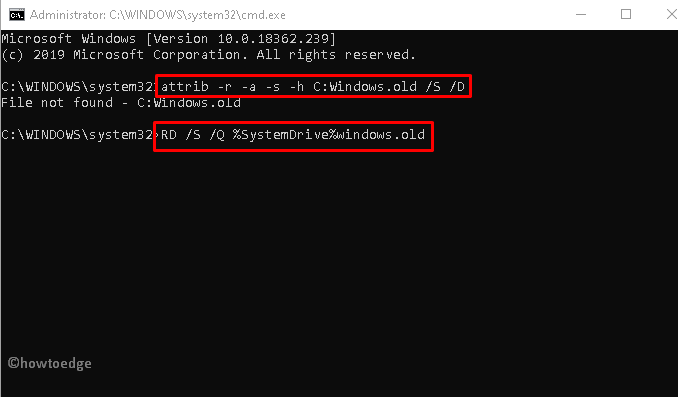
- Next, execute the following codes. Make sure to hit the Enter key at the end of each code.
attrib -r -a -s -h C:Windows.old /S /D
RD /S /Q %SystemDrive%windows.old
- After you finish the above steps, Restart your system to save the changes made so far.
6] Run SFC Utility
The System File Checker is another utility command of Windows 10 to fix various core file issues. This code identifies the corrupt system files and repairs the same. Here’s how to proceed-
- Launch the Start Menu then type Command Prompt.
- When the matching result appears, right-click on it and choose Run as administrator.
- If UAC prompts, tap Yes.
- Type sfc /scannow near the blinking cursor and then press the Enter key.

- This is a time-consuming process, so wait accordingly.
- Make sure to restart your PC once the above process completes.
7] Use System Restore Point
If you continue receiving the BSOD error iastora.sys interruption, you should better use the backup image of system files. This solution is applicable only when you have previously created a System Restore Point. Here are the steps to follow-
- Click on the Search icon and type System Restore Point. Double-click on the matching result.
- Under the System Protection window, select the System Restore button afterward Next on the succeeding page.

- Further, select the recently created Restore Point from the list. See the Snapshot below-
- Now click on Scan for affected programs to detect any faults in this file, followed by Next.

- Moving ahead tap Finish to confirm the changes.
- At last, Restart your system.
Most probably, you won’t see this interrupting BSOD error iastora.sys on your Windows Machine.
8] Clean install Windows 10
Even after applying all the above fixes, if the BSOD error iastora.sys still persists, you must install the latest feature update on your computer. To perform this task, you must download the Media Creation Tool or update Windows via the Installation Agent.
If you don’t have the Windows Setup file, follow these steps to get one –
- Open Microsoft Windows 10 download page.
- When the window appears, click on the Download tool now button to save the setup file.

- After you download the setup file, double-click on the same to start the installation. Next, check the “I Agree” option to accept Microsoft’s terms and conditions.
- Subsequently, enable the checkbox against Create Installation Media (USB flash drive, DVD, or ISO file) for another PC then Next to proceed.
- Now select your preferred language, architect, and edition. Henceforth, deactivate Use the recommended option for this PC option followed by the Next button.

- Succeeding that choose the USB flash drive radio button then Next again.
- At last, click on the Finish button to complete the process. Once over, Reboot your PC.
What is Error iaStorA.sys?
IaStorA.sys is basically a driver file and is found under the C:\Windows\System32\drivers folder. This driver works in line with Intel Rapid Storage Technology and allows communication between your PC and hardware or other connected devices.
What does Intel Rapid Storage technology do?
Intel Rapid Storage Technology is a Windows-based application and it runs to improve the overall performance and reliability of your Windows PC. This technology is in general equipped with SATA disks for desktop, mobile, or other server platforms.