If you are facing Windows Update Error Code 0x80090017 on your system and want a quick solution then this article might help you to do so. Well, here we are going to discuss all possible causes and solutions to fix error code 0x80090017. So first of all, we need to understand what this error code is and how it appears.
Every time when users try to update their Windows OS, they encounter an error code that prevents them from downloading and installing the latest updates on their PCs. In this post, we have compiled different solutions and that may help you fix them. Go through this article to find out how you can find a way around it.

Windows Update Error Code 0x80090017
To fix Windows 10 Update Error Code 0x80090017, try the following workarounds –
1] Run Windows Update troubleshooter
The Windows troubleshooter is an inbuilt application in Windows. You can use this tool to identify and fix Windows Update-related problems automatically. Here’s how to do it –

- Press the Windows button on your keyboard and select Settings.
- Click Update & Security > Troubleshoot.
- On the right side, you will see the Additional Troubleshooters link, click on it.
- Select Windows Update and then click Run the troubleshooter to detect the problem automatically.
- Then restart your computer and see whether the error 0x80090017 is fixed or not.
2] Reset Windows Update Components
At the Microsoft Community forums, many users reported that after resetting Windows Update Components, they got able to fix this issue. If you don’t know how to do this, use the following instructions –
- Open Command Prompt as an Administrator.
- Before you reset any component, ensure that all the update-related services are disabled on your PC. To do this, run the below codes one after another –
net stop bits
net stop wuauserv
net stop appidsvc
net stop cryptsvc
- Now, you have to rename the cache folders by running the below commands –
ren C:\Windows\SoftwareDistribution SoftwareDistribution.old
ren C:\Windows\System32\catroot2 Catroot2.old
- Then type the below commands and press Enter one by one –
regsvr32.exe wuaueng.dll
regsvr32.exe wuaueng1.dll
regsvr32.exe wucltui.dll
regsvr32.exe wups.dll
regsvr32.exe wups2.dll
regsvr32.exe wuweb.dll
regsvr32.exe qmgr.dll
regsvr32.exe atl.dll
regsvr32.exe urlmon.dll
regsvr32.exe mshtml.dll
regsvr32.exe shdocvw.dll
regsvr32.exe browseui.dll
regsvr32.exe jscript.dll
regsvr32.exe qmgrprxy.dll
regsvr32.exe wucltux.dll
regsvr32.exe muweb.dll
regsvr32.exe wuwebv.dll
regsvr32.exe vbscript.dll
regsvr32.exe scrrun.dll
regsvr32.exe msxml.dll
regsvr32.exe msxml3.dll
regsvr32.exe msxml6.dll
regsvr32.exe actxprxy.dll
regsvr32.exe softpub.dll
regsvr32.exe wintrust.dll
regsvr32.exe dssenh.dll
regsvr32.exe rsaenh.dll
regsvr32.exe gpkcsp.dll
regsvr32.exe sccbase.dll
regsvr32.exe slbcsp.dll
regsvr32.exe cryptdlg.dll
regsvr32.exe oleaut32.dll
regsvr32.exe ole32.dll
regsvr32.exe shell32.dll
regsvr32.exe initpki.dll
regsvr32.exe wuapi.dll
- Once you run the above commands, you need to make a network reset. To do so, type the below commands and press Enter –
netsh winsock reset
netsh winhttp reset
- Now you have to start all the services that you stopped earlier. Run the below commands to do this –
net start bits
net start wuauserv
net start appidsvc
net start cryptsvc
- Finally, restart your computer and the update error 0x80090017 should be resolved now.
3] Disable your antivirus temporarily
If the problem is still appearing, it is possible that the third-party antivirus running on your computer might be preventing you from installing the Windows Update. In this case, it is suggested to disable the antivirus entirely on your PC and see if it works. If the problem still persists, you need to uninstall the antivirus program. Here are the steps you can use –
- Press the Windows+X keys.
- Select Apps and Features from the menu list.
- Scroll down to the antivirus installed on your computer.
- Select the antivirus program and click the Uninstall button.
If uninstalling the antivirus program fixes the issue, you need to switch to a different third-party antivirus.
4] Install the updates manually
The next solution is to download and install Windows 10 Updates manually and see if it helps.
5] Perform System File Checker
If the above solutions don’t work for you, chances are your system files are corrupted. In that case, you can run the SFC scan utility to fix the corrupted system files and replace them with the corrected version. Here are the steps you can use –
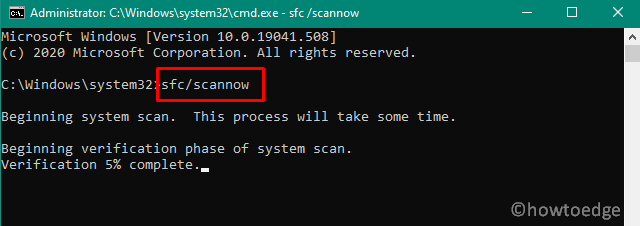
- Click on Start and type cmd.
- Right-click on the top of the list and select Run as administrator.
- Click the Yes button if UAC prompts on the screen.
- On the next screen, type the command given below –
sfc /scannow
- Press enter and let the scanning procedure complete.
6] Run the CHKDSK scan
This solution requires you to run the CHKDSK utility and ensure that the drive portions do have not any bad sectors. To do this, use the following steps –
- Right-click on Start and select Command Prompt (Admin) from the menu list.
- Copy/paste the below command and press Enter –
chkdsk C: /f /r /x
- If your system asks you to schedule the scan during a PC reboot, type “Y” and press Enter again.
- After running the above commands, close the running windows and restart your computer.
- Wait for a while until the task gets completed. Normally it takes 15-20 minutes to complete the process.
- Once this is over, check if it solves the error code.
7] Perform a Clean boot
If nothing works you can try performing a clean boot and see if it helps. Before that, make sure to sign in as an administrator to access the settings directly.
- Click on Start, type System Configuration and press Enter.
- Inside the application, go to the General tab, and select the Selective Startup checkbox.
- Uncheck the Load startup items option, and leave checked the remaining options as they are.
- Now move to the Services tab.
- Go to the bottom left corner, and select the Hide all Microsoft services checkbox.

- Then click the “Disable all” button.
- Click Apply and then OK to confirm the recent changes on your Windows PC.
After performing the above steps, restart your system and check if it solves the problem. If you find it working, the next step is to repeat the above steps and turn on the Services one by one. This way you will find the application that was causing the problem here.
Frequently Asked Questions
1. Why do Windows Updates fail?
If you’re running into an error code during a Windows Update, it could be due to outdated drivers, corrupted files, or incompatible settings. Also, make sure your computer is using the most recent security patches as that can contribute to this issue too! To get back on track with Windows Updates and avoid any further disruption take the time now to review these potential causes and rectify them accordingly.
2. Can Windows updates cause problems?
If Windows updates are not correctly installed or configured, it can become a major source of issues. Therefore, it is essential to ensure all updates are properly applied and the computer is utilizing the correct version of Windows. Furthermore, any third-party security software or antiviruses mustn’t interfere with these system improvements for them to function optimally; therefore double-check that no such interference exists.