If you want to uninstall the VLC Media player from your Windows PC for any reason, follow this tutorial till the end. At first, we will discuss the simpler methods like uninstalling it via Settings or Control Panel. If they both fail, go for the advanced tricks like – running its uninstaller, modifying the registry, or deleting it using Windows PowerShell.

Why should I remove the VLC media player from Windows?
VLC is one of the greatest media streaming as well as normal movies watching apps all over the world. However, with some latest issues encountered on its webpage, people are concerned about their privacy. As a result, many people are willing to uninstall VLC successfully from their systems.
Many users want to get rid of this app the moment they get a good alternative to this. A slightly complicated interface (when compared to other similar apps), audio issues, and a few other bugs may also force users to think of uninstalling VLC from their devices.
Ways to uninstall VLC Media Player on Windows PC
Uninstalling any application on Windows PC is a very straightforward task. This can easily be done using the Settings app. However, if are facing difficulty uninstalling a particular app (in this case, VLC) for some reason, there are other ways as well. Let’s start with the simplest of all them and that is using the Local Settings window.
1] Via Windows Settings
To uninstall VLC Media Player from Windows 11/10 PC, follow these easy steps –
- Press Win + I to launch the Settings app.
- Go to Apps > Apps & Features.
- Scroll down and locate VLC Media Player under the App list. You may search for it on the Search bar as well.
- After you locate this app, click the three dots available on its right end and select Uninstall.

- A pop-up window will appear next. Click Uninstall again to confirm deleting this app from your computer.
- After the uninstallation completes, restart your PC so that any leftover or residual files of VLC delete as well.
2] Using Control Panel
Control Panel is still supported by the latest versions of Windows 11, so users may also uninstall VLC Media Player from here. Here’s how to perform this task –
- Press Win + S and type “Control Panel” on it.
- When a matching result pops up, click on it.
- Click “Uninstall a program” under Programs.
- Now, look for the VLC media player, and when found, right-click on it.
- Click Uninstall/Change and thereafter Yes when the User Account Control window prompts.
- On the VLC media player uninstall window, click Next.
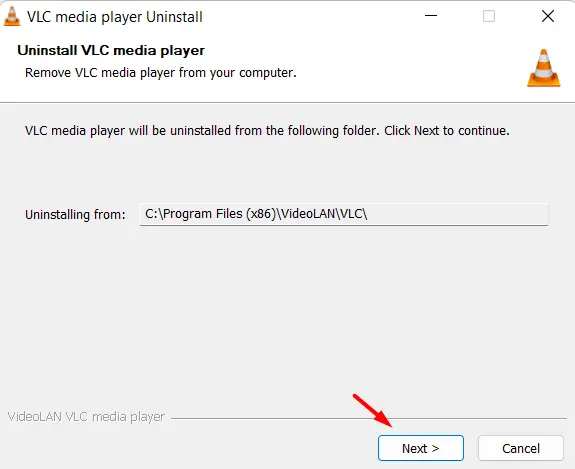
- Going ahead, tick the box “Delete preferences and cache” and hit uninstall again.

- Wait for the uninstallation to complete and when VLC is uninstalled successfully, restart your PC.
3] Use the VLC Uninstaller
When you install a new application on Windows PC, the app creates its own uninstall.exe file inside the root directory where it is being saved. So, if you aren’t able to uninstall the VLC media player using either Settings or Control Panel, you may run this uninstaller. You may easily locate this file by navigating to the below path on File Explorer (Win + E) –
C:\Program Files (x86)\VideoLAN\VLC
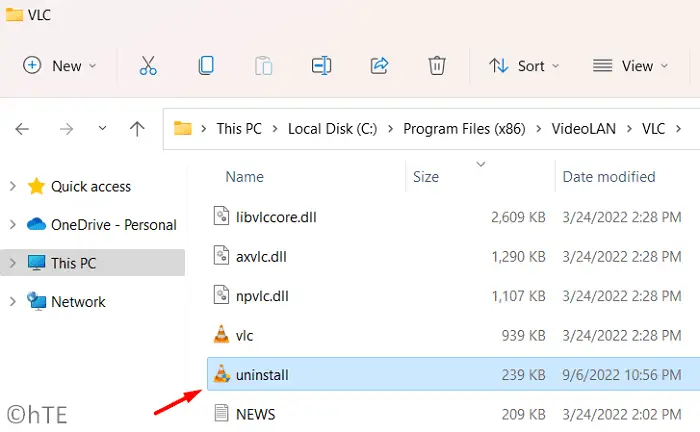
When you reach out to this folder, double-click on uninstall.exe and wait for a while. A prompt will appear next asking for administrator access. Click Yes to authorize uninstalling VLC from your system. On the VLC media player uninstall window, click Next and then tick the box “Delete preferences and cache”. Finally, click the Uninstall button.
The VLC uninstallation should begin soon afterward. In case this method fails as well, follow the last workaround using PowerShell.
4] Uninstall VLC using PowerShell
The VLC media player must have been uninstalled by now. However, if it isn’t the case for some internal reasons, you may use PowerShell to attain this task. Here’s how to uninstall VLC by running a single-line command on PowerShell.
- Press Win + X, and select Windows Terminal (Admin).
- The User Account Control window will launch next. Hit Yes to authorize opening it as administrator.
- When the terminal launches, copy/paste the below command, and hit Enter.
Get-Package -Name "VLC Media Player*" | Uninstall-Package
- Let this command run successfully. Once it is over, you may restart your PC. The VLC media player is all gone from your device.
5] Modify the VLC Uninstall string on the registry
For each and every application you install on Windows, the system generates its corresponding entries inside the registry. So, there’s a way to uninstall the VLC media player by modifying the Uninstall string on the registry as well. Here’s how to perform this task –
- Press Win + R to launch the Run dialog.
- Type “
regedit” and hit OK. - When the UAC window appears, hit Yes.
- Let the registry opens up and when it does, browse to the below path inside it –
Computer\HKEY_LOCAL_MACHINE\SOFTWARE\Microsoft\Windows\CurrentVersion\Uninstall\VLC media player
- Head over to its right pane and double-click on the DWORD entry – “
UninstallString“. - Copy the data available inside the Value data field.
Afterward, search for CMD inside the Search field (Win + S). Right-click on Command Prompt and select the option – Run as administrator.
- On the elevated console, paste the copied value and hit Enter.
- The UAC window should appear next. Click Yes to authorize removing VLC from your system completely.
That’s it, I hope you were able to successfully uninstall VLC from your Windows PC. Let’s know in the comment section if you face any difficulty following this guide.

