In this post, we will briefly discuss Browsing history vs data, the right ways to prevent Chrome or Edge from saving browsing history, and why that’s important. If you have concerns about your privacy, you should make this happen. One may use either Group Policy or Registry Editor to incorporate this new setting.
Note: In case you don’t want to activate this feature, you may also safeguard your privacy by browsing into the Incognito or Private mode.

Browsing History vs Data
To make your browsing experience more convenient, all browsers keep a track of your online activity. This includes browsing history, logging date & time, or some other data.
The browser history maintains a record of all the sites that you had ever visited in the past. However, browsing data means containing information like cache, cookies, passwords, etc. along with the browsing history.
Prevent Chrome from Saving Browsing History or Data
Google does not gather any account information or other personally-identifying information. It does, however, store log information, such as an IP address or some other cookies. Each website you visit is checked against your system’s Safe Browsing list.
If you don’t want Google Chrome recording all your browsing history, you may turn off this feature by following either of the below two methods –
1] Using Group policy
The best way to turn off browsing history or data on Google Chrome is by disabling the related policy on Group Policy. This policy governs the user experience when they sign in to their computer and use the Chrome browser.
Note: As GPE is not available on Windows 10 Home editions, such users may skip this way and apply the next method.
To prevent browser history and data from being saved on Google Chrome via group policy, follow these steps –
- Click the search button on the taskbar and type “
gpedit.msc“. - Click the top result and navigate to the path below –
Administrative Templates > Google > Google Chrome
- Double-click on this policy next – “Disable saving browser history “.
- When it expands, enable the “Enabled” radio button and hit OK.
- Restart your PC so that changes made come into effect from the next logon.
Note: If you want Chrom storing the browser history or data, follow the same steps as outlined above. However, this time tick the radio button – “Not configured” instead of “Enabled.”
Read Also: How to Reset all Local Group Policy settings on Windows 10
2] By tweaking Registry
The registry is a hierarchical database that includes all data essential for the operation of Windows, installed apps, and running services on it. Windows 10 Home Edition users may use this method to disable browsing history for Google Chrome.
Follow these steps to prevent browsing history and data from being saved on Chrome using the Registry –
- Press Win + R to start Run.
- Type “
regedit” and hit “OK”. The UAC prompt will come into the view next, hit Yes to authorize access. - Now, browse to the following path –
HKEY_LOCAL_MACHINE\SOFTWARE\Policies
- Make a right-click on “Policies”, select New > Key, and rename this one to Google.
- Right-click again on the newly created/renamed Key i.e. “Google” and proceed as follows – New > Key.
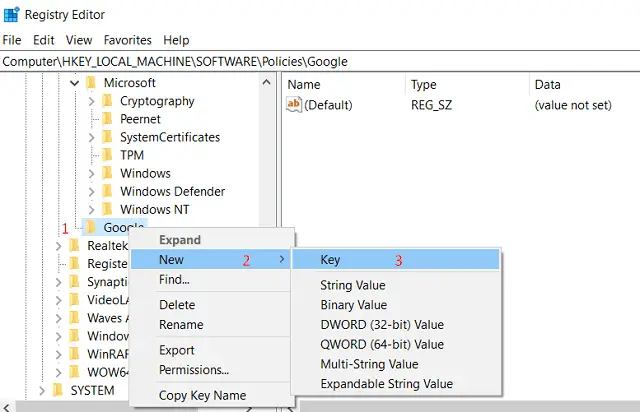
- When a new key is created, rename this one to “Chrome”.
- Right-click anywhere inside the Chrome directory, and proceed as follows – New > DWORD (32-bit) Value.

- Rename this registry entry as “SavingBrowserHistoryDisabled“.

- When created, double-click on it to open its properties window.
- Change its Value data to “1” from “0”.
- Click OK and reboot your PC.
Tip: If you ever want to reverse this process, re-visit the “SavingBrowserHistoryDisabled” entry, double-click on it, and change its Value data field to “0”.
Alternatively, you may also do the following –
- Right-click on SavingBrowserHistoryDisabled and then select the “delete” option on the context menu.
- If any confirmation window appears, hit Yes.
- After making the necessary changes, do restart your PC.
Prevent Edge from Storing Browsing History or Data
Microsoft Edge, just like Chrome, stores all your browsing history, data, and other crucial information. If you don’t want this browser to save all your important file information, do the following –
1] Via Group policy
This method is applicable to all editions of Windows except the Home edition. If you are currently using the Home edition, you better try the registry method. Let’s see what you need to do to configure the Group Policy –
- Press Win + R to launch the Run dialog.
- Type “
gpedit.msc” and press Enter to launch the Local Group Policy Editor. - Now, reach out to the below path –
Computer Configuration > Administrative Templates > Microsoft Edge
- Locate “Disable saving browser history setting” on the right pane. When found, double-click on it.
- Select the “Enabled” radio button from the available list of options.
- Click “OK” to save the changes and restart your computer.
Tip: If you ever want to re-allow saving browsing history or data on Microsoft Edge, just undo the above steps. In short, re-visit the above path, open “Disable saving browser history setting”, and check the “Not configured” option.
2] Using Registry
All Windows edition users (including Home edition users) may tweak the registry settings to prevent Edge from storing browsing data. Here’s how you may perform this task –
- Press Win + S, type “
regedit“, and click on the well-matched result. - The UAC window will appear next, hit the Yes button.
- Now, navigate to the following path –
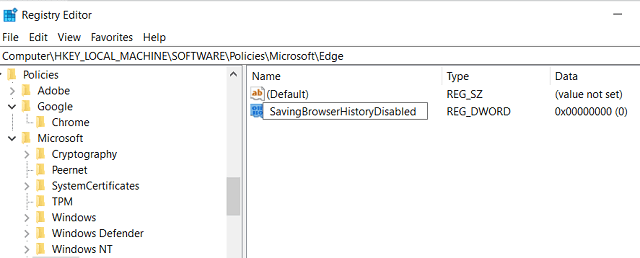
HKEY_LOCAL_MACHINE\SOFTWARE\Policies\Microsoft
- If there is no Microsoft folder inside the Policies, right-click on it, and choose New > Key. Rename the newly created entry as “Microsoft“.
- Right-click again on it and choose New > Key. This time, rename it to “Edge”.
- Right-click anywhere inside the Edge folder, and select New > DWORD (32-bit) Value.

- Rename it as SavingBrowserHistoryDisabled.
- Double-click on SavingBrowserHistoryDisabled and change its Value data field to “1”.
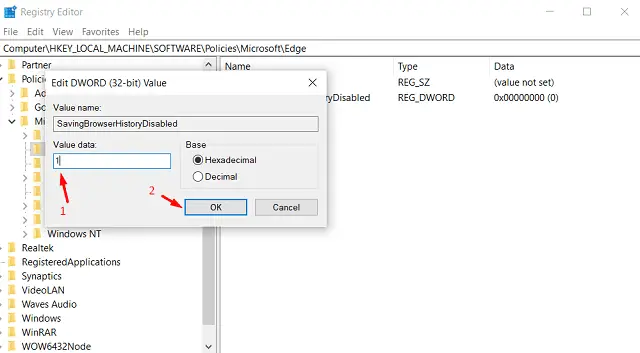
Click OK and restart your PC so that changes made become effective.
Note: If you ever want Microsoft Edge to save browser data or history, change its Value data field back to “0”.
I hope by now you do know how to prevent Chrome or Edge from Saving Browsing History on Windows 11/10 PC.
Is it necessary to clean your browser’s history and data regularly?
You use your default browser every day to surf online for purposes like – social media apps, news, entertainment, etc. The moment you exit the aforementioned websites, your browser saves a tiny information so as to smooth its opening whenever you visit those sites again.
It’s usually a good idea to clear all your cache, cookies, or browser history, on a regular basis. You may set your browser to forget the stored info when you exit them. However, preventing them from saving browsing history or data seems more okay. This way, your privacy will be more secure.
It has one con though and that is the browse will forget all usernames and passwords as well. Understand what you will be missing and if seems okay, then only enact accordingly.


