Starting with the latest Windows 10 build version, Microsoft hides the direct access of the Hardware and device troubleshooter to its users. This tool actually eases out the commonly occurring hardware issues in the Windows operating system.
Since the company hasn’t completely written off this utility program, one can still access this tool by tweaking Windows settings. In this guide, we will look into two different ways that can help to locate and run the Hardware and Devices Troubleshooter.

The first two methods are entirely the same, with a few steps here and there due to interface changes on Windows 11 and 10 PCs. This is no other than the Windows Settings.
One may use its UI to perform a separate troubleshooting of different hardware, net connectivity, playback, Bluetooth, etc. In case you can’t find a particular hardware setting using this, try the Command Prompt way. Let’s explore both these methods in detail –
See this – How to use Recommended Troubleshooting on Windows 10
Ways to Run Hardware and Devices Troubleshooter
To Run Hardware and Devices Troubleshooter on Windows 11/10, try either of the following methods –
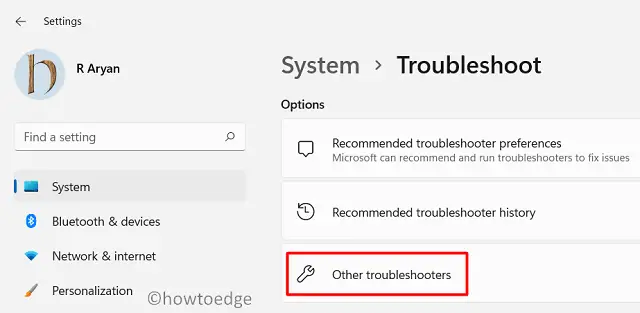
1] Using Windows 11 Settings
The settings user interface on Windows 11 is completely different from what we were having on Windows 10. This is why we have included a separate topic on how to run hardware and device troubleshooters in Windows 11.
To enable this setting, follow these steps –
- Press Win + I to launch the Settings app.
- Go to System > Troubleshoot.
- Hit Other troubleshooters on the subsequent page.
- Here, you will find two separate sections i.e. “Most frequent” and “Other“.
- See what they offer to troubleshoot. In case you find the one that you were looking for, hit the Run option.

- When the troubleshooting window launches, hit Next.
- This tool will run immediately afterward checking what exactly occurred with the selected hardware.
- In case it does find any issue that is solvable, it will try fixing that for you. However, if the solution requires you to intervene, there appears a prompt telling you what to do next.
- Do as this tool says. Once this is over, restart your PC.
I hope you are able to fix the hardware problem on your computer by following this section alone. In case you are still facing hardware problems, go and check if you can fix it via CMD.
2] Using the Settings App (Windows 10)
Windows Settings does provide an easy way to run the Hardware and Device troubleshooter right on its interface. Here’s how to use this to diagnose issues related to Battery, SD card, Sound, and several others –
- Press the Windows Key using the Keyboard and hit the Gear icon.
- When the Settings UI comes into view, select Update & Security thereafter Troubleshoot.
- Moving ahead click Additional troubleshooters on the right pane.
- On the next screen, scroll down and you will find the section – “Find and fix other problems“.
- Here, you can view all the connected hardware and devices to your computer.
- Select the one that is causing trouble on your PC, and hit the button – Run the troubleshooter.

- When the troubleshooting window launches, hit Next.
- This tool will run immediately afterward checking what exactly occurred with the selected hardware.
- In case it does find any issue that is solvable, it will try fixing that for you. However, if the solution requires you to intervene, there appears a prompt telling you what to do next.
- Do as this tool says. Once this is over, restart your PC.
3] Via Command Prompt
If you can’t find the above tool on your device, you may perform this task using the Windows Console as well. Here’s how to proceed –
Recent – How to auto-run Windows 10 Troubleshooter
- Start Run (Win+R), type cmd, and hit the Ctrl + Shift + Enter keys combination.
- When the UAC window appears, tap Yes. This will open up the Command Prompt.
- Now, copy/paste the below code and hit Enter –
msdt.exe -id DeviceDiagnostic
- This will auto-begin the Hardware and Devices Troubleshooter page, click Next to go ahead.

- The detecting process starts immediately afterward, wait for this to finish scanning.
- Usually, this finds the faulty device and repairs the same (if possible).
- If this doesn’t report back any issue, hit Close the troubleshooter to come out of its interface.

- Do reboot your PC when the troubleshooting is completed.
Sign back into your device and check if the hardware issues are resolved by now.


