Many users have recently reported experiencing the error 0x8024402c when trying to update their operating systems. You may also encounter this problem when you are trying to download software from the Microsoft Store. In this post, we will see the problems and their causes, as well as solutions to fix them.
Please follow the sections below, based on when you are experiencing this error code:
- Error Code 0x8024402c while updating Windows 10
- Error 0x8024402c while opening or installing Store apps
- Solve Windows Defender Error 8024402c
Windows 10 Update Error 0x8024402c Solutions
Here are some workarounds that may help fix the 0x8024402c update error in Windows 10 –
1. Disable Windows Firewall
To download the files you need for an update, your PC must connect to Microsoft’s servers. However, in some cases, Windows Defender may block this access and result in update-related problems. The solution to such issues is to disable the Windows Firewall. Here’s how you do it –
- Open the Control Panel.
- Locate “View by” on the top-right corner and select Large icons by pulling down the drop-down menu.
- Click Windows Defender Firewall.
- Select “Turn Windows Defender Firewall on or off” on the left pane.
- Tick the checkbox – Turn off Windows Defender Firewall (not recommended) under both Private and Public Network Settings.

- In the end, hit Apply then OK to confirm the above changes.
Reboot your computer and check if you can now update Windows without getting into trouble like 0x8024402c. If not, follow the next set of solutions.
2. Troubleshoot Windows Update
As we’ve already mentioned in a few articles, troubleshooters are powerful tools for resolving many types of errors. As of now, Microsoft provides a specific Windows Update Troubleshooter for managing update errors. You might be able to fix this issue with the help of this utility. Take a look at it and see if it can help you. Below are the steps you need to take –
- Navigate to the following location –
Windows Settings > Update & Security > Troubleshoot
- Head over to the right page and click Additional troubleshooters.
- Click to expand Windows Update and hit Run the troubleshooter.

- Now, follow the on-screen instructions to resolve the 0x8024402c error.
- If this troubleshooter provides an “Apply this fix” option, click on it.
3. Download and Install the Latest .NET Framework Update
.Net Framework should remain updated in order to avoid any type of network issues on Windows 10. In case you haven’t updated this network for a long time, we recommend upgrading the same. There’s an easy way to download and install the latest framework update from the Microsoft Update Catalog.
- Visit the official website and search for the “.NET Framework” for the respective Windows 10 version.
- Afterward, click once on the Last Updated column to get the latest update.
- Pick the system architecture that you are having on your device, and hit the Download button.

- On the next screen, hit the top link to start downloading the recent .NET Framework.
- After the download completes, open the folder containing this file, and double-click the setup.
4. Reset Proxy Settings to fix 0x8024402c
Many a time, an incorrect proxy may also result in different update-related issues on the computer. To resolve this, you must reset the Proxy using the below steps –
- Make a right-click on the Windows icon and select Run.
- When the Run window comes into view, type “cmd” and press Ctrl + Shift + Enter keys together.
- Doing so will invoke the Command Prompt with administrative rights.
- Next, execute the below codes one by one followed by the Enter key separately –
netsh
winhttp
reset proxy
- Now that you have reset the Proxy settings, go back to Settings > Update & Security > Windows Update, and hit the Check for updates button. The update process should work without any issues.
5. Modify the registry – UseWUServer
If you are still encountering the 0x8024402c error, you must modify a key DWORD entry i.e. UseWUServer.
Note: Make sure to create a system backup before following the below guideline –
- Press Win + S and type “registry” in the text field.
- Right-click on the top result and choose to
Run as Administrator. - Subsequently, reach out to the following location –
HKEY_LOCAL_MACHINE > SOFTWARE > Policies > Microsoft > Windows > WindowsUpdate > AU
- Jump to the right side and look for a key entry with the title “UseWUServer“. By default, this has a value of “1”. Change the value data field to “0” instead of “1”.
6. Reset Windows Update Components
If none of the above methods work to solve the 0x8024402c issue, try resetting Windows 10 update components using the following steps –
- Launch Command Prompt having right Admin rights.
- Stop the basic services related to Windows Update i.e. BITS, Cryptographic, and others. To do so, all you require is to execute the following commands –
net stop bits
net stop wuauserv
net stop cryptsvc
net stop appidsvc
- In order to reset all Windows 10 update components, you must run the below line. Running this code will clear all the junk files (not-in-use) from the system
Del “%ALLUSERSPROFILE%\Application Data\Microsoft\Network\Downloader\qmgr*.dat”
- Or, you may rename the update-related folders to something backup or old. Two such folders are – SoftwareDistribution and catroot2.
Ren %systemroot%\SoftwareDistribution SoftwareDistribution.bak
Ren %systemroot%\system32\catroot2 catroot2.bak
- Although you have cleared off all the update components, there is a possibility of the registry attaching to the old values. One may fix them by deleting all such entries. Open the Run command by pressing the WinKey + R. Type “
regedit” in the text bar and press OK. When the UAC window comes into the display, hit Yes. - Navigate to “
HKEY_LOCAL_MACHINE\COMPONENTS” and look for the following entries on the right pane. If you do find any one or all of them, right-click separately on each one of these, and choose to delete.
PendingXmlIdentifier
NextQueueEntryIndex
AdvancedInstallersNeedResolving
|
Note: If you don’t find the “Components” section under the HKEY_Local_Machine, you may skip deleting the above entries. You may add the Components folder to the registry by following the below steps –
|
- Since this issue is related to network connection, we suggest resetting Windows Store and Proxy as well.
netsh winsock reset
netsh winhttp reset proxy
- Now that you have updated all Windows 10 components, restart the services that you stopped earlier. Make sure to press the Enter key at the end of each command –
net start bits
net start wuauserv
net start cryptsvc
net start appidsvc
- Lastly, restart Windows to incorporate the above changes. I hope this time, you do succeed in solving the 0x8024402c issue on your computer.
Microsoft Store Error 0x8024402c Solutions
If you are getting this error while installing apps from the Microsoft Store, you may try out these suggestions –
1. Reset Microsoft Store
- Open the Search window by pressing Win + S keys altogether.
- Type “
wsreset” in the text field. - Right-click on the top result and hit Run as Administrator.
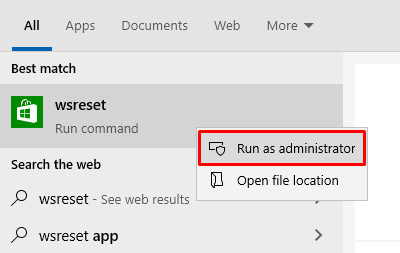
- This will start running the code “wsreset.exe” in the command prompt and may take a few seconds.
- Once over, Microsoft Store is reset on your computer, and the same launches on the display screen.
2. Reinstall Windows Store via PowerShell
If the above workaround doesn’t address this error 0x8024402c, you should reinstall the Store app. Reinstalling Microsoft Store isn’t possible using the normal ways as this is a system app. So, you need to launch PowerShell as an administrator and run a few codes on it. Here’s how to reinstall Store using Windows PowerShell.
How do I solve Windows Defender Error 8024402c?
If you are getting an error 8024402c while updating Windows Defender, check if any Windows updates are pending on your computer. For this, open Settings > Update & Security > Windows Update, and hit Check for updates.
In case there aren’t any updates available for your device, disable and re-enable Windows Defender. Now, try again to update Windows Defender.
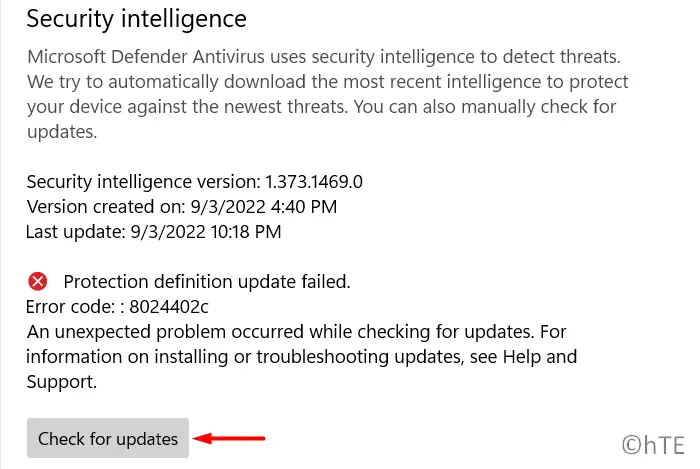
Note: Windows Defender also fails to update when you have set your PC as a metered connection. If that’s the case, you need to first remove this setting on your device. Press Win + I, and reach out to the below path –
Network & Internet > Wi-Fi > XYZ
Scroll down to Metered Connection and turn off its toggle switch. That’s it, I hope this guide helps to resolve the error code 0x8024402c on your Windows PC.


