Did you encounter an update error 0x800B0108 while installing pending updates on your computer? Well, you have come to the right place as here in this article we will discuss what possibly could have gone wrong and six working methods that can resolve this issue on your behalf. Without any further ado, let’s explore the reasons why this error occurs.
What causes this update error 0x800B0108 in Windows?
An update error 0x800B0108 mostly occurs when your system meets one or a combination of the following issues on your computer. They are –
- Certification Issues
- COM components Issues
- System Glitches
- You are using some third-party antivirus
- The presence of corrupt or broken files inside your computer
Windows Update Error 0x800B0108, Fixed
If you are struggling with an error code 0x800B0108 while updating Windows, we suggest following the below solutions one after another –
- Check and Resolve the Certificate Issues
- Fix Component Object Model (COM) components Issues
- Manually download and install Pending updates
- Troubleshoot Windows Update
- Uninstall or Disable Antivirus
- Run SFC and DISM Scans
Let’s explore these solutions in somewhat more detail –
1] Check and Resolve the Certificate Issues
As stated above, this update error 0x800B0108 mostly occurs on failing certificate issues. To overcome this error code, one must try installing the missing certificates manually. However, for that, you require the setup file of certmgr.msc.
Assuming you did have access to this file or have downloaded this file from a certified website, follow the below steps on how to install this certificate on Windows using Certificate Manager. Following this way one can install fresh certificates with the same or different keys. Alternatively, one can also use the import functions.
Here’s how to proceed ahead with this task –
- Press Windows + X, and select the Run option.
- Type
certmgr.mscon it and hit OK. - The system will now redirect you to the Certificates Manager window.
- Users have three different options to choose the certificates from and they are as follows –
Personal: for certificates related to your user account
Trusted Root Certification Authorities: for certificates issued by trusted root authorities
Intermediate Certification Authorities: for certificates issued by intermediate authorities
- After you have selected a certification method, go to Action > All Tasks, and select Import.

- When the Certificate Import Wizard opens up, click Next, and browse to the location where you have downloaded the certificate file.

- Select the certificate and then hit Open. Click Next again so that Certification Manager processes the file.
- In case your file is password-protected, you must enter your password to decrypt the file.
- Tick the checkbox that says “Mark this key as an exportable” and hit Next again.
- Select the certification method from where you would like to import the certificate and hit Next.
- In the end, click Complete to finish importing the certificate.
Now that you have imported the certificate, close all running windows and restart your computer. From the subsequent login, check if you can update Windows normally.
2] Fix Component Object Model (COM) components Issues
Windows 11/10 utilizes the Component Object Model (COM) components to provide an interface for software to interact with the hardware components. When this interaction fails, this might trigger an error code 0x800B0108 that prevents Windows Update from happening.
If that’s indeed the case, one may resolve this error by troubleshooting the COM issues on his/her computer with the help of the Component Services tool. Assuming you are yet receiving the same error code, you should resolve the COM components issues by following these easy steps –
- Open the Run dialog by pressing Win + R.
- Type “
comexp.msc” on it and hit OK. - The system will now launch the Component Services window on the display screen.
- Head over to the middle pane and double-click on Computers and then My Computer.
- Locate and select DCOM Config next. Choose the configuration which is most likely to cause an update error on your computer. Right-click next on the same configuration and select Properties.

- On its properties window, go to the Security tab, and click Edit under Launch and Activation Permissions.
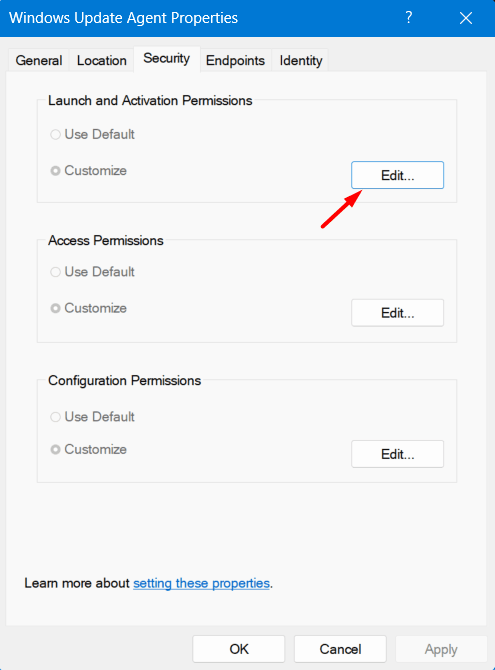
- Click the Add button and then type Local Service into the box under the Object name.
- Click Check Names next. Make sure to enter the object name correctly.
- Click OK to confirm the recent changes made over the COM components.
- Use the drop-down menu next to Launch and Activation Permissions and choose Local Service.
- Do check both the checkboxes starting with “Local” under Allow for Permissions for System. For example, tick the checkboxes next to Local Activation and Local Launch.
- Click OK to confirm all the recent changes, close all running windows, and restart your computer.
Sign back into your device again, and check whether you can update Windows normally without getting into an error 0x800B0108.
3] Manually download and install Pending updates
When an update is failing on some error code and you are bored of trying different solutions, you should manually download and install the relevant update. For this, you must know the failing update’s “KB number”, and search for the same in Microsoft’s Update catalog.
Once you see the standalone package of the failing update, locate the update matching your system architecture, and hit the Download button. Wait for the download to complete and when it is over, double-click on the downloaded “.msu” file format to install the pending update.
Here’s a complete guideline on how to download and install pending updates on Windows 11 or Windows 10. Following this way you may resolve the error code 0x800B0108, however, the same might re-occur when the next update is due on your Windows PC. So, go ahead and try the below suggestions as well.
4] Troubleshoot Windows Update
There’s an inbuilt tool on Windows that can diagnose and resolve update-related issues on your computer. Initiating this tool will check for the reasons preventing an update from happening on your computer and address them on its own. Now that you know what’s the role of troubleshooter in fixing Windows Update errors, let’s have a look at how to implement this fix on Windows 11/10 –
Windows 11:
- Open Settings by pressing Win + I and navigate to the below path –
System > Troubleshoot > Other troubleshooters
- Under “Most frequent”, locate Windows Update, and hit the Run button available on it.

- Click Next when the troubleshooter launches and follow the on-screen instructions.
Windows 10:
- Press Windows + I to launch Settings.
- Go to Update & Security > Troubleshoot next.
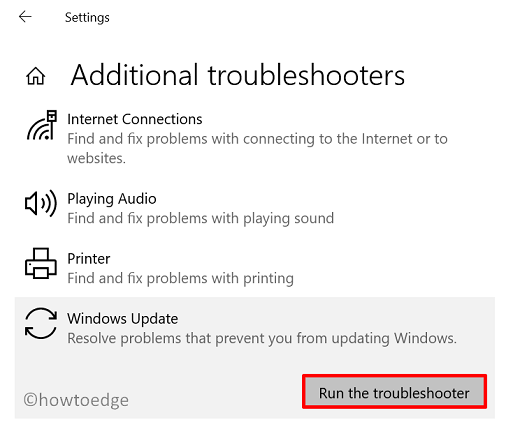
- Head over to the right pane and click to expand Additional Troubleshooters.
- Scroll a bit down, locate, and click to expand Windows Update.
- Click Run the troubleshooter to initiate the tool checking and repairing the corrupt files.
- After the troubleshooting completes, restart your PC so that the recent changes become effective from the next login.
I hope this tool alone resolves the issues that were preventing updates from occurring on Windows 11/10 PC. However, if not, follow the next set of solutions.
5] Uninstall or Disable Antivirus
The presence of a third-party antivirus program might also prevent Windows Update from happening normally. This is because of their constant interactions with the system files and folders. It is because of this interaction, the system files become corrupt and may at times trigger an error code 0x800B0108 when installing pending updates.
Uninstall or at least disable such an application and check if you can update Windows normally now. If the update process is now happening smoothly, the problem was with your security app itself. Windows Security is the perfect antivirus for the Windows ecosystem. So, you should rely more on this built-in application instead of running an external anti-malware (free app) on your Windows PC.
6] Run SFC and DISM Scans
As stated above, the presence of some third-party apps might corrupt the operating system, we suggest running SFC and DISM scans so that these tools repair such files on your computer. Here’s how to run both of these tools on Windows –
- Press Windows + X, and choose Terminal (Admin). Windows 10 users may select Windows PowerShell (Admin) instead.
- When the UAC window prompts, hit Yes to authorize opening the terminal.
- Copy/paste the following inside the terminal or PowerShell and press Enter –
sfc /scannow
- Wait for the SFC to complete the scanning/repairing process and when it is over, execute the below code on the same console –
DISM /Online /Cleanup-Image /RestoreHealth

- Unlike SFC, the DISM will check for system integrity and repair the corrupt files from your computer.
After this tool reaches 100% scanning as well and no issues are reported till now, close the terminal and restart your PC.