In this post, we will discuss what causes Backup failed Error 0x81000033 and what are the possible ways to address this issue on Windows 11/10 PC. If you are also facing trouble generating a system restore point because of this error code or 0x80780119, try out the solutions discussed in this guide.
Upon receiving this bug, you won’t be able to create a system image backup on your computer. This issue may throw an error message as well that reads the following –
"The backup failed, Error code 0x81000033"
By now, you must have become aware of what the error code 0x81000033 is. So, let’s learn what possibly cause this issue and how to resolve it on Windows 11 or 10 PC.
What causes Error 0x81000033 on Windows 11/10?
The system image backup error 0x81000033 may occur when your system meets one or more of the below conditions –
- Not having enough free space inside the System Reserved partition
- Having too many language packs installed on the computer
- Outdated or obsolete device drivers
- Turned off system protection
- USN Journal taking too much disk space

Fix The backup Failed, Error 0x81000033
Now that you know what possibly may trigger this error code, here’s a list of solutions running which you may fix this issue on Windows 11 or 10 PC. Try to follow the solutions in the same order as provided below –
- Purge Disk spaces using the Disk Cleanup Tool
- Remove unnecessarily installed language packs
- Turn on System Protection
- Update Device drivers
- Delete existing USN journal
- Increase the size of the System Reserved partition
- Inspect Hardware via CHKDSK
1] Purge Disk spaces using the Disk Cleanup Tool
Lack of storage spaces is the prime reason because of which the backup failed on error 0x81000033 or 0x80780119. Go and check the current free spaces on the root drive. In case it does display filled up to 85% or more, use Disk Cleanup to free up unnecessarily stored cache, temp files, old Windows installations, etc.
Make sure to restart your PC so that any residual or leftover files delete as well. When you sign back into your PC, try again to create a system backup. If you are still facing problems generating a restore point, try the next solution.
2] Remove unnecessarily installed language packs
By default, there is a single language pack installed on Windows 11 or 10 PC. However, at times, we accidentally mark the checkboxes while installing optional updates and thus end up having too many language packs running on our devices.
The presence of too many language packs not only occupies a huge amount of disk space but also prevents the system from generating any restore points. So, it is best to remove all those packs that you don’t or rarely use on your Windows PC. Here’s how to get rid of unnecessarily installed language packs –
- Open Settings by pressing Win + I.
- Select Time & language on the left pane.
- Head over to the right side and click Language & region.

- Under the Language section, you may find all language packs installed on your computer.
- You may see three horizontal dots beside any language pack. Well, click on it and hit the option – Remove.

- The system will immediately uninstall the selected pack.
Reboot your PC next and see if you can now create a system backup without getting into error 0x81000033.
3] Turn on System Protection
By default, the System Restore point generation is disabled on Windows 11 or 10 PC. This remains as it is unless you turn ON the system protection for different Disk drives available on your computer.
Note: This solution is applicable only when the system protection feature is disabled on your PC. If you had enabled this feature sometime back on your computer, skip this solution and follow the next one.
As long as the system protection remains disabled, you can’t create any restore point. The error 0x81000033 or 0x80780119 must be occurring because of this default setting. To turn On the system protection on Windows 11/10, do the following –
- Right-click on the Windows icon and select System.
- The Settings window will launch next under System > About.
- Under Device specifications, look for the option – “System Protection“.

- The system will launch its properties window next.
- Under Protection Settings, select the root drive followed by Configure.

- Moving ahead, check the radio button “Turn on system protection”.
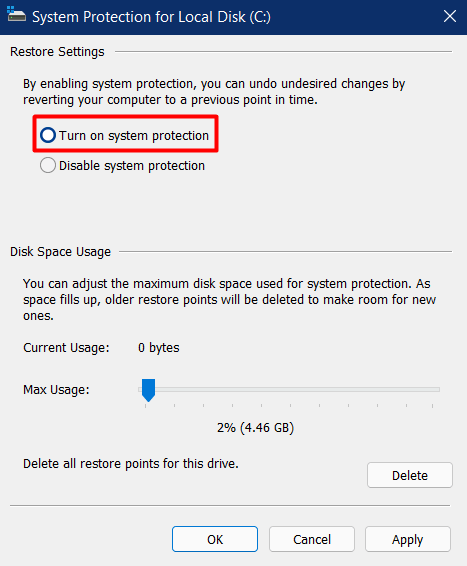
- Hit Apply then OK to save this configuration.
Restart your PC and try again to create a restore point. I hope you may now create a system backup successfully if the system protection was previously disabled.
4] Update Device Drivers
The presence of outdated/obsolete device drivers may also invoke this error code 0x81000033 while creating a system image. You may check and update the corrupted ones by following these easy steps –
- Go to Settings > Windows Update on Windows 11 and hit Check for updates. If you are still on Windows 10, browse to this path instead – Settings > Update & Security > Windows Update. Once you are there, hit the Check for updates button.
- Let the system connect to Microsoft servers and find if any optional updates are available for your device or not.
- In case it does reveal any pending updates, click “Optional updates”.
- On the succeeding page, mark all the checkboxes, and hit the button – “Download and Install“.

- Wait for a few seconds while the system downloads and installs the checked-in drivers.
Once this is over, restart your PC and see if doing so resolves error codes 0x81000033 or 0x80780119.
5] Delete USN Journal
These days, all disk drives are formatted with NTFS and thus they include a unique feature on them and that is USN Journal. It is this update sequence number that maintains a record of all the recent changes made on the root drive.
Each passing day adds some data to this journal as we often made several changes to our devices. When the USN journal size exceeds its permissible limit, this may result in an error code 0x81000033 while generating restore points.
Here’s how you may delete the USN Journal on your computer –
- Press Win + S to launch the Search window.
- Type “Disk Management” and hit the top result i.e. “Create and format hard disk partitions“.
- Once this opens up, change the drive letter of the System Reserved volume. Let’s say you change this to “F”.
- Launch the CMD as administrator next and execute these codes –
fsutil usn queryjournal F:
fsutil usn deletejournal /N /D F:
- Go back to Disk Management, right-click on the System Reserved partition, and hit the option – “Change Drive Letter and Paths command”.
- When a dialog box appears, click Remove. A pop-up window will appear next, hit Yes.
- Click Yes again to confirm the recent changes.
Once you delete the existing USN journal, restart your PC. I hope you are now able to create system images now without getting into any bug or issue.
6] Increase the size of the System Reserved partition
When the error 0x81000033 is occurring because of fewer disk spaces inside the System Reserved Partition, one should try to increase its disk space. Since this is a system reserved partition, you can’t increase its size normally.
What you may do is create a new system volume and assign it as the new system reserved partition. Here’s how to perform this task –
- First of all, decide the drive letter that you want to assign to the newly created system volume. Press Win + E to launch File Explorer, and see all the pre-existing drive letters. If the letters E, F, or G are already in use, consider naming the upcoming driver as “H:”.
- Launch Command Prompt as an administrator.
- On the elevated console, copy/paste the following and press Enter –
bcdboot.exe /s C:\Windows /s H:
Note: In the code above, “C:” is the root drive, and “H:” is the drive letter that we are trying to assign to the new system volume. Change them appropriately if either or both vary on your device.
- Execute the below list of commands one after another. Don’t forget to press the Enter key after each command.
DISKPART
DISKPART> select volume H
DISKPART> active
- After you complete running these codes successfully, restart your PC.
7] Inspect Hardware via CHKDSK
If the error 0x81000033 is still appearing, check if the hard disk is alright and functioning properly on your device. To do this, follow these simple steps –
- First of all, press Win + R.
- Type “CMD”, and press Ctrl + Shift + Enter together to launch Command Prompt as administrator.
- The UAC window will appear next, hit Yes to confirm accessing the console.
- On the elevated prompt window, type the following, and press Enter –
chkdsk C: /f /r
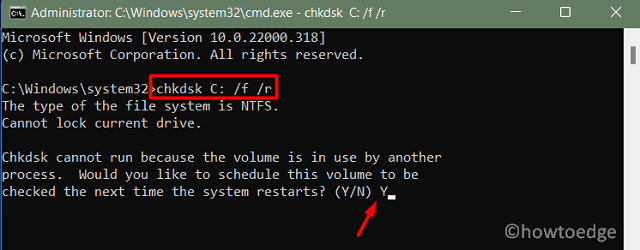
- The command won’t run as the root drive is already in use. Type “Y” and press Enter to confirm running this code when the PC restarts.
- Come out of the Command Prompt, and reboot your PC. CHKDSK will then take over.
Once this completes scanning the hard disk, you will get a report mentioning whether you can still use your HDD or if this requires a replacement.
How do I Fix Error error 0x80780119?
The backup failed, error 0x80780119 also occurs when your device lacks sufficient disk spaces, corrupted device drivers, damaged HDD, etc. We have already stated what you can do to fix this issue on Windows 11/10 PC. Follow the solutions discussed in this guide, and you will easily address the error 0x80780119.
I hope the solutions indeed work to resolve error codes 0x81000033 or 0x80780119 on your computer.