In this guide, we will look into the “CRITICAL SERVICE FAILED BSOD Error”, the reasons why it occurs, and how to fix it on Windows 11/10. This is basically a blue screen issue that causes your PC to stuck on the login screen displaying some error messages.
When it occurs, you won’t be able to log into your Windows normally. Instead, what you can do is restart your device multiple times so that it enters the Safe boot. Once you entered this state, all third-party apps and services won’t run. So, it becomes quite an easy task to find the real culprit and resolve that. Let’s explore the solutions in detail –

What causes BSOD Error 0x0000005A?
There are several instances when this blue screen error may appear on your desktop or laptop screen. A few of them are enlisted below –
- Presence of viruses, malicious codes, etc.
- System file corruption
- Corruption within the Windows Image or Update components
- Bad sectors on the hard disk
- Disable Driver Signature Enforcement
- Outdated device drivers
Since you are on a blue screen error, it’s not easy to find the exact cause behind its occurrence. Instead, what you can do is try applying the solutions discussed below in no particular order, and see if any resolves the error 0x0000005A.
Fix – CRITICAL SERVICE FAILED BSOD Error
If you are not able to get past the Critical Service Failed blue screen, you need to first boot your device into Safe Mode. Booting your device into this mode disables all third-party apps and services. So, any nuisance because of them won’t play any role now.
- Inspect hard disk via CHKDSK
- Repair corrupt files using SFC/DISM
- Disable Driver Signature Enforcement
- Update Device Drivers
- Use System Restore
1] Inspect hard disk via CHKDSK
Before you proceed to apply any solutions, check if the HDD that you are using is okay or not using CHKDSK command-line program. Here’s how you can check harddisk for possible corruption –
If you do have an installation disc, insert it in your computer, and hit Repair your computer. Else, simply turn your device On/Off multiple times to boot your device into Safe Mode.
- At the Choose an option screen, click Troubleshoot.
- Click Advanced options > Command Prompt.
- On the elevated console, type the following, and press Enter –
chkdsk C: /f /r /x
- Since C: is the root drive on your PC, it won’t run instantly. Instead, this will prompt a message that suggests running it when the system reboots. Type “Y”, and press Enter. Restart your PC next so that CHKDSK resumes scanning the hardware.

- After the scanning completes, you will get a report stating whether the HDD is alright or needs a replacement.
Proceed to the next set of solutions only when the above scan declares your hard disk is all good. Otherwise, no matter how many times you fix this issue, this will occur time and again.
2] Repair corrupt files using SFC/DISM
The BSOD errors usually occur because of some corruption on the computer. For example – missing or obsolete system files, corrupt update components, or wrongly configured Windows 11/10.
Here’s how to run SFC/DIMS in Windows –
- Open the Command Prompt as an administrator (discussed above).
- When this launches, run this code first –
sfc /scannow

- The SFC tool normally takes 10-15 minutes to find and repair all missing/damaged system files. This timing may increase depending on the level of corruption on your device.
- When this scan reaches 100%, execute this code next –
DISM /Online /Cleanup-Image /Restorehealth

- The DISM tool will look over the installed operating system on your computer and repair any issues with it. This also takes 10-15 minutes to complete repairing the Windows image, so wait patiently.
There is a possibility that Windows Update Components have already been corrupted. As you are already on the CMD, run these two codes to rename Windows cache folders –
ren %systemroot%\softwaredistribution softwaredistribution.old
ren %systemroot%\system32\catroot2 catroot2.old
- Restart your computer and see if it resolves the issue that you are struggling with.
3] Disable Driver Signature Enforcement
Enabled driver signature enforcement in Windows 11/10 may also cause this Critical Service Failed error on your PC. To resolve this issue then you should try disabling this enforcement. Performing so will make sure that not only Microsoft but all externally signed drivers start when your operating system boots up. In short, this will bypass the currently occurring issue on your computer. Here’s how to perform this task –
- Enter “Automatic Repair” on the Blue Screen as stated above.
- Click Troubleshoot > Advanced options > Startup Settings.
- Moving ahead, click the Restart button.
- When your PC reboots, a list of options will appear on the display screen. These options bear a number responding to a particular task.
- Click F7 to choose the option – Disable Driver Signature Enforcement.
Now that you have enabled using externally signed Driver Signature Enforcement on your PC, the critical service failed BSOD error should resolve automatically.
4] Update Device Drivers
If you are still getting the Critical Service Failed BSOD error while starting your system, this might be due to obsolete or outdated drivers on your computer. It’s better to update all device drivers and see if it solves the blue screen error. To update adapters in Windows, do the following –
- Boot your device into the Safe boot first.
- Now that you are able to log into your device, press Win + X.
- Choose the option – Device Manager on the Power Menu.
- When the device manager comes into the display, expand each one of the sections available here, right-click on the drivers inside, and hit update device.
- On the succeeding page, you will receive two options to choose from. Click “Search automatically for drivers”.
- Let the system find and install any pending updates to the chosen driver.
Lately, Windows users are not able to find any updates to the drivers using Device Manager. Microsoft has added this functionality directly inside the Settings under the name – “Optional updates”. Go to the path below and hit Check for updates.
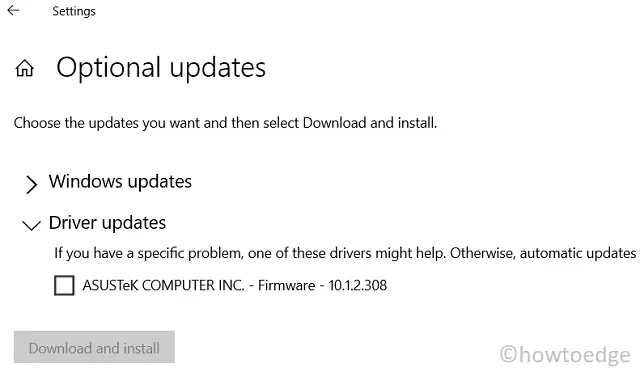
When you do find the optional updates link after this search, click on it. Tick the checkboxes next that you want to update, and hit Download & Install.
5] Use System Restore
Assuming you have already created a restore point back in the past, you may follow the steps outlined below. In case you haven’t generated any system backup, skip this method, and follow the next one. A restore point is basically a system image of a previous point wherein everything was running perfectly. Here’s how you can resolve Critical Service Failed BSOD error using this method –
- Press the power button so that your PC restarts.
- When Windows 11/10 boots up, turn your device off by pressing the power button again.
- Keep doing the same thing until the “Automatic Repair” option appears on your display screen.
- Click Advanced options.
- When it expands, hit Troubleshoot then Advanced options again.
- Subsequently, hit System Restore.

- The system will check if there is any restore point available on your device. If it detects any, there appears the System Restore prompt.
Follow the on-screen instructions to complete the remaining steps. All you require now is to choose a backup point, scan it for possible issues or malware, and then revert your PC back to this state.
Clean Install Windows
In case none of the above workarounds resolve the issue that you are facing on your PC, stop searching for any further solution. Instead, repair your Windows using an installation disc, or simply clean install Windows. We suggest performing a fresh install as this will resolve any other issues on your computer as well.
What extra can I do to fix BSOD errors?
You may diagnose RAM for possible issues, remove recently installed third-party apps, or run Startup repair.
I hope this guide helps to fix the CRITICAL SERVICE FAILED BSOD Error 0x0000005A on your PC. If you have any suggestions or queries, let us know in the comment section.