Updating Windows 10 is an important part as this fixes the security loopholes and provides new features. However, there are instances where installing new patches starts creating a nuisance. In such scenarios, it is better to disable automatic installing Windows 10 updates. It is thus a matter of choice whether you want to go for the cumulative updates or not.
By default, whenever new cumulative updates come, they are auto-downloaded on your device. If you haven’t set your System as a metered connection, this will consume huge data as each comprises at least 200 MB or more. You may configure Group Policy or use registry tweaks to disable automatic installing Windows 10 updates. Let’s explore them in detail-
How to stop automatic installing updates on Windows 10
Here is the step-wise procedure to disable automatic installing updates permanently on Windows 10 PC-
1. Disable automatic updates using Group Policy Editor
To prevent the automatic Windows Update permanently using Group Policy Editor, you need to follow these guidelines-
- Right-click on the Power menu and choose Run from the list.
- In the text box, type ‘
gpedit.msc‘ and hit OK to cite the Group Policy Editor.

- Now, navigate to the following path-
Computer Configuration\Administrative Templates\Windows Components\Windows Update
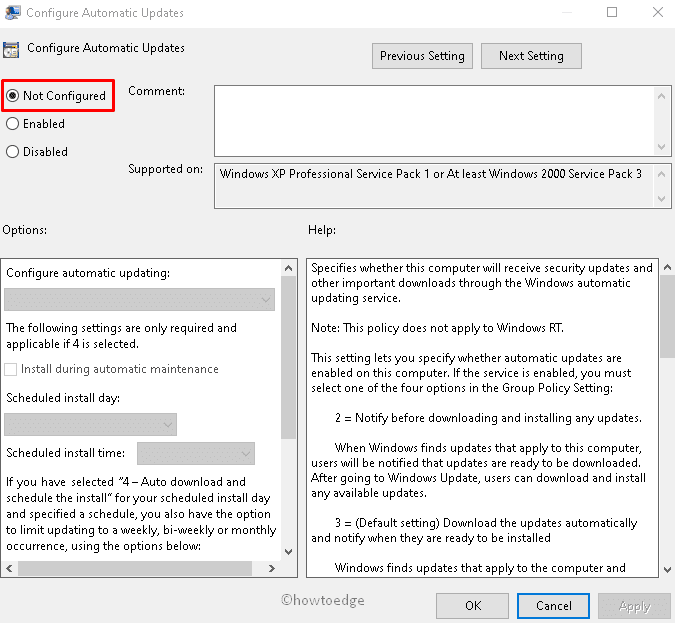
- Jump to the adjacent right pane and open the Configure Automatic Updates policy.

- Next, activate the Disabled option then Apply and OK to confirm the changes.

- When you execute these steps successfully, your Windows device will stop downloading default cumulative updates.
Note: After disabling the automatic updates, you can download the patch-up manually by browsing this path-
Settings > Update & Security > Windows Update > Check for Updates
Enable automatic updates using Group Policy Editor
In case, you want the Windows cumulative updates to download and install automatically, just follow these instructions-
Open the Group Policy Editor and navigate to the below address again –
Computer Configuration\Administrative Templates\Windows Components\Windows Update
Move to the right pane and open Configure Automatic Updates policy. Here, select the “Not configure” radio button.
Limiting updates
If the above disabling recent files of updates doesn’t prove to be fruitful, carry out these quick steps-
Step-1: Press Win and S hotkey together to open the Search icon.
Step-2: In-text area, type Group Policy Editor. Once a well-matching result pops up, double-click the same.
Step-3: Henceforth, go to the following address-
Computer Configuration\Administrative Templates\Windows Components\Windows UpdateStep-4: Switch to the right panel and double-click the Configure Automatic Updates policy.
Step-5: Next, from three sequence options, select the Enable radio button.
Step-6: Subsequently, select any one of the below numbers to configure the automatic cumulative updates-
2 - Notify for download and auto-install.
3 - Auto download and notify for install.
4 - Auto download and schedule the install.
5 - Allow local admin to choose the setting.
Note: The best option to disable automatic updates is the second one i.e. Notify for download and auto-install.(See the snapshot)-

Step-8: At last, select Apply and OK button to save these changes.
Step-9: Once you set this up successfully, a new notification will pop up asking to download the updates manually in the Settings app.
Recommended: How to enable Automatic Registry backup in Windows 10.
2. Disable automatic updates using Registry Tweak
Windows 10 Pro users may disable automatic installing updates using Registry Editor as well. To turn off this feature permanently, you should make the following changes in the Registry-
Important: Any incorrect modifications under Registry Editor might corrupt your entire system. Hence, you must create a full backup before performing the needful changes-
- At first, launch the Run dialog (Win & R) and type regedit where the cursor winks.
- Tap the OK button to invoke the Registry Editor window.
- If the User Account Control prompts, tap Yes to permit the access.
- Henceforth, reach out to the following path-
HKEY_LOCAL_MACHINE\SOFTWARE\Policies\Microsoft\Windows
- Here, right-click on the Windows option and choose New > Key from the context menu.
- Type WindowsUpdate under the name template and hit Enter key.
- Subsequently, right-click on the newly created folder (WindowsUpdate) and choose New then Key from the upcoming sub-menu.

- This time name this one as AU and press the Enter Key.
- Jump to the right pane and right-click anywhere in the blank area.
- Select New then DWORD (32-bit) Value on the context menu. See the Snapshot below-
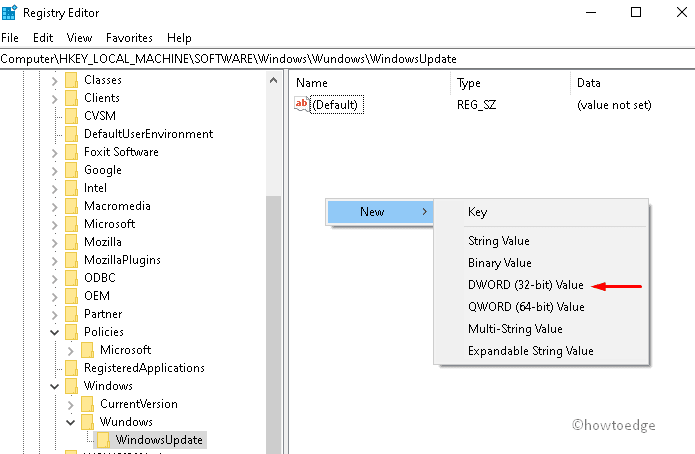
- Rename this new key to NoAutoUpdate and press the OK button.
- The next process is to open the NoAutoUpdate entry and change its value to 1.
- Click OK to confirm the modification and Reboot your PC.
That’s it, your computer will stop downloading the updates automatically from the next login.
To install the new cumulative files, navigate to the following path-
Settings > Update & Security> Windows Update and click Check for updates button on the right pane.

Limiting Updates
If the above alteration doesn’t work as expected, you may try some registry tweaks in order to customize the Update settings. This, in turn, will block the automatic installing updates feature. Here are the steps to follow-
Step-1: Type Regedit in the search icon and hit Enter key on the well-matching result. The UAC prompt will appear immediately after, tap Yes to sanction the access.
Step-2: Next, go to the following address –
HKEY_LOCAL_MACHINE\SOFTWARE\Policies\Microsoft\Windows
Step-3: Subsequently, perform a right-click on Windows (folder) and choose New followed by Key option.
Step-4: Next, rename this directory as WindowsUpdate then OK to confirm the changes.
Step-5: Thereupon, right-click WindowsUpdate and choose New -> Key from the context menu.
Step-6: This time put the name of the new folder as AU and press the Enter key.
Step-7: Succeeding after perform right-click anywhere on the subsequent window and choose New click then DWORD (32-bit) Value. Rename this entry to AUOptions.
Step-8: Henceforth, open this folder and put the below number as per your requirements-
2 — Notify for download and auto install.
3 — Auto download and notify for install.
4 — Auto download and schedule the install.
5 — Allow local admin to choose settings.
Step-9: Similar to that of Group Policy editor, performing this will disable automatic installing Windows 10 updates. To stop the installation of the update completely, value 2 is the best choice. However, you can choose any option depending upon your requirements.
Once you finish the above steps successfully, click the OK button to save it and Reboot your computer.
Now your computer will prevent the auto-update of the Windows 10 Operating System. You will receive a notification whenever you attempt to download the new cumulative update. In case, you want to download and install this patch, just approve this manually.
Note: If you select No-4 (Auto download and schedule the install), this won’t restore the default settings. To do this, right-click on the WindowsUpdate key, and choose the Delete option. Lastly, reboot your PC to save these changes.