If you’re facing some kind of Wi-Fi connection issue on your computer or your internet connection is slow then disabling and re-enabling Wi-Fi and Ethernet adapter can fix the problem. Further, you may even need to reset all network adapters to factory settings. In this post, you will learn how to enable and disable Wi-Fi and Ethernet adapter on Windows 11, including the way to reset them.
Microsoft has made it pretty simple and straightforward to access Windows Settings. Unlike Windows 10, there are a few changes you may experience while going through the Windows 11 Settings. So, let’s explore it.
Related: How to change Windows 11 Taskbar Location – Top, Left, or Right
Wi-Fi and Ethernet adapter problems on Windows 11
- Disable Wi-Fi or Ethernet adapter on Windows 11
- Enable Wi-Fi or Ethernet adapter on Windows 11
- Reset Wi-Fi network adapter on Windows 11
1. How to Disable Wi-Fi and Ethernet adapter on Windows 11
If you want to disable Wi-Fi or Ethernet adapter on your computer, use the following steps –
- Right-click on Start and open the Settings menu.
- Select the Network & internet option from the left pane.
- Now scroll down and click the Advanced network settings tab.

- Under the Network adapters section, click the Disable button next to the Wi-Fi option.
- And then click on the Disable button to disable your Ethernet adapter.
After following the above steps, your Wi-Fi and ethernet adapter will be successfully disabled.
2. How to Enable WiFi or Ethernet adapter on Windows 11
To enable WiFi or Ethernet adapter on Windows 11, use the instructions given below –
- Press the Win+I keys to open the Settings app.
- Select the Network & internet option from the left pane.
- Then scroll down and click the Advanced network settings tab.

- Under the Network adapters section, click the Enable button next to the Wi-Fi option.
- And then click on the Disable button next to the Ethernet adapter.
3. How to Reset Wi-Fi network adapter on Windows 11
If your Wi-Fi connection is slow or any other internet related problems you’re currently facing on Windows 11, then you can reset your Wi-Fi network. Here is how to do this –
To reset the Wi-Fi network adapter on your Windows 11 PC, use the following steps –
- Open the Settings menu using Win+I keys.
- Select the Network & internet option from the left pane.
- Click the Advanced network settings tab to view all network adapters.

- Under the More settings section, click on the Network Reset option.
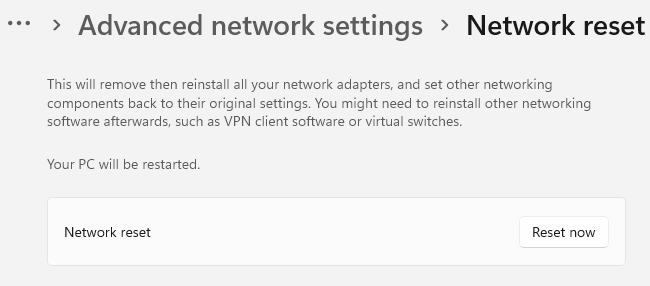
- On the next page, click on the Reset now button.
- To confirm reset your network settings, click on the Yes button.
- Then restart your computer and check if it’s now working fine.
Thus you can reset your Wi-Fi network adapter on the Windows 10 OS.
Read Next: How to Align Windows 11 Taskbar Icons to the Left