VLC is one of the most popular and widely used software that lets you play most of the media codecs and video formats. Yet, it is prone to a number of flaws or glitches. One such problem that users often encounter is VLC Media Player Audio Issue or Audio not working on it.
There is a possibility that you had muted your speaker or microphone and as a result, audio is not coming while playing media on VLC. So, you need to first ensure there isn’t any issue within your Windows Operating System. The best way to ensure this is by running some videos online (YouTube). Only when you are hearing well on online sites, proceed ahead to the solutions.

Fix VLC Media Player Audio Issue
As stated earlier, this could be a silly mistake like you have accidentally or intentionally turned off your speaker. If you had already checked the same, yet there is no sound coming out of VLC while playing some media, follow these fixes.
- Turn on Audio/Unmute Audio on VLC
- Enable Sound Device
- Disable and Enable Audio Track
- Reset VLC Media Player Audio Preferences
- Update VLC to the Latest Version
1] Turn on Audio/Unmute Audio on VLC
It might be possible that you have intentionally muted the sound of your video player or of the whole PC and forget doing so. So, the first solution we recommend is to check whether your VLC audio is muted or not. If your audio is muted, you will see a cross sign over the sound icon in the VLC media player. To unmute your VLC, simply click on the sound icon and check if it works.
2] Enable Sound Device
This VLC Media Player Audio Issue can also occur if the playback device is disabled in your computer sound settings. Follow the below instructions to enable it.
- Open Control Panel.
- Once it opens, make sure the Windows is viewed by Category.
- Click on Hardware and Sound > Sound.
- In the Sound window, right-click on the playback devices and select Enable.
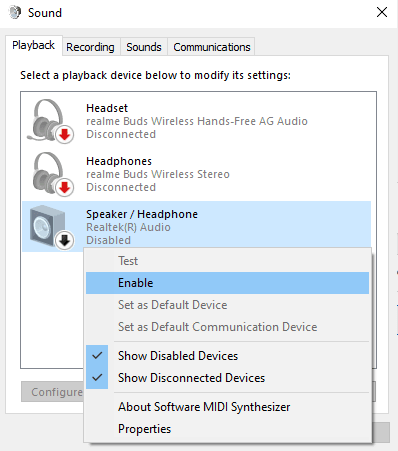
- Next, hit Apply > OK buttons to confirm the recent changes and restart your PC.
When Windows reloads, check if the Audio issue resolves on your VLC Media Player.
A few users reported fixing the Audio issue after they disable all enhancements of the playback device. Do so and check if the problem resolves this way. Here’s how to perform this task –
- Reach out to the Sound window (as explained above).
- Right-click on the playback devices and select Properties.
- Go to the Enhancements tab, and mark the checkbox next to Disable all enhancements.
- Afterward, click Apply > OK to confirm the recent changes.
After applying this fix, restart VLC and check if the sound starts coming out of this media player.
3] Disable and Re-enable Audio Track
The audio not working issue may also occur due to some glitches in the audio track. To fix this, one may try disabling and then re-enabling the audio track. Here’s how to disable/enable the audio track on VLC –
- Open the VLC media player and start playing any video clip.
- While playing the video, go to the Audio tab and select the Audio Track option.
- Select the Disable option and then Enable it again.
4] Reset VLC Media Player Audio Preferences
It is possible that you might have changed the audio settings and don’t know how to revert it. In this case, you can reset your VLC Media Player Audio Preferences and check if everything works fine now.
- Open VLC media player
- In the VLC media player window, select Tool > Preferences.
- Go to the Audio section and then click on the Reset Preferences button.

- Click on the OK button to confirm it.
5] Update VLC to its Latest Version
Another potential way to fix the VLC Player no sound problem is to update VLC to the latest version. It is might be possible that your VLC media player is outdated and that caused this audio issue. You can fix it by upgrading the current VLC version to the latest one so that it will get a reasonable improvement, that lacks in the current version.
- Open the VLC media player and click on Help > Check for Updates.
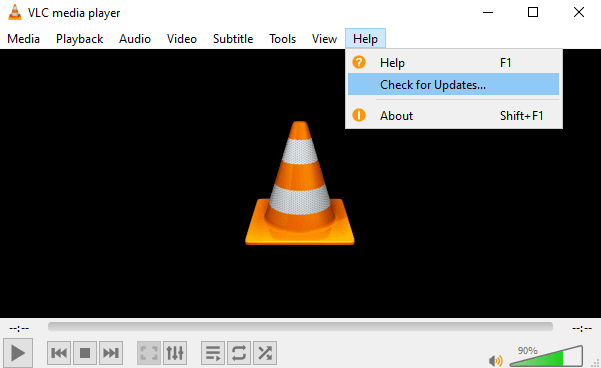
- If you see a prompt on the screen, click Yes to continue it.
- Once it downloads the update, click on the Install button to install it.
- Click Yes if they ask for the Admin privileges and then complete the installation.
Read Next: