Credential Manager on Windows 10 is a digital locker that collects your sign-in information for websites, apps, and networks. This features stores the username and credentials when you check the option and save them for future logins.
Although this feature is new, it’s been around for a long time. Besides, it does not only allow you to save your usernames and passwords but also to view, delete, add, backup and restore logon credentials. In this blog post, you’ll learn the steps to use the Credential Manager on Windows 10 to manage all your logon information.
Methods to set up and use Credential Manager on Windows 10
Here are the easy methods to set up and use Credential Manager on Windows 10-
- Update existing sign-in information using Credential Manager
- Remove sign-in information using Credential Manager
- Add new sign-in information using Credential Manager
- Backup sign-in information using Credential Manager
- Restore sign-in information using Credential Manager
1} Update existing sign-in information using Credential Manager on Windows 10
Here are the following steps to update a password or username already stored on Windows 10-
Step-1: At first, click on the Start button and type Control Panel.
Step-2: Press the Enter key and the Control Panel window will appear carrying all the items.
Step-3: Select User Accounts.
Step-4: In the left pane, click on Manage your credentials option.
Step-5: Hit the Windows Credentials tab.
Step-6: Select the particular account and click on the Edit button.
Step-7: Here, update the username and password and then hit the Save button.
Once you complete the above procedure, the information will be updated with the new credentials. Thus, no more login will prompt if you change the original username or password.
2} Remove sign-in information using Credential Manager
Here are the following steps to remove a password or username already stored using Credential Manager on Windows 10-
- At first, press Window + R to open the Run dialog.
- Type control panel and hit Enter.
- From the Control Panel items, select the User Accounts option.
- In the left pane, click on Manage your credentials.
- Click the Windows Credentials tab.
- Now, select the specific account and then click on the Remove button.
- Click the Yes button to save the changes.
When you complete the above steps, the account credentials will no longer be available on the device. It means that future logins will require you to enter a username and password.
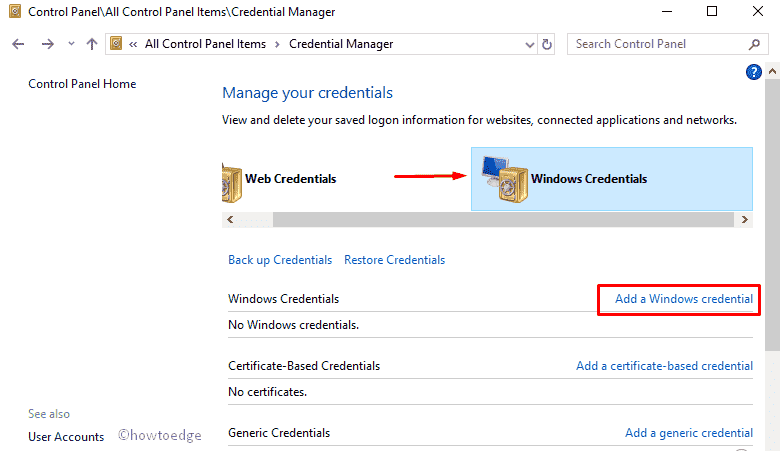
3} Add new sign-in information using Credential Manager
Here are the following steps to Add new sign-in information using Credential Manager on Windows 10-
- Press the Window button and type Control Panel.
- Press the Enter key and the Control Panel window will appear carrying all the items.
- From the Control Panel items, select the User Accounts option.
- In the left pane, click on Manage your credentials.
- Click the Windows Credentials tab.
- Now, select the Add a Windows credential option.
- On the following screen, type the internet or network address that corresponds to the app or network resource.
- Specify the username and password to verify.
- At last, click on the OK button to save the changes.
-
When you complete the above steps, the new account information will be added to your device to sign-in automatically the next time you access the apps or network shared.
4} Backup sign-in information using Credential Manager
Here are the following steps to export and backup your sign-in information using Credential Manager on Windows 10-
- At first, press Window + R to open the Run dialog.
- Type control panel and hit Enter.
- From the Control Panel items, select the User Accounts option.
- In the left pane, click on Manage your credentials.
- Click on the Windows Credentials tab.
- Now, select the Backup Credentials option.

- Here, a new window will appear. Click on the Browse button to specify a destination for the backup.
- Specify a name for the .crd backup file.
- Click on the Save button.
- Hit the Next button.
- A new screen appears asking you to use CTRL + ALT + DELETE keyboard shortcut to continue.
- This will continue your backup on the Secure Desktop.
- Specify a password to protect the backup file.
- Confirm the password.
- Click on Next button.
- At last, hit the Finish button.
When you complete the above procedure, you’ll end up with a .crd file. This file will carry all your Windows 10 and web credentials. Additionally, you can import these credentials to another computer or to the same device after a clean installation.
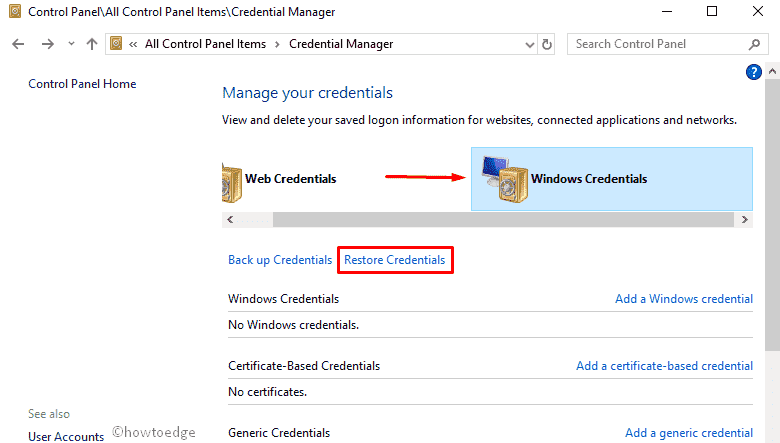
5} Restore sign-in information using Credential Manager
Here are the following steps to restore your sign-in information from backup using Credential Manager on Windows 10-
- Click on the Start button and type Control Panel.
-
Press the Enter key and the Control Panel window will appear carrying all the items.
- From the Control Panel items, select the User Accounts option.
- In the left pane, click on Manage your credentials.
- Click on the Windows Credentials tab.
- Select the Restore Credentials link.
- Here, a new window will appear. Click the Browse button.
- From the files, select the .crd files with the backup information.
- Now, click the Open button.
- Hit the Next button.
- A new screen appears asking you to use CTRL + ALT + DELETE keyboard shortcut to continue.
- Type the password to unlock the backup.
- Click the Next button.
- Finally, hit the Finish button.
When you complete the above procedure, all your web, app, and network credentials will be restored on your device.