Are you struggling with an Update Error Code 0x8024001E when upgrading Windows to its next available Build version? If yes, then follow our nine working solutions that might help you to overcome this issue in no time.
This error typically occurs due to the presence of corrupt DLL files, missing or damaged registry entries, or because of malware infection. Apart from these usual reasons, this issue might also occur when you download and install a broken or incomplete patch update on your Windows PC.

How to Fix Update Error 0x8024001E in Windows
To fix this, make sure to first remove any third-party antivirus (if exists any). Next, boot into Safe Mode and try the below workarounds one after another. Safe Mode ensures no new types of error codes appear in the meantime.
Solutions List
1] Check Network Connectivity
Downloading upgrade files requires a good internet connection. If not, this might miss some of the key files that result in an error code 0x8024001e. In case you find any trouble with the Network, make sure to reset your network.
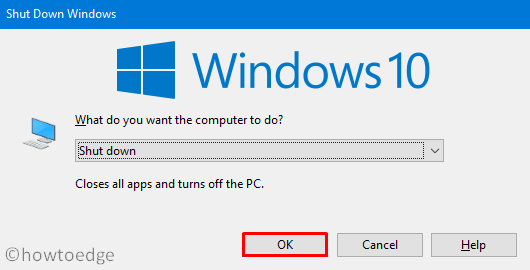
2] Restart the Computer
Rebooting Windows often solves several network-related bugs and errors. To shut down your PC properly, you may use the following steps –
- Minimize all of the current windows and press Alt+F4.
- When the Shutdown Window prompts, hit OK.
3] Update Device Drivers
The presence of corrupt or outdated device drivers may also result in similar errors. What you can do is open the device manager and check whether your computer has any obsolete device drivers that require updates. Here’s how to do this –
- Press WinKey+R to start the Run dialog.
- Type “
devmgmt.msc” at the void and hit Enter to launch Device Manager. - Click “>” left of the Network Adapters to view the drivers it includes.
- Right-click on each one of the drivers listed inside and select “Update driver“.

- Choose “Search for drivers online” on the succeeding window.
- Next, follow the on-screen instructions to complete the remaining steps.
- Once over, Restart Windows so that the changes made above come into effect.
Now, check whether you still encounter the 0x8024001e error or not. If yes, then try the below workarounds –
4] Reset Winsock
If you still receiving the error, try resetting the Winsock. Here are the essential steps to work upon –
- First of all, open Command Prompt as Administrator.
- On the elevated console, copy/paste the below code and hit Enter –
netsh winsock reset
- Wait for the Command Prompt to reset the Winsock.
- Once done successfully, Restart the computer to see the effects.
5] Run SFC/ DISM
Sometimes the update error 0x8024001e occurs because of missing or damaged system files or Windows images. To fix this, you must run SFC and DISM codes separately. Here’s the tutorial –
- Jointly press “Win+S” to open the Search UI.
- Type “cmd” in the text field, right-click on the top result and select “Run as Administrator“.
- Now, copy/paste
sfc/ scannownear the blinking cursor and press the Enter key.
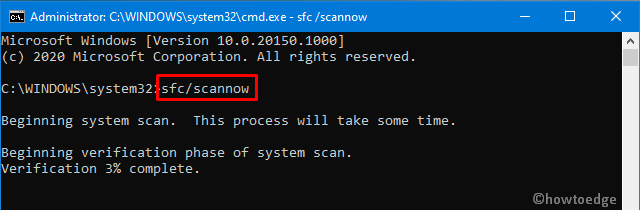
- This usually takes 15-20 minutes to scan and repair corrupt system files. In certain cases, this might take even more time, so wait accordingly.
- Once over, execute the below code to fix any error inside the Windows Image.
DISM /Online /Cleanup-Image /Restorehealth
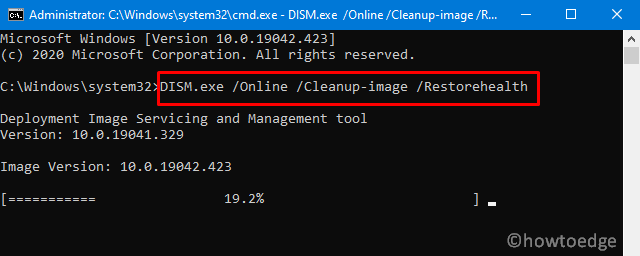
- This process again might take a long time, so be patient and don’t end in the ongoing process. Otherwise, some other system errors occur.
6] Restart Windows Update Service
At times, Microsoft Update automatically stops by itself. If that’s the case, this will stop any update services as well thus causing the 0x8024001e error to occur in the first place. You may check whether this indeed is the case or not. In case the Update service is found stopped, restart it back and the bug resolves immediately. Here’s how to proceed –
- Right-click on the Win icon and hit “Run“.
- Type “
services.msc” inside and click OK to start the Services window. - Scroll down to Windows Update in the list of services, right-click on it, and hit Start.
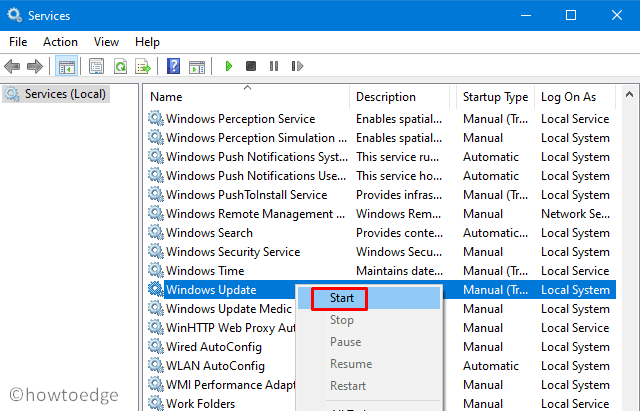
Note: If this is already running, better stop this first then re-enable it.
- Restart the computer to incorporate the above changes.
- Now, check whether the error still exists or has vanished.
7] Delete SoftwareDistribution and Catroot2 Contents
The Update Error 0x8024001e may occur even while the Update service is running in the background. This is due to some corruption inside the SoftwareDistribution or Catroot2 folders. To get rid of this error, you must clear all of the contents inside both these folders. Here’s how to perform this task –
Note: Make sure to stop the Windows Update service before following the below steps. Just do exactly as discussed in the above method and choose “Stop” instead of “Start”.
- After stopping the Update service on the Services window, navigate to the following path –
C:\Windows\SoftwareDistribution

- Press Ctrl+A to select all items, right-click anywhere and choose “Delete“.
- Do the same for the Catroot2 folder. You may locate this browsing at the below address –
C:\Windows\System32\catroot2
- After deleting the contents successfully, go back to the Services window.
- Do the right-click on Windows Update service and hit “Start“.
- Now, Restart the computer so that the changes performed come into effect from the next login.
8] Run Startup Repair
A corrupt entry inside the Registry may also result in the 0x8024001e error. In order to fix this, you should use the Automatic Repair tool and this will automatically find and fix the corrupt entries. Here’s how to proceed –
- Press Win+I to launch the Settings UI.
- Select Update & Security thereafter Recovery on the left column.
- Jump to the adjacent right and click “Restart now” under the Automatic Repair section.
- When the PC reboots, click
Troubleshoot > Startup Repair.

- This will restart the computer. If there appears a prompt asking to select the account, choose the Administrator one.
That’s it, the automatic repair will search for any corrupt entries inside the registry and repair them (if found).
9] Use System Restore Points
If you have previously created any restore points in the past, try using them. If not, skip to the last workaround. Here’s how to use the restore points on Windows 10 Machine.
What if the error 0x8007025D is still occurring?
Hopefully, the error 0x8007025D must have been resolved by now. However, if it does appear again, you are left with only two options now and they are “Reset this PC” or “Clean Installation of Windows“. Choose whichever method suits you the most.
That’s it, I hope the above set of solutions indeed helps to fix the 0x8024001E error on your Windows PC.