Did you face an update error 0x8024a22d while downloading or upgrading Windows 11 to its next available OS Build version? This blog post covers all the underlying causes that may invoke this error code and six fixes that should find and resolve these causes on your Windows 11 PC.
When this error occurs, you may receive an error message as well that reads the following –
|
|

Fix Windows Update Error 0x8024a22d
If you see Windows Update Error 0x8024a22d on your Windows 11/10 computer, follow the solutions mentioned below to resolve the issue.
1. Troubleshoot Windows Update
The best way to resolve an update error code in Windows is by running the Update Troubleshooter. This tool runs to find and resolve the underlying causes on your computer. Even in cases where it fails to solve the immediate cause, this tool mentions the issue and ways to fix the same. Here’s how to troubleshoot Windows Update –
- Press Windows + I to launch Settings.
- Go to System > Troubleshoot > Other troubleshooters next.
- Locate Windows Update, and click on the Run button available on its right end.

- When the troubleshooter launches, click Next and follow the on-screen instructions.
- Wait for this tool to find and resolve the known issues on your computer.
As soon as this troubleshooting method completes, you may restart your PC and check if the error code 0x8024a22d is resolved now.
2. Check All Update Services
For Windows Updates to download and install error-free, all update services must be enabled on your PC. If any one of these services is disabled, you will face trouble upgrading to the next available Build version.
Here’s how to check and re-enable all those services –
- Press Windows + R to launch the Run dialog.
- Type
services.mscon it and hit OK. - When the Services window launches, scroll down and check if the below services are running on your PC.
| Background Intelligent Transfer Service | Manual |
| Cryptographic Services | Automatic |
| DCOM Server Process Launcher | Automatic |
| Windows Update | Manual (Triggered) |
| Windows Update Medic | Manual |
| RPC Endpoint Mapper | Automatic |
| Windows Installer | Manual |
In case you find any one of these services disabled, right-click on that, and select Properties. Change its Startup type using the drop-down menu available underneath it.
- You have the options to choose from Automatic, Manual, and Manual ( Triggered).
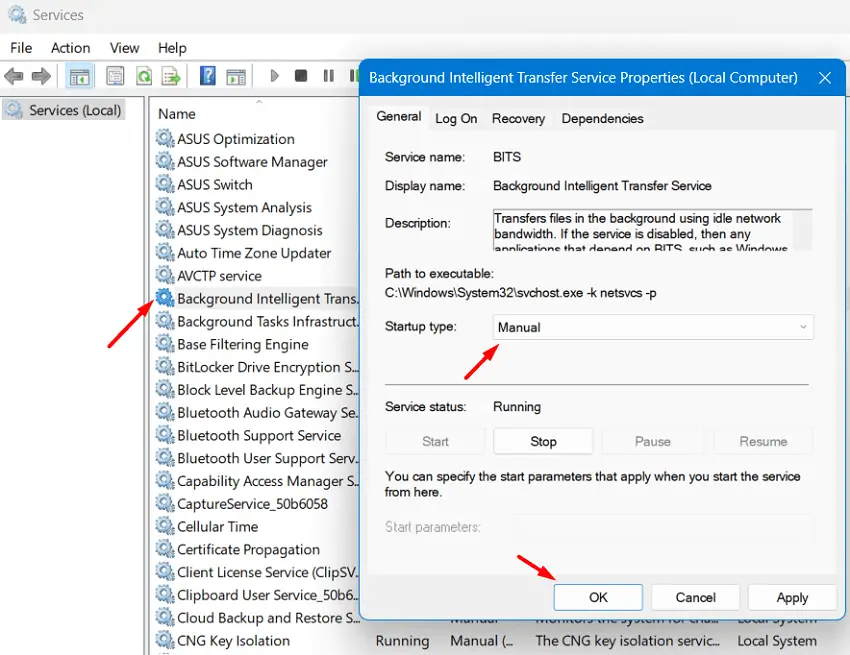
- Choose the option exactly the same as outlined above next to an update service.
Now that you have ensured the running of all update services and have set their Startup types as well, close the Services window, and check if the update error 0x8024a22d resolves this way.
3. Run SFC and DISM
Many a time, the presence of corrupt system files or folders may also initiate an update error 0x8024a22d on Windows 11. If that’s the case, you must run SFC and DISM tools and check if this error code is resolved afterward. Here’s how to run both of these tools on your Windows PC –
- Launch Command Prompt as administrator first.
- When the UAC window prompts, hit Yes to authorize accessing CMD as admin.
- On the elevated console, type the following, and press Enter –
sfc /scannow
- Wait for the System File Checker to find and resolve missing or corrupt system files.
Note: DISM is another useful tool that may find any corruption within your System Image and resolve the same. You may run this tool on the previously opened Command Prompt as well.
- Copy/paste the following on the elevated console and press Enter.
DISM /Online /Cleanup-Image /RestoreHealth

- The above code will run next and check if there are any issues within your System Image.
- Once the scanning/repairing process reaches 100%, you may close CMD, and restart your PC.
Sign back into your device again and check if you can update Windows without encountering the same error 0x8024a22d on your Windows PC.
4. Repair Windows Update Components
All update-related information is stored inside Windows Cache folders and they are SoftwareDistribution and Catroot2. With numerous updates installed on your computer on a weekly basis, these folders might contain some outdated update files.
Our next solution is to purge both of these Cache folders. Proceeding this way there won’t be any previous data available, and thus it might not cause any update issues when installing new updates on your Windows PC.
5. Manually download and install pending updates
Microsoft releases standalone packages of each cumulative update at its Update Catalog site. This is the webpage from where you can download the setup file of each update including the non-security or optional ones.
If you are here, the above four methods must not have worked in your case. Worry not, as you can always download the standalone package from Microsoft’s Update Catalog. All you need is to know the KB number that is released for your PC.
You may get this info by visiting Windows 11 Update history. Once you go to the Update history page, select the version of Windows installed on your computer, and then select the latest update (from the top). From here, you can note down the latest cumulative update (security, non-security, or optional).

Go to Microsoft’s Update Catalog, and type the noted-down KB number in its search field. Press Enter next and you will see a list of matching updates appearing on your display screen. Choose the update matching your system architecture, and hit the Download button.
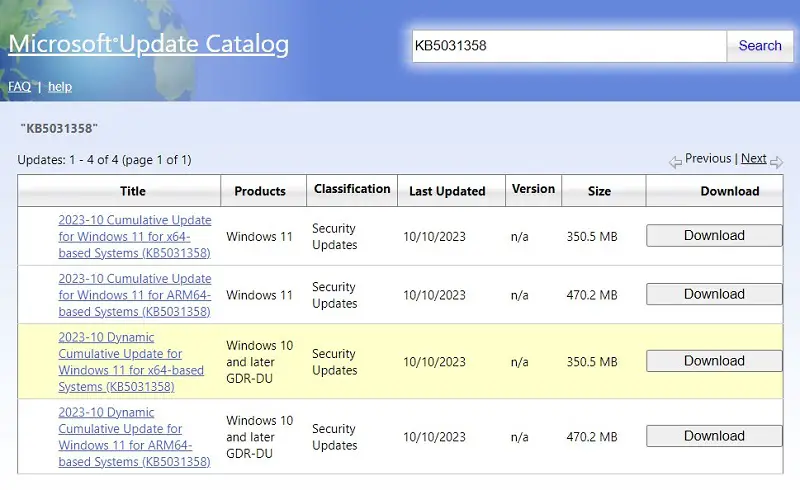
The standalone package downloads as a .msu file which you may install by double-clicking on the downloaded file. That’s it, you have successfully upgraded your Windows 11 PC.
6. Enter Clean Boot and Upgrade your PC
Though the above method helps you immediately resolve an update error on Windows 11, the error might appear when a new update is available for your PC. In case you don’t want to manually download and install the monthly patches, you may follow the Clean Boot method instead.
Clean Boot disables all third-party apps and services on your PC. As there won’t be any interference from third-party apps you may upgrade your operating system quite easily. Here’s how to perform this task on Windows 11.
When will Windows 11 23H2 will be available?
Windows 11 version 23H2 is supposed to come sometime in the fourth quarter of 2023. As of now, Microsoft has not confirmed any exact date for this version. Its beta or preview channel has already been released on 26th Sept 2023, but they are for Insider Business users only.