OneNote is an essential tool to make notes and upload them online. This way, you can access your work over multiple devices. You may even share your work with your colleagues and ask for their input. The problem occurs when you start getting OneNote Sync Error codes on your Windows PC.
There are multiple reasons why OneNote stops syncing and this article is going to present them in detail. We will look into the reasons affecting the syncing process and three ways that can solve this problem. We will also discuss some common occurring error codes in OneNote and their solutions. Let’s explore the reasons and their solutions in detail.

Read Next: How to enable dark mode for OneNote on Windows 10
OneNote Sync Error Codes: Ways to Solve them
To solve a OneNote Sync Error on Windows 11 or 10 PC, try out the below fixes one by one. In case you are struggling with a specific error code, check if the same is mentioned here. This section discusses why it happens, and the best possible solution to that problem as well. Here’s what to do when OneNote won’t sync.
1] Download and Install the Latest version of OneNote
Different OneNote Sync error occurs mainly when you are using an outdated version of OneDrive or OneNote on your PC. Go to Microsoft Store and download the latest version of these apps from there. After you have downloaded the required setup file, close all instances of these apps on your Windows PC and double-click on the setup file.
Wait for the installation to complete successfully and when it is done, launch OneNote again and press Shift + f9. You may even click the Sync now button in the Notebook Sync Status dialog box to sync all your notebooks.
For Microsoft Accounts
Here’s how to update OneNote using your Microsoft account –
- Close all apps running in the background and start Microsoft Store.
- If you aren’t already signed in, use your Microsoft account to log in here.
- Click Library available on the left navigation and hit Get updates.
Note: Windows 10 users may click on their profile and select Downloads and updates. Succeeding after, click Get updates to view all your applications that require updating.

- If there is an update possible on Office (Microsoft 365), click update and wait for this application to upgrade automatically.
- Your copy of OneNote is now up to date. So, close Microsoft Store and start OneNote.
Now, check if you can sync all your notebooks on your Windows 11/10 PC.
For Office 365 Accounts
If you are getting this OneNote Sync error with an active subscription to Microsoft 365, you need to follow these steps –
- Go to Search (Win + S), and search for Word, Excel, or any other Office application.
- When found, click on its icon. The chosen office app will launch next.
- Go to the File tab next and select Account.
- Select Update Options and click Update Now.

- You will see a prompt next suggesting saving your work. Click Continue to save all your work and wait while the Office apps are updated to the next available version.
- After this updating process completes, close all running apps, and restart your PC.
Hopefully, the OneNote Sync error resolves from the subsequent login.
2] Sign in to your personal OneNote account
Many a time, the OneNote Sync error appears just because you aren’t logged into the right account. Go and check if you are signed in to your personal account or not. Here’s how to perform this task –
- Go to Start (Windows icon) and click All apps.
- Locate the OneNote desktop app and click on it.
- When this launches, go to the three horizontal dots and select Settings.
- On its settings page, select Accounts and you can view the account that you have added here.
- If this account differs from your original account, click Add account.
- Now, use your official user id and password to log into your account where you generally save your notebooks.
- Click Close and go to the Notebook Sync Status dialog box next. Click Sync now or press Shift + f9 to sync all your work in OneNote.
3] Set up OneNote to Sync Notes Automatically
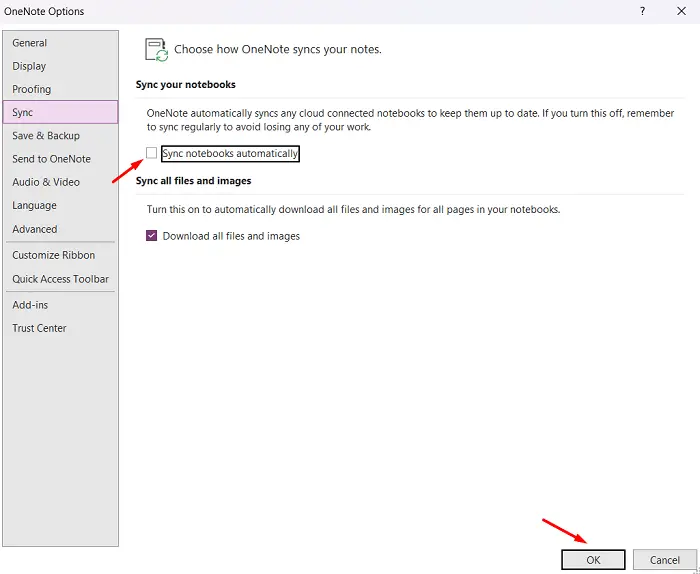
You may also encounter OneNote Sync errors when this application is not set up to sync your notebooks automatically. If you do want every work of yours to save on its own, you must set up OneNote to sync your Notes automatically. For this, you need to do the following –
- Launch the OneNote desktop app first and click the three dots.
- You may find this hamburger sign on the top-right end of an opened document.
- Select Settings and then Options.
- Scroll down to Sync notebooks automatically and turn On the toggle switch.
- You may even enable syncing all your files and images in the below section.
- Do so and close this Options pane.
That’s it, I hope the OneNote Sync Error resolves on your computer by following the above solutions.
Solve OneNote Sync Error Messages
Even after applying the above fixes, some error codes may still occur. If that’s the case, you must look into their specific causes and resolve them. Here’s a list of error codes, why they occur, and ways to solve them.
1] OneNote sync error 0xE4020045
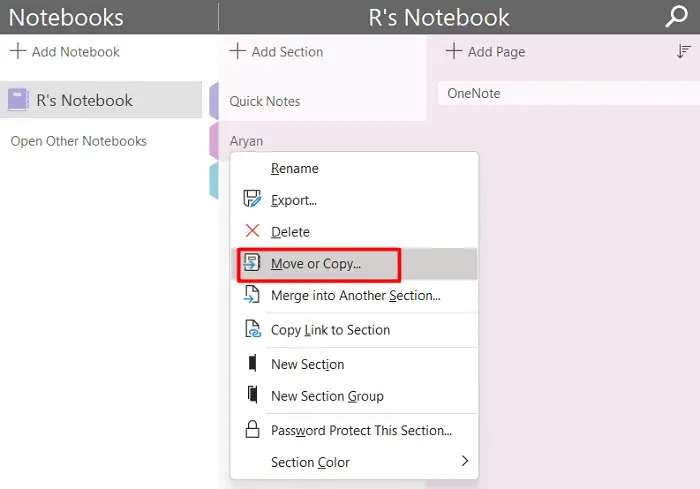
It is possible to back up, sync, or share a OneNote notebook to OneDrive. However, when you do this task by simply dragging and putting it inside your OneDrive, an error like 0xE4020045 might occur. This happens because OneNote still treats that particular notebook as the locally stored file. The error disappears on its own when that file is properly moved to OneDrive. The error message resembles the following –
OneNote sync error 0xE4020045 (Unsupported Client)
To solve this error code, you may do the following –
- Close OneNote, if it is still running.
- Now, navigate to the folder in which the affected notebook is stored.
- The path should look like the following –
C:\Users\<username>\Documents\OneNote Notebooks
- Copy this folder and paste it to the root folder on your hard disk.
- As soon as you paste this folder, the OneNote sync error resolves a few seconds later.
In case you don’t want to face similar issues in the near future, make sure you read this guide – Move a OneNote for Windows notebook to OneDrive.
2] OneNote sync error 0xE0190193
Using OneNote, users can view notebooks that are shared with them. However, when the owner denies accessing that notebook, you might receive an error code 0xE0190193. If that notebook was important to you, you may request the owner to share that with you once again. The error message that you receive is as follows –
OneNote sync error 0xE0190193 (403: Forbidden)
In case the prohibition was intentional, you can’t do anything to solve this error code.
3] Out of Sync Error 0xE000002E,
If you are getting an error 0xE000002E on OneNote, wait for some time and this error resolves on its own. This is a temporary issue and hence doesn’t require any fix. The error message that you receive while facing this error code is as follows –
Something went wrong during the OneNote sync, Error 0xE000002E
In case you don’t want to wait, you may force a full sync by pressing Shift + f9 while OneNote is running on your PC.
4] OneNote sync error 0xE000005E
This error occurs when you aren’t able to sync a section in one of your notebooks. As per Microsoft, this is a temporary issue and may resolve on its own. You may press Shift + f9 to force sync all your notebooks. This error usually occurs with an error message that reads the following –
Referenced Revision Not Found, OneNote Sync Error 0xE000005E
In case you are getting the above error code despite syncing your notebook several times, do the following –
- Right-click on the name of your notebook and select Notebook Sync Status.
- You will see a small arrow next to your notebook icon. Click on it and you will see the section that is causing the syncing error 0xE000005E.
- Note down the section heading that’s causing the issue. You may find the section name just above the box containing the error message.
- On the Shared Notebook Synchronization dialog box, click Close.
- Create a new section in the same notebook containing the error.
- Now, copy and paste the error part into the new section.
- Go back to the noted-down section and delete it.
- You may now sync your current notebook by pressing the Shift + f9 keys.
If the error appears in the new section as well, consider updating your OneNote.
5] OneNote sync error 0xE40105F9
This error occurs when you are on an outdated version of OneNote such as “OneNote 2013 desktop”. This is happening because the notebooks are no longer supported by the Server.
Unsupported Client Build, Error 0xE40105F9
In order to solve this problem, you must download the latest version of OneNote and install it on your Windows 11/10 PC.
6] OneNote sync error 0xE4010641
The OneNote Sync Error 0xE4010641 occurs mainly when your device gets disconnected from the Network. This could also occur when the network location to which your device is previously connected is not available or not in the range.
You’re offline or the network location is unavailable, Error 0xE4010641
To solve this error code, you may try the below fixes –
- If this is indeed happening because of network connectivity issues, wait for some minutes and try syncing your notebooks manually. You may press “Shift + f9” or click the Sync Now button in the Notebook Sync Status dialog box.
- There is a possibility that the Server itself has been turned off temporarily for maintenance purposes. Wait for some time and try again to sync your notebooks. You may even talk to your SharePoint or IT administrator to enquire about any Server outage.
- Though there is less probability of this, it could also appear when your notebook no longer exists at the network location. This will happen only when someone having proper permissions deleted your notebook from the server. Go to OneDrive (if you had saved a file there) and check if your file is still there or not.
7] Quota Exceeded error
As its name suggests, you have already used the allocated space on your OneNote account. So, you must delete certain files that are lying unnecessarily and are consuming extra storage space. If all the files are equally relevant to you, you may go for a higher plan at OneDrive.
This error might also occur when your Windows PC has run out of free disk space. Use Disk Cleanup Tool to get rid of unnecessarily stored cache, temporary files, and those files which are not important and worth having.
How to confirm if you faced a OneNote Sync Error?
Sync Errors occur mainly when you are trying to access a shared notebook. Since notebooks are stored in the cloud, any problem inside the Server or with the Network may result in a sync error. Moreover, there is a possibility that the owner of that notebook has modified that document and uploaded it again.
However, as you are still viewing a notebook unedited, the sync error might come into the picture. You may confirm this by upgrading your OneNote to the latest version and clicking on the Sync Status button. In certain cases, the owner may also remove the required permissions to view a file. Contact the owner and request him again to let you view that shared notebook.
How to troubleshoot Sync Issues when a Notebook Won’t Sync?
OneNote files stop syncing or throw an error code mainly when there is some problem with either the OneNote desktop app or the Microsoft Server. You have to first confirm from where this problem actually occurs. To do so, follow these easy steps –
- First of all, launch your OneNote Desktop app.
- Right-click on any notebook and select Copy Link to Notebook.
- The OneNote link must have been copied into the Clipboard.
- Now, launch your default web browser and paste the copied link on its URL.
- Press Enter to view that notebook. The browser might prompt logging into your Microsoft account.
- Use the right OneNote account to enter and view your notebook.
Two cases arise out of this scenario and they are discussed properly below –
Case: 1 You are able to view your notebook
Well, in this case, there is no problem with the Microsoft Server. The problem lies within the OneNote desktop app and a mere closing/restarting of this notebook will resolve the issue.
- When viewing a notebook in OneNote Desktop, right-click on the problematic notebook and select Close This Notebook.
- However, when you are viewing it on OneNote Online, click Edit Notebook and select Edit in Microsoft OneNote. Wait for this notebook to appear on your desktop app and when it does open, re-follow the 1st step.
Case: 2: The notebook doesn’t open in the web browser
In case the chosen notebook doesn’t open online, the problem may lie with the Microsoft Servers. You may confirm the same by visiting the Microsoft Service Status page. If there is no server outage reported on the Status page, the problem may lie with your ISP. So, contact customer support and get the network issues sorted out.
Can I stop OneNote from syncing?
Yes, it is possible to stop OneNote syncing on your Windows PC. Open this application first, and go to File > Info. Go to View Sync Status, and you can see all your notebooks lying there. Opt for “Sync manually”, and this will stop syncing of notebooks automatically.
In case you ever change your mind, come back to this path, and hit Sync Now.
How do I manually sync a notebook?
Provided that you still have the right to view or edit a notebook, you may do the following to sync it manually on the OneNote desktop app.
- Right-click on the notebook that is not syncing.
- Select Sync > Sync This Notebook.
- Go to the Page Sync Status icon and check if the selected notebook has now been synced.
If not, and you do know about the sections that are not syncing, copy the contents of that section and paste it inside a new section. Remove that section that is otherwise not syncing and press Shift + f9.
How to Move a OneNote file to my OneDrive account?
If you are planning to share a OneNote file with your friends or others, you may rightly do so using your OneDrive account. Create your account there first if you are not having one. Assuming you do have a OneDrive account and have ownership rights over a notebook, follow these steps –
- Launch OneNote desktop first.
- Open the notebook that you would like to save to OneDrive.
- Go to File > Share, and select a location for your notebook.
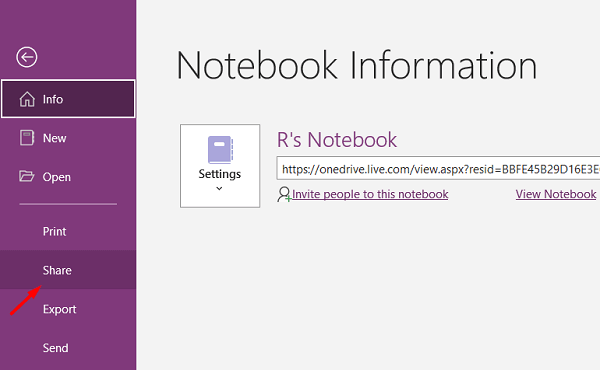
- Sign into your OneDrive account next, and provide a name to your notebook.
- Click Move Notebook next.
- After you see the location in the list, select it.
That’s it, you have successfully moved the notebook from your computer to OneDrive. You might even receive a message stating that – “Your notebook is now syncing to the new location.” You may now share that file with your friends right from OneDrive.

