Did you recently encounter a Blue Screen issue that displays an error message containing “ntkrnlmp.exe”? Well, in this guide, we discuss the probable causes that might cause this bug check in the first place. In addition to this, we also explore some of the working solutions that can address this STOP Error.
We all know the importance of different device drivers on the Windows operating system. They play a crucial role in executing different operations on our device. In case, any driver becomes corrupt somehow, this may lead to the ntkrnlmp.exe BSOD trouble. Updating the Graphics card drivers and configuring the Driver Verifier Manager are the best ways to address this blue screen bug check.
What is ntkrnlmp.exe?
There is an executable file called ntkrnlmp.exe that belongs to the Windows OS. When the Windows operating system starts, the program containing ntkrnlmp.exe will be executed and loaded into RAM, and it will run as an NT Kernel & System process. Ntkrnlmp.exe blue screens are commonly caused by corrupt graphics card drivers. You may also experience the ntkrnlmp.exe blue screen if your computer has a virus or malware.
What Causes Ntkrnlmp.exe Errors?
The term Ntkrnlmp refers to NT Kernel Multi-Processor Version, which acts as the to-do list in your computer. Kernels in operating systems manage a computer’s applications, processes, and other data to ensure the seamless operation of the system. A problem with any of those programs can stall Ntkrnlmp.exe and cause the computer to crash.
Here are some possible causes of Ntkrnlmp.exe errors:
- Malware and viruses.
- The power cord or adapter is damaged.
- Performing system updates on Windows.
- A new driver, software update, or device installation.
- The installation of third-party software that is poorly designed or unproven.
What are C-States and EIST in BIOS
The C-states and EIST in BIOS keep the record of power-saving features and control the processor’s clock speed. Once this option is enabled, it could cause the blue screen of death issues. So, disable this as soon as possible. If no fixes seem to be helpful then you can try to undo your previous settings using a system restore point.
- Open the PC in Safe Mode
- Update graphics card drivers
- Disable C-states and EIST in BIOS
- Configure Driver Verifier Manager
- Disable driver verifier
- Enable System Restore Point
Open the PC in Safe Mode
As we have told you earlier that this is a blue screen type error, you cannot access your login screen. If that’s the case then open the system in safe mode first and try the below fixes. Here is the process of safe mode:
- First, insert the Windows installation media like, and press the power button.
- Open the system starting up and press the function key like
Esc, Delete, F2, F8, F10, F12, or backspacedepending upon the system architecture. - Now choose your preferable language and click Next for further process.
- Go ahead and click on the Repair your computer option located at the bottom.
- Thereafter click on the Troubleshoot category followed by Advanced Options.
- Here choose Startup Settings and wait for the next option.
- On the next window select “Enable Safe Mode” with its supported function key.
- Lastly, tap the Restart button and wait for your PC startup. If this process is completed successfully, try our solution to resolve the ntkrnlmp.exe BSOD error.
Fix: ntkrnlmp.exe BSOD error in Windows 10
Here are the solutions to fix ntkrnlmp.exe BSOD on Windows 10 –
1] Update graphics card drivers
The main reason causing the ntkrnlmp.exe BSOD issue on the System is not proper synchronization between Windows OS and the Driver. Hence updating the faulty driver is the best possible solution to resolve this BSOD problem. Here is the process-
- Right-click on the Start icon at the left bottom corner of the taskbar and choose Device Manager.
- Next, expand Display adapters from the list and right-click on the graphics card driver.
- Now choose Update driver from the context menu.
- On the succeeding screen, click Search automatically for updated driver software. Just keep patience until the task is finished.
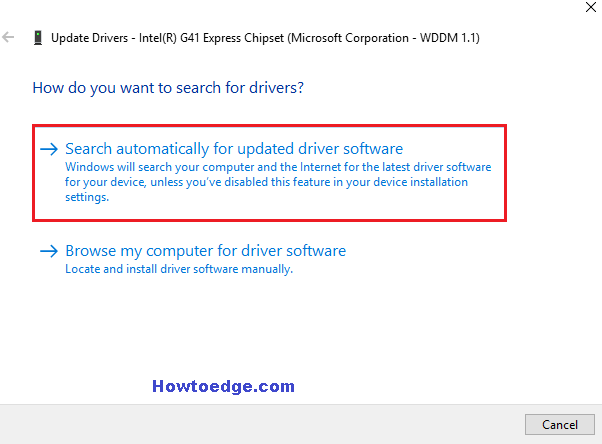
After the process is completed, restart your PC and check whether the ntkrnlmp.exe BSOD issue has been solved or not. If not, follow the below solutions.
2] Disable C-states and EIST in BIOS
Sometimes the C-states and EIST in BIOS are set as enabled. This could also be one of the reasons behind ntkrnlmp.exe BSOD on your Windows OS. The Enhanced Intel Speed Step Technology (EIST) is a power-saving feature that permits the operating system to control the clock speed of Intel processor cores. When this option is set as enabled may lead to the blue screen of Death error (BSOD). This is why just disable the C-states and EIST in BIOS and in turn it could solve the ntkrnlmp.exe BSOD issue.
- Firstly, turn off the PC and press the power button again.
- When the OS is loading, press the supported function key like F2, Del, Esc, etc. to load the system into BIOS mode.
- When the BIOS setup utility appears, tap the Advanced tab.
- From the list of options click CPU configuration or CPU specifications thereafter hit the CPU Power Management option on the further screen.
- Henceforth, click the C-state and Intel EIST options and set their value as disabled.
- Save the changes and exit from the current screen.
Finally, Restart the PC and check if the ntkrnlmp.exe BSOD issue has been solved or not.
3] Configure Driver Verifier Manager
Sometimes the faulty driver itself is responsible for this ntkrnlmp.exe BSOD issue. Hence, run the Driver Verifier Manager to find the troublesome drivers and try to repair them if possible.
- Go to the Search box and type verifier in the blank box then hit Enter to launch this app.
- If the User Account Control appears, click Yes to let this app opens up.
- Here, select Create Standard Settings then hit on the Next button.
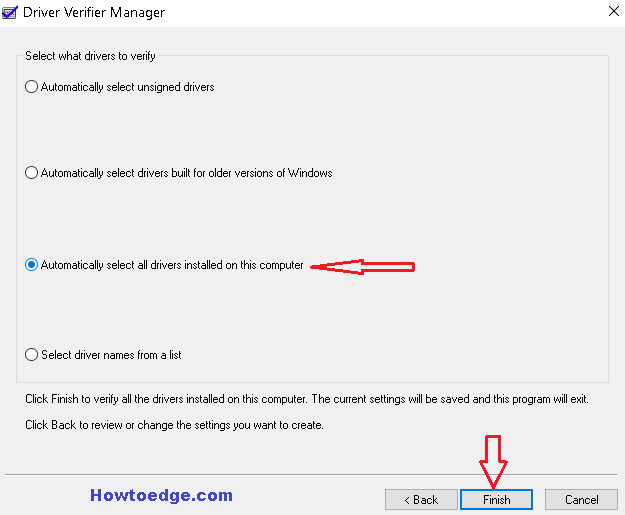
- Henceforth, activate the checkbox Automatically select all drivers installed on this computer followed by pressing the Finish button.
- This will start verifying the trouble. Keep patience until the Driver Verifier Manager scans each driver and displays a message with a specific location of the buggy driver if found.
- Once the process is completed, click OK and reboot your PC.
- Lastly, follow the described solutions to resolve this trouble.
4] Disable driver verifier
When the driver verifier solves the ntkrnlmp.exe BSOD issue you must disable this app by following the below methods-
- First of all, launch Command Prompt as an Administrator.
- Click Yes on the UAC prompt to authorize the access.
- On the prompt area, type verifier and hit Enter to execute the code.
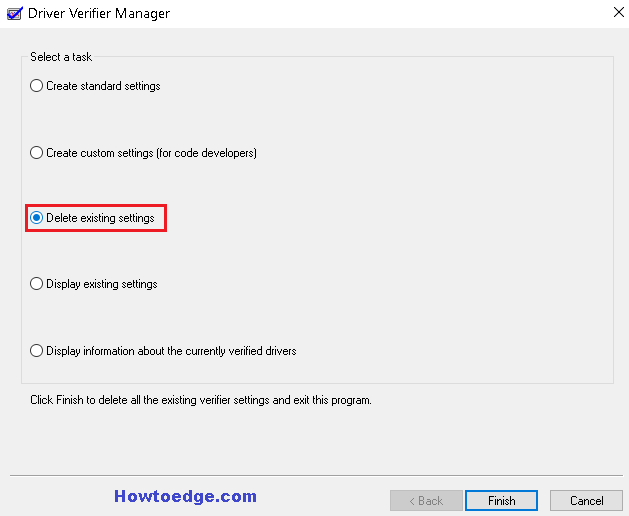
- When the Driver Verifier Manager appears up, select the Delete existing settings checkbox and hit Finish.
- Lastly, click Yes and Restart your PC again.
5] Enable System Restore Point
If you have tried all the above-described methods but no one proves suitable to solve this Ntkrnlmp.exe BSOD issue, roll back your past settings created before occurring this problem. To use this, you should have previously created a System Restore point.
- Go to Cortana and type system restore then hit on the Create a Restore Point option to launch the window.
- Tap the System Protection tab thereafter System Restore on the same dialog box.
- On the further screen click Next and let the window go ahead.
- Here, select the restore point which is created before the Ntkrnlmp.exe BSOD issue, and tap the Next button.

- Now your PC will automatically roll back the previous settings and avoid the recently installed apps and drivers.
- Once the process is finished, reboot the PC. This tool surely helps you to avoid the Ntkrnlmp.exe BSOD issue and your system starts working normally.
That’s would be all, If you still have doubts or suggestions about this error, write to us in the comment box.
Where is ntkrnlmp.exe located?
ntkrnlmp.exe is a legitimate file which is also called Windows NT Kerenal Memory Management. This is an executable file and you may locate this file by reaching out to the following path – C:\Windows\System32.
There are times when some virus copies this name and resides inside your computer. Users often read it as a legitimate file and thus don’t remove it from their systems. The perfect way to differentiate between a system file and a virus is by reaching out to its path location. If its path location is anywhere different than C:\Windows\System32, you are having a malware attack on your Windows PC. Consider performing a full scan of your computer, and have this file removed.