Several users reported receiving a black screen when they were trying to start BlueStacks on their Windows PCs. Since you are here, you must have faced this problem as well. In this post, we will look into the reasons causing such an issue on BlueStacks and the six workarounds that might help you to overcome this problem in Windows.
What may cause a Black Screen issue on BlueStacks?
The black screen on BlueStacks could be the direct result of the following issues on your computer –
- Presence of Malware – If you are using some third-party antivirus program, we suggest uninstalling or at least disabling the same.
- Not Meeting Minimum System Requirements: To run an Android emulator on a Windows PC, your device must meet the minimum required parameters. Go and check if your device meets all the conditions required for an easy installation of BlueStacks on Windows.
BlueStacks Black Screen Issue, Fixed
Now that you know what may result in a Black Screen issue on BlueStacks, let’s have a look at the possible workarounds for this. Make sure to apply these solutions in the same order as they were put in.
1] Restart, Update, or Reinstall BlueStacks
Since you are encountering the Black screen issue while launching BlueStacks only, you should first try out the following fixes –
- Restart BlueStacks – When you restart a system, it stops all system processes and thus there’s a possibility that you fix the black screen by simply rebooting BlueStacks. Just close the cross button on its right-top corner, wait for a few minutes, and then start BlueStacks again.
- Update BlueStacks – Remaining on an older version of BlueStacks might also result in different bugs or issues. So, you must update BlueStacks by reaching out to the following page –
Emulator Settings > About > Check for updates
- Restore BlueStacks from backup: If the Black screen error is still occurring, you better use a restore point available inside BlueStacks. In case no such backup is available inside, you should reinstall BlueStacks by downloading its setup file.
If the Blue Screen error is still occurring on BlueStacks, you better try out the next set of solutions provided below.
Fix Bluestacks Engine could not start in Windows 11
2] Update Graphics driver via Windows Update
It is essential to keep all your device drivers up to date so that they can work optimally towards playing games or performing high-end tasks in Windows. Moreover, this also ensures the device drivers remain compatible with the latest release of Windows.
BlueStacks Black Screen issue is a direct result of having corrupt or outdated graphics drivers on your computer. If you are getting a black screen while opening BlueStacks, here’s a solution to it –
- Press Windows + I to launch Settings.
- Go to Windows Update, and hit Check for updates.
- The system will connect to Microsoft servers online and check if any update to the graphics driver is available for your device.
- If there are indeed some pending updates for graphics cards or firmware, you will see an optional updates link.
- Click on this link, tick all the checkboxes, and then hit Download and Install.

Wait for the installation to complete and when this is over, you will receive a prompt suggesting to restart your PC. Do so and check if the black screen issue resolves while starting BlueStacks in Windows. In case you didn’t get any optional updates under Windows Update, you should follow the next solution.
How to Fix BlueStacks Incompatible Windows Settings
3] Manually download and update the Graphics driver
Well, in that case, you may manually download and update the graphics driver on your computer. However, for this to happen, you must know the right manufacturer of your graphics driver. Here’s how to get this info –
- Press Windows + X, and select Device Manager.
- On the next screen, click to expand the Display Adapters.
- Right-click on the graphics driver present inside it and select Properties.

- The system will default take you to the General tab on the upcoming Properties window.
- Note what’s written next to Manufacturer.
Open your default browser next and check if you can find the graphics driver updates by visiting your manufacturer’s official site. For example, to update Intel(R) UHD Graphics, you should visit Support for Intel(R) Graphics. NVIDIA users may NVIDIA official site download the latest version of their graphics card.

Identify and choose your product from the respective site and download the latest version of your graphics driver. The downloaded setup file is basically an executable file, so all you require is to double-click on it. The graphics driver will soon upgrade to its latest downloaded version.
Note: While selecting a graphics driver for your laptop, make sure to go for the right model, PC manufacturer, and all. This is important as every other laptop has some different graphics card pre-installed on it.
Make sure to restart your computer so that the recent changes come into effect.
4] Change Graphics settings in BlueStacks
When you fresh install BlueStacks on your computer, the emulator adopts its default settings. The pre-defined settings are, in general, for high-end computers, and they might not work as desired in low-end devices. So, you must configure the BlueStacks settings correctly if you don’t want to get into any trouble while playing any games over the emulator.
Out of all changes, you must incorporate the following changes to the graphics settings in BlueStacks –
- First of all, launch BlueStacks and click the Gear icon on the right bar.

- This will you to the Settings page inside BlueStacks.
- Go to the Graphics tab on the left pane and head over to the right side.
- Under Graphics Engine Mode, you will find two settings – Compatibility and Performance.
- Change this mode to Performance. If this has already been selected to Performance, choose Compatibility instead.
- Under Graphics Renderer, select OpenGL if it has been selected to DirectX.
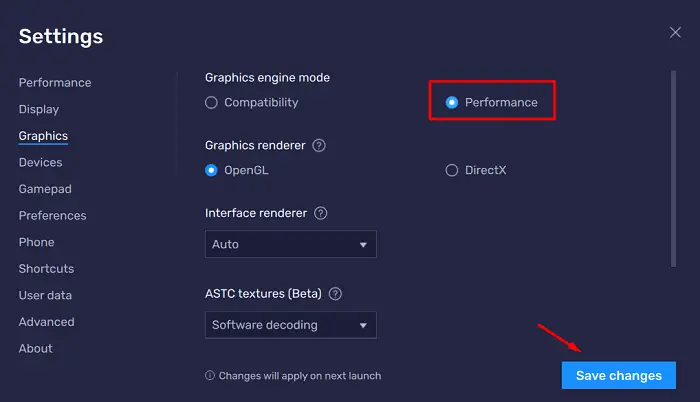
- Use the drop-down next to Interface renderer and select Auto. Using the ASTC drop-down menu, select Software decoding next.
- After you make the above changes on the BlueStacks, click Save Changes.
Restart the BlueStacks emulator and check if this resolves the Black Screen issue.
5] Uninstall and reinstall the Android app or game
If nothing seems to be working to resolve the Black Screen issue on BlueStacks, you should reinstall the Android games or apps on this emulator. To remove any application or game from BlueStacks, open the Google Play Store, reach out to the faulty app/game, and choose the Uninstall button.
Do restart your BlueStacks after successfully removing a game or application on it. Launch BlueStacks, open the Google Play Store, search for the uninstalled application, and reinstall it back on the emulator.
6] Create a new instance in BlueStacks
BlueStacks supports creating multiple instances on it. Considering the default instance is not working on your Windows, you should create a second one and check if the same works fine for you. Here’s how to perform this task –
- On your Windows, double-click on the BlueStacks icon to launch the emulator.
- Go to the right sidebar, and click on the Multi-Instance button. Alternatively, you may also use the following shortcut –
Ctrl + Shift + 8.
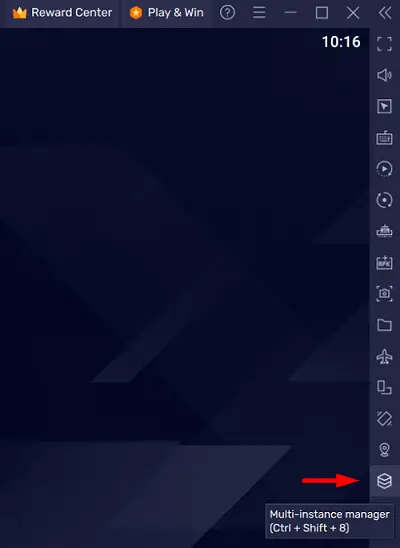
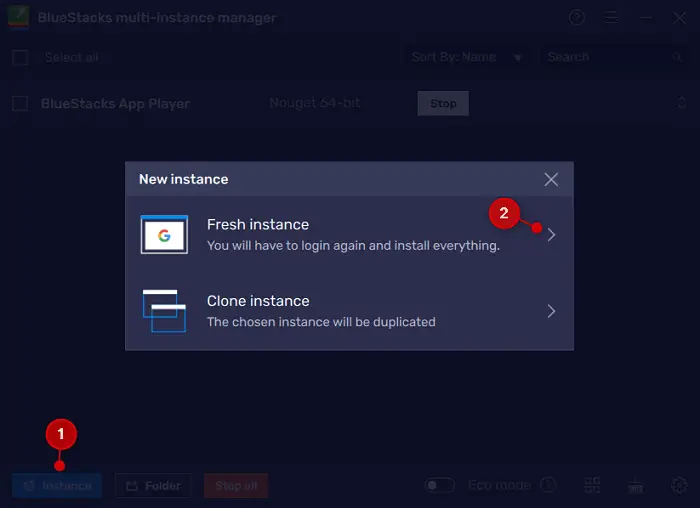
- On the next screen, click the Instance button and then hit Fresh Instance. You may go for Clone Instance as well, however, we don’t suggest opting for that.
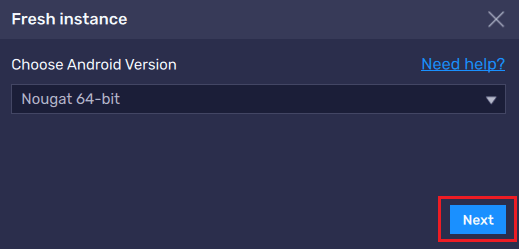
- Using the drop-down menu, select an Android version, and hit Next.
- On its properties page, you need to select some values for the following – CPU cores, Memory allocation, DPI, API settings, Resolution, and Performance mode.
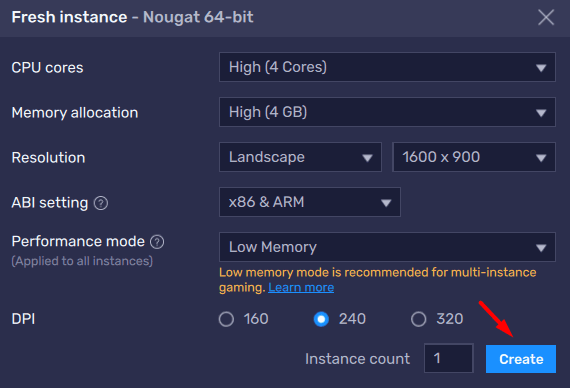
- Make sure to use optimal values so that BlueStacks runs without any glitches on your Windows PC.
The instance creation will soon be complete on your BlueStacks emulator. If you wish you may even rename the new instance or delete the old instance on your emulator.

Though it is up to you whether you want to delete the previous instance or not, we suggest deleting the previous ones. By doing so, you ensure no extra resources are being utilized by BlueStacks and thus it runs smoothly.
I hope the Black Screen error resolves now when starting BlueStacks in Windows. If that’s not the case, you must seek additional support from the BlueStacks support team, or switch over to a different emulator.
Can I use BlueStacks without Hyper-V?
Yes, it is possible to run BlueStacks without enabling Hyper-V on Windows Operating systems. Hyper-V is basically a hardware virtualization technology that supports creating virtual machines in Windows. However, as BlueStacks uses a different type of virtualization technology, you don’t require enabling Hyper-V to use this emulator on Windows.
Another important thing to note is that the Hyper-V and BlueStacks are not compatible with each other. So, if you are planning to install the BlueStacks emulator on your PC, you better turn this Hyper-V technology off.
How do I disable Hyper-V in Windows?
To disable Hyper-V on Windows 11/10, use the below steps –
- Press Windows + S to launch the Search window.
- Type “Turn Windows Features” without quotes on it and click on the top result.
- The Windows Features will pop up next on the display screen.
- Scroll down to Hyper-V, uncheck the box available left of it, and hit the OK button.
- Restart your PC next so that the recent changes become effective from the next login.
Now that you have disabled Hyper-V, you may go ahead and install the BlueStacks software on your computer.
Top Three Alternatives to BlueStacks
If you are looking for alternatives to BlueStacks, you should try out either of the following four options –
NoxPlayer: This is the perfect emulator if you are looking to make a switch from the BlueStacks. Not only does this provide all the features, but it also optimizes Gameplay to another level.
MEmu Play: MEmy Play is another great Android emulator that supports numerous games and applications. The best thing about this tool is that it supports both Intel as well as AMD CPUs. Moreover, this also provides a dozen customization options to its users.
LDPlayer: In case you are looking for a BlueStacks alternative that heavily optimizes playing games, you may try out this LDPlayer. The best thing about this tool is that it consumes very little RAM and occupies a minimal amount of system resources on your computer.


