Windows Defender is a free program that helps protect your computer against pop-ups, slow performance, and security threats caused by spyware and other unwanted software. Microsoft releases updates for Windows Defender periodically. These updates can be downloaded and installed automatically, or you can download them manually from the Microsoft website. This article will explain how to update the Windows Defender antivirus in Windows 11/10.
Update Windows Defender antivirus
Microsoft always tries to bring an update for each one of its services on a regular basis. Windows Defender, being a part of Microsoft, also receives updates from time to time. However, this solely depends on you on whether you want to keep this updated or block its updates. If you ask us, we suggest always keeping your programs up to date as this can only prevent you from numerous attacks online.
In this post, we will focus on Performing Automatic Updates, upgrading Windows Defender via Command prompt, and manually updating this security app. The update process could fail to owe to some errors like registry malfunction, NIS issue, or the presence of third-party Antivirus, etc. We will see the solution to each section in this post. In the end, we will cover the last resort i.e. Enable the Windows Defender using Group Policy is disabled. Therefore, read this article in detail and sort any complexity that exists on your Windows Defender Antivirus.

Is Windows Defender Update important?
There was one time when Windows defender was considered just a plain and simple application. These days, windows Defender is considered one of the best anti-malware software out there that aims to protect your system from all sorts of issues. This includes Real-Time Protection, Device Performance, and health, Parental Controls along with App and Browser control, and Device Security.
Keeping in mind the various functions performed by this software, updating Windows Defender is really a nice idea. This will give you an upper hand in comparison to all those free antivirus programs. In short, Windows Defender Update is, in reality, a much-required task.
- Perform Automatic Update
- Update Windows Defender using Command Prompt
- Network Inspection System updates
- Download and install the update
- Remove third-party antivirus software
- Perform full Scan
- Restart Security Center Service
- Enabling Windows Defender from Group Policy
- Delete conflicting Registry Entry
Here is how to update Windows Defender Antivirus
Here is the process to update Windows Defender Antivirus in Windows 10.
1] Perform Automatic Update
An automatic update is a quick and easy way to update Windows Security. This process by default downloads the latest version and applies it to the Windows Defender Security app. To do this follow the below process:
- Hit the Up Arrow on Taskbar and select the Windows Security icon here.
- Make a click on the Virus & threat protection category.
- On the same page, hit Check for Updates.
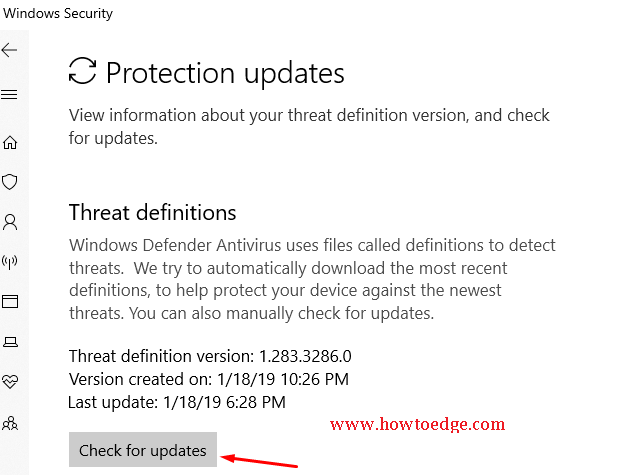
This process will look for the pending available updates. Now install the same on your PC.
2] Update Windows Defender using Command Prompt
Sometimes the Enterprise Administrator can also send push updates to endpoints on their network. You can use a batch script to run the following commands so that the definition cache is cleared. Keep in mind to use the prompt with administrative privileges.
- Press Win logo and R hotkey to launch the Run dialog box.
- Type cmd and simultaneously press Ctrl + Shift + Enter shortcut to launch Command Prompt as administrator.
- If the UAC prompt appears up, click Yes to authorize the access.
- Copy/ paste the below code one by one and hit Enter at the end of each command.
cd %ProgramFiles%\Windows Defender
MpCmdRun.exe -removedefinitions -dynamicsignatures
MpCmdRun.exe -SignatureUpdate

- When the process is completed, the Windows Defender will get updated automatically.
3] Network Inspection System updates
The NIS (Network Inspection System) is there to protect your system from any hazard from the network. The prime role of this is to inspect the attack from the client and then control System Center Endpoint Protection, Forefront Endpoint Protection, and Microsoft Security Essentials.
To update Network Real-time Inspection, firstly ensure the version of running antivirus Client component.
Thereafter download the same i.e. either 32-bit or 64-bit as per your system architecture.
4] Download and install the update
To manually update Windows Defender on your system, you need to follow the below-described methods-
- Go to the system tray and click on the File Explorer icon.
- Click on the This PC option then choose Properties from the context menu.
- Again on the same page, get the detailed configuration of your system either 32-bit (x86-based) or 64-bit (x64-based).

- Now click on the below link depending upon your System architecture to download the Windows Defender Antivirus file. 32-bit | 64-bit | ARM.
- Save the file at a specific location on your PC.
- Henceforth touch the file which appears as win10-mpam-fe-x86.exe on 64-bit Windows.
- For 32-bit Windows, you can see the win10-mpam-fe-x64.exe file. Select as per your system configuration to update the Windows Defender Antivirus manually.
- Once the above process is finished, the Security software of your system starts working fine.
5] Remove third-party antivirus software
If you have third-party antivirus software installed on your system, they might also be the culprit behind Windows Defender not updating issue. Therefore, the best thing is to uninstall the anti-spyware programs from your system. Here are the steps to follow:
- Jointly press the Windows key and I shortcut to open Settings.
- Hit the Apps category and switch to the right pane of Apps & features.

- Scroll the cursor and select the Anti-malware program from the list.
- When found, click on the same and hit the Uninstall button.
- Here tap again on the Uninstall button to confirm the changes.
- Wait till the process gets finished thereafter retry to update the Windows Defender again.
6] Perform Full Scan
When there is a fault in the system files, they could hamper the smooth performance of your PC. As a result, you can’t update your Windows Defender. You can use the system file checker command here i.e. SFC /scannow. This will scan the faulty file and then try to repair the same.
- Open Command Prompt with admin right.
- Copy and paste “sfc /scannow” in the command prompt windows then hit Enter.
- This is a time taking process so wait patiently. Once the task is completed, Reboot your system and try the above methods to update Windows Security again.
Have a look at Windows 10 Cumulative Update KB4480967
7] Restart Security Center Service
If even after trying the “sfc/ scannow” command doesn’t bring the desired result, you can try resetting Security Center Service. Follow the below-written steps to proceed ahead-
- Press the Win+ R shortcut to open Run.
- In the blank box, type services.msc and hit OK.
- Scroll down the cursor and locate Security Center.
- There forth Right-click on the same and hit Restart.

8] Delete conflicting Registry Entry
Conflict in the registry editor can also bring abrupt changes and thus result in Windows Defender Update Error. Follow these steps to reset settings on the Registry Editor.
Step-1: Press the Windows key + R hotkey to open the Run dialogue box. Alternatively, you can go to Start and search for ‘Run’.
Step-2: Now type ‘regedit‘ and hit Enter. This will open the Registry Editor. Here navigate to the following path-
HKEY_LOCAL_MACHINE\Software\Microsoft\Windows NT\CurrentVersion\Image File Execution Options
Step-3: Here search for MSASCui.exe, MpCmdRun.exe, or MsMpEng.exe.
Step-4: If found then make a right click then hit Delete. In case you don’t get any of the files mentioned above, close this editor.
9] Enable Windows Defender from Group Policy
If none of the solutions worked on your system then try this method as the last solution.
In certain situations, you can receive the message “This app is turned off by Group Policy”. If that’s the case, Windows Defender requires activation using the registry editor. You will face this situation only when there is another antivirus enabled on your system. Therefore, it is a must to remove any conflicting application before force enables the Windows Defender manually. To enable Windows Defender using Registry Editor, follow these steps:
- Go to the Start button and type run. Double click on the best-matched option to let open the Run.
- Type
regeditin the void then hit enter to open the Registry Editor. - Once Registry Editor opens up, navigate to the following key-
HKEY_LOCAL_MACHINE\SOFTWARE\Policies\Microsoft\Windows Defender
- Here on the right pane, if you see a registry DisableAntiSpyware then set its value to 0.
- If the above key is not there, you have to create the same and then perform the later function.
- Make a right-click on the Windows Defender Key and select the New DWORD option here. Rename this file to DisableAntiSpyware. After this, change its value to 0.
- At last, save this key and exit from the Registry Editor.
I hope this time, the Windows Defender Update issue has been resolved on your system. If you have any queries related to this article, do ask us in the comment box.
That would be All!