In this article, we will discuss how to enable and disable mouse ClickLock in Windows 10. However, first, we need to understand what the term ClickLock is and the ways to use it effectively. Microsoft has introduced this attribute initially on Windows 7 to lock down the mouse button after a single click. It empowers you the ability to highlight or drag any file without holding down the left click of Mouse.
With this feature, you can select and drag a file in an easy way. For example – Suppose, if you want to relocate a specific file, you don’t have to hold down the left mouse button to move the selected file. Just hold the text or file up to 3 sec thereafter release the left mouse button and drag the file anywhere. This feature can also fix certain issues related to Mouse drag. Let’s explore this in detail.
Ways to enable and disable Mouse ClickLock in Windows 10
Learn How to enable and disable mouse ClickLock in Windows 10 using the following steps –
1. Turn On or Off Mouse ClickLock in Mouse Properties
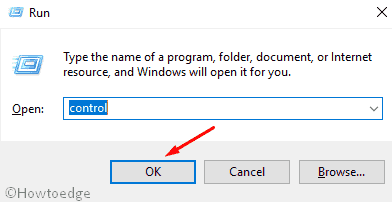
- At first, press Win+ R hokey altogether to launch Run.
- Type control in the void next hit OK to open the Control Panel items.
- Hover the cursor over Mouse and make a click on the same.

- A new window i.e. Mouse Properties will open up, tap the Buttons tab.
- Again, tick against Turn on ClickLock, to highlight or drag any item without keep pressing the mouse button. Besides, to turn off this feature, uncheck the same box.

Note– If you have turned on this feature, you should change the settings for it as well.
- Explore the Settings… button under the same section.

- Afterward, you can specify the time to keep press the mouse button prior to locking your click.
- Click on the OK button to save the setting.
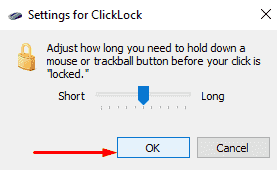
Note– Holding downtime for the mouse button is approx. 200 to 2200 milliseconds. In general, the default time is 1200 milliseconds.
2. Change Settings for ClickLock using Registry Editor
- Press Win + R hotkey to launch the Run dialog box. When it opens, type Regedit in the space succeeding after tap the OK button.

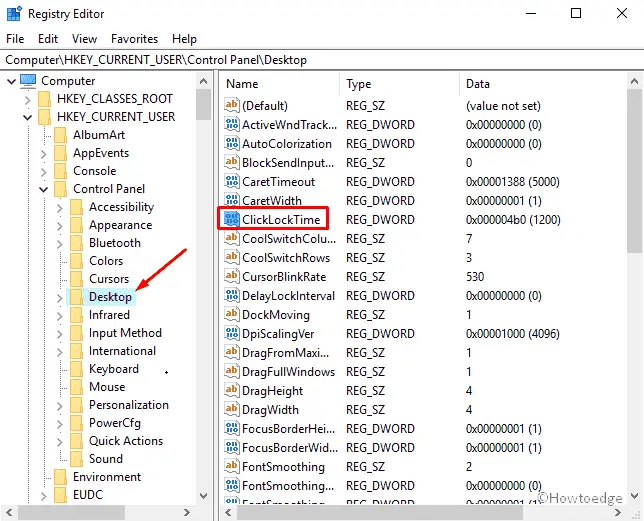
- This will open the Registry Editor window. Subsequently, locate the following path on the left panel of the current window-
HKEY_CURRENT_USER\Control Panel\Desktop
- Afterward, jump to the right side of the current screen and make double-click on the ClickLockTime to modify it.
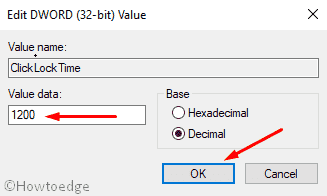
- Select the Base as Decimal and put the value range between 200-2200 milliseconds. This will determine how long there is the requirement to keep pressing the mouse button prior to locking your click.
- Tap the OK button to save the settings then close the Registry Editor.
Finally, reboot your system to save the current changes made to the Settings.
| Editor’s Note: This article was first published in the Year 2020. We have lately updated this article to keep the contents fresh and up to date. |