If you’ve been having audio issues in Windows 11, we have some helpful advice for you. While it may seem like Microsoft controls everything, it’s actually a combination of various factors that contribute to your computer’s sound. In this article, we’ll explore how to fix Realtek audio issues in Windows 11 and find a solution that works for you.
This problem can be caused by a number of reasons, but it most often happens when installing new devices or upgrading your audio drivers.

Related: Fix: Realtek High Definition Audio Error 0xC0000374 on Windows 10
What Causes Realtek Audio Issues on Windows 11?
Realtek Audio Issues may be caused by many different factors on Windows 11. The most common reasons are listed below to help you find the right one.
- The audio output is through the wrong channel.
- Windows has outdated or corrupt drivers.
- The Audio Output Device itself is malfunctioning.
- Incorrect audio settings.
- The audio service is not running or was corrupted.
How to Fix Realtek Audio Issues in Windows 11
If you recently upgraded to Windows 11, you might have noticed that your sound quality has decreased and you might experience static, popping, or distorted noise. This is a known issue with Windows and there are a few ways to fix it –
- Check your network connectivity
- Restart the Audio service
- Turn off audio enhancements
- Reinstall the Audio Device
- Choose another Audio format
- Run the Audio Troubleshooter
- Check the Audio Output
- Update the Audio driver
1] Check your network connectivity
Many people waste hours on their computer system even though the problem may actually lie with the device itself or the connection. Additionally, check to see if power is getting to the output device. If the problem persists, try reconnecting it to the system. If there is a mute button on your device, make sure it’s turned off. You should also be sure that the volume is not set to the minimum on the audio output device.
Connect the audio device to a different system if the problem persists. If the device now works properly, we can rule out damage to the cables or issues with the device
2] Restart the Audio service
As far as an audio output on Windows is concerned, there are three services. You may encounter problems if any one of them isn’t running or if it’s encountered a bug. The three services are Windows Audio Endpoint Builder, Remote Procedure Call, and Windows Audio. Let’s check first whether they are running. Start them if they’re not.
- In the Start Menu, type in Services and press Enter to launch the app.
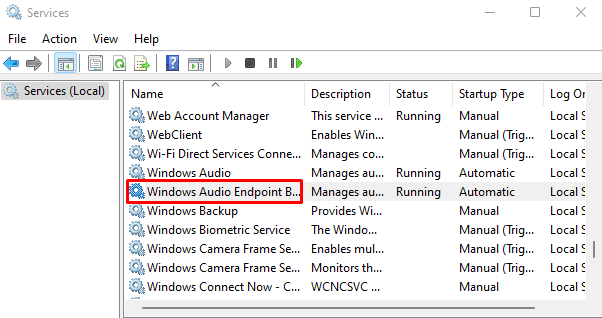
- Scroll down and double-click on the Windows Audio Endpoint Builder service.
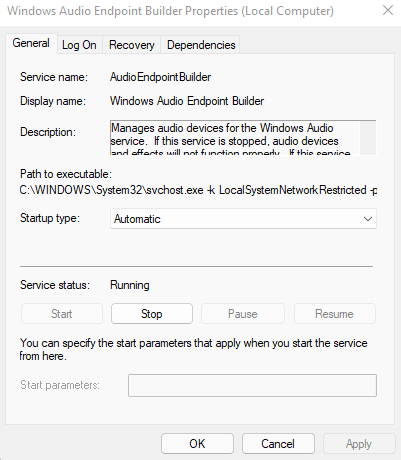
- On the General tab, check if the Service status is running.
- If the service status is not running, click on the Start button.
- In case the service is running, then first stop it and then start it again.
- Similarly, repeat the process for the other two services and check if it resolves Realtek Audio.
3] Turn off audio enhancements
It has been reported that audio enhancement is responsible for Realtek’s audio problems. It might be a good idea to disable the enhancements if you have enabled them earlier. What you need to do is as follows –
- Click on Start, type Control Panel, and press the Enter key.
- Search for the Sound option and open it.
- On the resulting window, switch to the Playback tab.
- Next, select the speaker that isn’t working and click Properties at the bottom.
- Go to the Enhancements tab, and mark the checkbox next to Disable all enhancements.
- Click on OK at the bottom to save the changes.
- Then close the window and check if the error with audio output is solved.
4] Reinstall the Audio Device
If you’re still experiencing the issue, the driver might be corrupted or there is a bug with it. Reinstalling the driver in such a case will resolve the issue.
- Open the Run dialog using the Windows+R keys.
- Search for the Realtek Audio device on the next screen.
- Now right-click on the driver and choose Uninstall device from the menu.
- If a confirmation box pops up, click Uninstall.
- Now reboot the computer and once the system starts, Windows will automatically install a fresh version of the driver, one that’s not corrupted.
- You now need to restart your computer and once Windows starts, a fresh driver will be installed.
In case this doesn’t resolve the issue, you can proceed to the next fix.
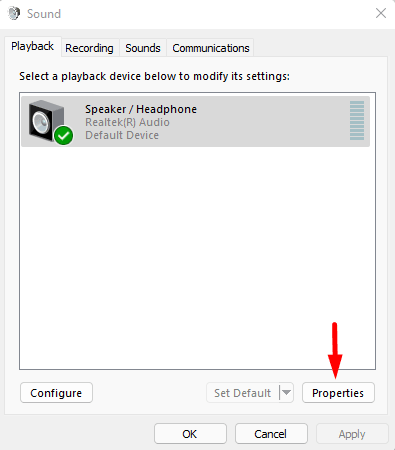
5] Choose another audio format
Audio output issues are often caused by the audio format not being compatible with the hardware. If this is the case, you may choose another format that works for you. Here is the procedure to do so –
- Search for the Control Panel.
- Select the Sound option.
- Click on the Playback tab.
- Next, select the speaker that isn’t working.
- Then right-click on the speaker and select the Properties option.
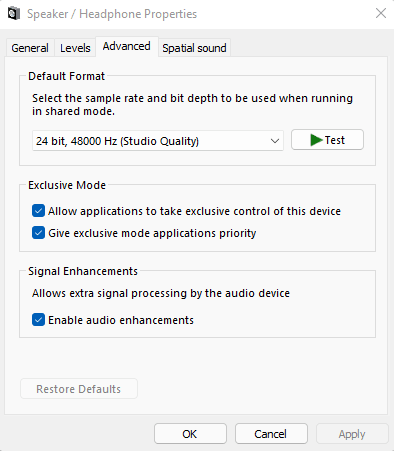
- In the Speakers Properties window, switch to the Advanced tab.
- Under the Default Format section, select the sample rate and bit depth using the drop-down menu.
- Then click on the Test button.
- Test each one until you find the one that works for you.
- Save your changes by clicking OK at the bottom of the screen.
If changing the audio format did not fix the problem, move on to the next fix.
6] Run the Audio Troubleshooter
There are several built-in troubleshooters available in Windows that help in identifying and solving most of the problems easily. The Playing Audio troubleshooter is such a utility that you can use to fix the audio issues in Windows 11 computer system. Here’s how to do it
- Press the Windows+I keys to open the Settings app on your device.
- On the System tab, scroll to the right and click the Troubleshoot option.

- Next click Other troubleshooters then search for the Playing Audio troubleshooter.
- Once you find it, click on the Run button next to it.
- In the next step, the troubleshooter will search for and list all of your audio output devices.
- Choose the one you are experiencing difficulty with and then click on the Next button.
- The software will now diagnose and correct any device or configuration issues.
As you proceed through the troubleshooting process, follow the onscreen instructions and select the appropriate response
7] Check the Audio Output
Users may also encounter problems when selecting an incorrect audio output device. This can be verified through the Action Center.
- Press the Windows+A keys to open the Action center.
- Next to the volume level, click the small arrow icon.
- The system will now display a list of the audio devices connected to it, choose the playback
device for the audio. - The issue should now be resolved. In that case, you should make that device the default.
- To do this, open the Start menu, search for Change system sound and then select the relevant search result.
- From the Sound window, go to the Playback tab, then select the output device you wish to use.
- At the bottom, click on Set Default.
- To save your changes, click OK at the bottom
8] Update the Audio driver
Your computer may also have problems playing audio if the Realtek driver is outdated. In such a case, we recommend you try installing the update manually and see if it works anymore.
- Right-click on the Start button and select the Device Manager from the option list.
- Next, search for the Sound, video and game controllers option and then double-click on it.
- Right-click on the Realtek(R) Audio driver and select Update driver from the menu list.
- Windows will now give you two options, either the one that will automatically find the best drivers for your system or the other to install updates manually. The 1st option would be too risky, so we recommend leaving it to Windows.
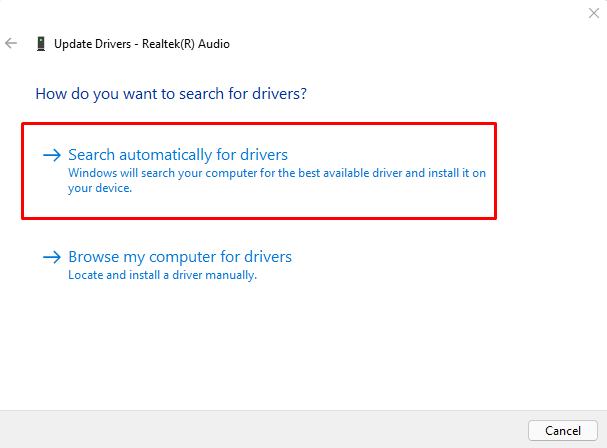
- Therefore, select Search automatically for drivers and follow the on-screen instructions to complete the installation process.
After installing the update, restart the computer and see if the Realtek Audio problem has been resolved.
Read Next: Fix- Realtek High Definition Audio Issue on Windows 10