Windows Update Error 0x80070643 is a common nagging message which appears up when you try to install the cumulative update. This trouble will display “Update successfully installed” on the Update history however failed to perform the same.
There might be various reasons behind this trouble. The Update Database got corrupted, the .NET framework needs to repair, the system file is missing, etc. are the possible culprits for the Windows Update Error 0x80070643.
The first thing here is to check the architecture of the system and install the latest version of the .NET Framework file. Again Run SFC command, Install Updates Manually and Update Windows Defender Antivirus Manually are some other possible workarounds to solve this issue. In this article, we will guide you on how to fix this problem.
Mostly the Error 0x80070643 gets generated under two circumstances, and they are –
Fix: Update Error 0x80070643 on Windows 10
If Windows fail to update and generates Error 0x80070643 on the System, you can try these workarounds.
Fix Error 0x80070643 while Update
You might experience Error 0x80070643 while updating your computer or after installing the update. Follow these guidelines to perform this.
1. Run SFC/ SCANNOW command
Basically, the corrupt system files of OS may cause this Error 0x80070643 on Windows 10 PC. The SFC command works to scan the fault in files and repair it if possible. Here is how to do:
- Press Windows key and R shortcut key to launch the Run dialog box.
- Type cmd and sequentially press Ctrl+ Shift+ Enter key to open the command prompt as administrator.
- Again write sfc /scannow in the prompt then hit Enter.
- This is a time taking process, So wait until the process gets completed.
- Once the process is finished, try to install the Windows updates. Hope this tool works for you without any issue.
2. Reset Update Components
If the above method is not able to rectify the Error 0x80070643 on your system, attempt these codes on the same prompt.
- Firstly, open the Command Prompt as administrator.
- Type the below codes one by one and press Enter after the end of each command.
net stop wuauserv
net stop cryptSvc
net stop bits
net stop msiserver
Ren C:\Windows\SoftwareDistribution SoftwareDistribution.old
Ren C:\Windows\System32\catroot2 Catroot2.old
net start wuauserv
net start cryptSvc
net start bits
net start msiserver
- Type exit and press Enter key to close the Prompt.
- At last end the current session of command prompt and try to reinstall the Windows update again.
3. Install Updates Manually
If you can’t get the updates automatically, try to install the same using manual methods. All you have to do is to follow the below steps-
- Go to File Explorer on the Taskbar and click on This PC.
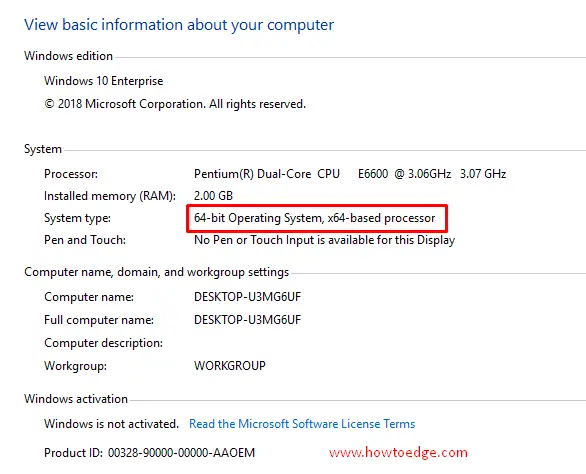
- Here right-click anywhere and select Properties from the context menu.
- Thereafter check the detail about the system nature i.e. whether the installed OS is 32-bit (x86-based) or 64-bit (x64-based).

- Again look for the available Update in the Setting Window.
- Then copy the cumulative update, started with KB.
- Visit the Microsoft Update Catalog and locate the same available there.
- Make sure to select an update suitable for your System (x86 or x64).

- Once confirm, click on the Download button and wait until the file gets downloaded.
- Lastly, install the update. The file should get successfully installed without pause.
4. Update Windows Defender Antivirus Manually
In general, the Windows Update error 0x80070643 occurs due to Windows Defender not activated. Here the best resolution is to update the Windows Security program. You can follow the steps described below to update Windows Defender manually:
- At first, check your system architecture for 32 or 64-bit configuration.
- Now download the Windows Defender updated file for 32 bit, 64 bit, or ARM as per your system processor.
- You can go to the Microsoft Website to download the file directly if using any other version.
- Once you have downloaded the file, install the same to activate the Windows Defender.
- At last, reboot your PC and try to reinstall the Windows Update again. Check if the issue is gone or not. If not, follow the below solution:
5. Install the latest .NET Framework
The .Net Framework is a vital tool to perform the Windows Update. In case the .NET file gets corrupted or is missing somehow, it can lead to the Error 0x80070643. If that’s the case, you have to download and install the recent version of .NET Framework on your system. If you don’t know how to proceed, here are the steps:
- First of all, visit the official site to download Microsoft’s .NET Framework.
- Select the recent .NET Framework file here then download it.
- Double click on the downloaded file. Again to complete the setup, follow the on-screen instructions.
- This will definitely solve the Error 0x80070643 on the system.
Fix Error 0x80070643 during the program installation
The same Error 0x80070643 can also occur while installing a program on the system. You can try out the following methods to fix this issue on your computer.
1. Restart your computer
In general, when you fresh install an application on the system, a prompt appears up asking for the reboot of the PC. If you ignore this request, the system will generate some log files. This, in turn, will start creating trouble later on.
Most of the errors get fixed simply by restarting the PC. Therefore, try this method out and see whether Error 0x80070643 has been resolved or not.
2. Restart the Windows Installer service
The wrong configurations under the Windows Installer service can cause the installation error 0x80070643. So restarting this service might also be a possible workaround to solve this issue. Here is the process:
- Press the Win logo and R hotkey together to launch the Run dialog box.
- Here in the blank box type “services.msc” then hit Enter key.
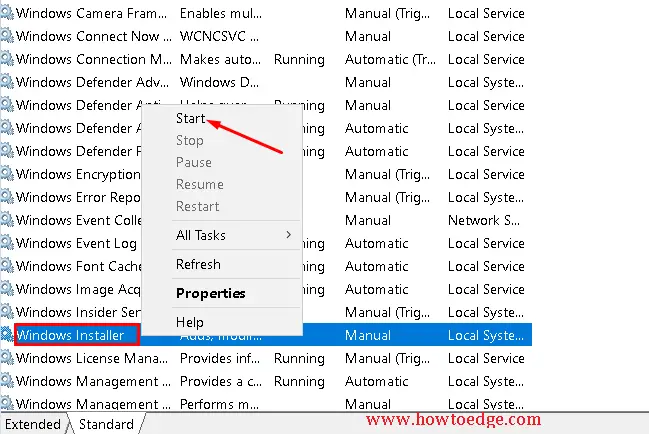
- Again in the Services Window, locate and select Windows Installer and right-click on the same.

- Select Start/ Restart to activate.
- If this workaround works, you won’t get the installation error 0x80070643 on your system anymore.
3. Repair and install .NET Framework
When none of the fixes help you to solve the Windows update 0x80070643 issue, the .NET Framework file might have gone corrupted.
- In case the file is corrupted, use the .NET Framework Repair Toolto fix this.
- If the error persists even after trying the above tool, install the latest .NET Framework on your system. The installation is explained in the above section.
I hope the installation error 0x80070643 is no longer available on your system. That would be All!!


